I first encountered Martin Martinsson’s work last year when perusing Flickr for pinhole work. It was his Movements 7 image that I found, and it was a perfect example of aesthetic in the everyday. When I dove deeper into his photos, I found a photographer who really understood spacial relationships – he clearly has the eye of an architect.
There’s a distinctively geometric pattern to his photos. In some of the photos, this geometry reaches out and grips you till you come to terms with the more subtle aspects of the photo. In other works, the geometry doesn’t hit you immediately, not till you let the image blur a little.
Martin’s work is often dripping with color and a moody tonality. He’s a photographer who’s bold style stands out immediately. He is also very skilled in an elusive practice: finding excellent imagery in the everyday hustle. Most of us can’t afford to pinhole full time, and so we have to fit it in around the rest of our lives.
Martin has been gracious enough to entertain our prodding questions below. I recommend you keep an eye on his work on Flickr, as he’ll soon be releasing additional photos.
Let’s start with your journey in photography. Did you start with pinhole? Or is it something you discovered later?
The pinhole camera was something I discovered a few years ago, so no, I did not start with pinhole photography at all! In fact I have been interested in photography for as long as I can remember. I remember that my parents were interested in photography and they both had some nice cameras laying around. Photography was always something present when I was a child and also discussed around the dinner table. I don’t really remember a particular starting point but when I was a teenager I thought photography was really a fun thing to do and I always tried to make an extra effort when I started taking photos myself. For a period of time, especially in my late teens and early twenties, I took a lot of photos and I have box after box with old photos laying around the house.
My manual 35mm camera broke down about the same time as digital cameras really started to hit the market. I bought one of those small digital devices, but strangely digital photography killed my interest in taking photos. For me something was lost without the manual controls and I thought most modern cameras looked and felt horrible to handle…
About three years ago I decided to give photography another chance so I went to the store to buy me a new high end digital device with retro looks and manual controls. I haven’t got any type of formal training in photography so I really never knew anything about the technical or artistic aspects of photography. Except for framing, I always just pressed the shutter button and hoped for the best. I decided that this time I will take it more seriously – bought any kind of book about photography I could find – and started to play around with my new camera. Digital was really a fantastic way for me to learn more about the technique and to really try all those “what happens if I do this” or “how can I achieve this type of effect” – type of questions most beginners have.
After some time my wife got a pinhole camera as a birthday present from a friend. It is one of those paper cameras you have to assemble by yourself with the use of tape. I wasn’t even sure it was possible to find 35mm film any longer since I was under the impression film photography was a thing of the past. A visit to the local camera store proved me wrong. I bought a few rolls of film, stole the camera from my wife (I have absolutely no intention of giving it back) and started to shoot some film again. The photos looked fantastic! It was mind blowing!!
That started another journey, or maybe it was more like going back to square one. I was reminded of what attracted me to photography in the first place. I have barely touched my digital camera after that but I take more photos than ever!
Waiting
[singlepic id=281 w=600]Waiting, ©Martin Martinsson[/singlepic]
Your Flickr feed is filled with great photography, both lensed and lensless. How has one form of photography influenced the other?
Thank you! That’s very flattering to hear. As I mentioned before, I used digital photography as a way to learn more about photography and once I got to know the camera a little better and was able to take photos that sometimes even looked better than the physical world, I became a little bit bored (easily done playing around in Photoshop or Lightroom). I noticed that I was not very interested in capturing the world as it is. Even making the photos that look “nicer” than reality is something I don’t find very stimulating.
I currently own about ten different cameras. I am not exactly sure what the influences would be, but I know that regardless of what I take photos of, I am aiming towards a somewhat different or unique look. My interest in analogue photography as a whole has always been about finding a special look that is in a way of out of my control. Adding an unexpected and uncontrollable element to the photos. That might be different things like a special type of film with unique characteristics, grain, physical defects on the negative, expired film or using a pinhole camera. All these things are possible to fake with a computer but I find that it is much more fun when there is a certain element of surprise.
Movements 1 – By Bike
[singlepic id=274 w=450]Movements 1 – By Bike, ©Martin Martinsson[/singlepic]
What is it about pinhole photography that attracts you to the artform?
The first time I got a roll developed I had no idea what to expect or even what the photos would look like. I didn’t have a light meter or anything to help with the exposures and mostly used my body, the ground, walls and statues instead of a tripod. I had never even used such a camera before. The photos that came out where blurry, with vignetting, weird colourings and sometimes with partially overlapping exposures. The photos also had a very unique look to them with a sort of dreamy characteristics. I absolutely loved it and in the beginning it was all totally out of my control how the photos turned out. I was hooked at once and haven’t really been able to put away that camera ever since.
After a while I started to learn a bit more about pinhole photography with its unlimited depth of field (or maybe more accurate unlimited out-of-focus) , bought a proper light meter and scanner, and got to know a little bit more about which types of film I like to use. My pinhole camera is also really small and convenient. It fit in almost all pockets so there is really no excuse not to take it with me. Besides, film is cheap (in comparison to Polaroid photography which is another passion of mine) so there is really no excuse not to experiment and to take as many photos as possible just for the fun of it. Not all of them are good, but it doesn’t really matter.
Pinhole cameras have a really unique character to them which I don’t really know how to describe in words. It just has a really special and unique look. Almost instant art.
Movements 5 – Commuting Underground
[singlepic id=275 w=600]Movements 5 – Commuting Underground, ©Martin Martinsson[/singlepic]
Movements 8 – Waiting at Kastrup
[singlepic id=276 w=600]Movements 8 – Waiting at Kastrup, ©Martin Martinsson[/singlepic]
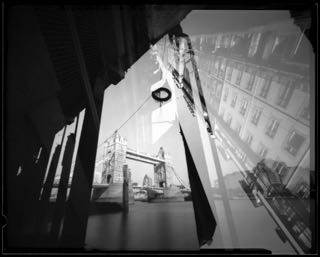
I first came across your work when we featured your photo, “Movements 7” back in April. I loved this photo because you found a way to make something mundane so beautiful. In your Movements series, you focus on modes of travel. What was the inspiration for this series?
The idea behind the “movements” photo series was a combination of pure pragmatism in combination with and a simple creative idea that I wanted to explore. I am father of two children and I have a job which demands lots of extra working hours so my time is obviously very limited. I would actually like to walk around just take photos all day, but since time is so scarce I need to take advantage of any spare time. Such a moment is actually while commuting between kindergarten, grocery stores, work and the apartment. Travelling or moving around is something that takes up a lot of my time so why not take advantage of it and actually do something useful like taking photos?
The second idea I had, had something to do with the special characteristics of the pinhole camera. The long exposures open up lots of creative opportunities – either by using a stationary camera with moving subjects or vice versa. Since commuting means lots of moving around and lots of moving subjects I wanted to do a series about it. It is an activity that takes up quite a part of my life. It is also a part of my life filled with lots of frustration and waiting. On the other hand it can also be a moment of quality time with the family (or yourself) and some sort of (to use your words) mundane beauty which I thought was interesting to capture.
Movements 9 – Arriving at Triangeln in Malmö
[singlepic id=277 w=600]Movements 9 – Arriving at Triangeln in Malmö, ©Martin Martinsson[/singlepic]
Do you feel you’ve been successful in presenting the vision you pursued in Movements? Why or why not?
Actually I was quite disappointed at first with the results. The photos were taken during quite a long timespan and I have probably used up at least four-five rolls of film. From that batch there were only about 5-6 photos which caught my attention. I thought that was quite a meagre result considering what I normally get from a roll of 35mm pinhole. Quite a disappointment, but I have afterwards realized it was partly caused by the colour temperature of the light in the underground. The yellow light didn’t work really well in combination with slide films like Provia and Velvia and there were also a lot of underexposed photos caused by the fact that I forgot to calculate for reciprocity failure. The only photos which turned out ok, were shot in either daylight, or in situations where the light was really blue. I wasn’t really aware of that when I started the project. At least a lesson learned. I have continued to take photos in the underground and on trains but still haven’t developed and scanned the results. This time I have bought a Tungsten colour balanced film which I hope will work better!
Blue Underpass
[singlepic id=272 w=600]Blue Underpass, ©Martin Martinsson[/singlepic]
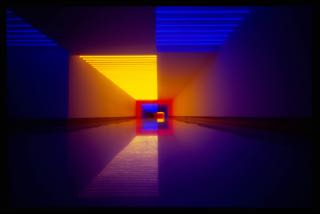
Your photo, “Coloured Underpass”, is stunning. It’s absolutely arresting. I’ve honestly had this photo open on my computer for 4 weeks now – I can’t stop looking at it. I need to know, how was this photo made? Is this a double exposure? Is it a glass hallway with lots of reflections? I must know!
I am so glad you like it! Maybe you will be disappointed now because there is really no trick! It is just a hallway between two office buildings at the Munich RE headquarters in Munich with coloured florescent lights. I was there at an open event last year when I noticed it. Each segment (leading to a different building) has its unique colour for making orientation easier. Each colour shift is an intersection between different underpasses and the floor consists of white pigmented concrete which has been polished so it reflects the light somewhat.
As I was taking photos of it, I realized that I needed to elevate the camera from the floor to get a better central perspective of the space. Luckily there was a wine bar in the building behind me so I went to pick up a drink with the tallest glass available to use it as a tripod – champagne!
Coloured Underpass
[singlepic id=273 w=600]Coloured Underpass, ©Martin Martinsson[/singlepic]
You have a fantastic sense of space and depth. To what do you attribute this ability to see? Are you trained in visual arts? Obsessed with shape? Something different?
That is very nice to hear. I don’t consider myself being a real photographer at all, just a guy who enjoys exploring things visually, and when I compare my work to some of the really good professionals out there I feel really humble regarding my own skills. On the other hand I have sold a few photos lately and there has been some attention in the internet which I would never have anticipated when I started so I must be doing something right?!
As I mentioned before I am not trained at all in photography and haven’t really had any artistic training except for my education as an architect. So shape, space and depth is something I work with all day but I really don’t know if there is a connection, at least not a conscious one. My day time job does have an influence on the type of subjects I find interesting like infrastructure or different type of “junk space” I can’t see an aesthetic influence. Photography is actually something I do as a way to escape thinking about work and my daily activities.
Orange Underpass
[singlepic id=278 w=600]Orange Underpass, ©Martin Martinsson[/singlepic]
Stairs
[singlepic id=280 w=600]Stairs, ©Martin Martinsson[/singlepic]
ƒ/D Associate Editor Libby Selinsky contributed to the content of this article.