Tag Archives: pinhole

Paul Barden: Rural Pinholes

Note: all images in this article are ©Paul Barden

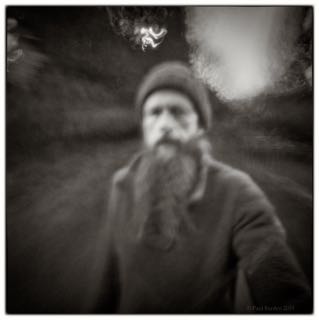
[singlepic id=68 w=250 float=right][/singlepic]I first came across Paul’s images while perusing the Flickr Pinhole Photography Group pool. As I scrolled through the page I came across this arresting self portrait, “Walking the Dead”, (right) of a bearded man that had this quality to it that just stopped me in my tracks. I think it’s because, for me, it represented a feeling you get when you’re walking a wilderness or rural area around dusk. Nothing is out of focus, but nothing is clear.

This image drew me to Paul’s work and, as I looked through his images, I found a certain familiarity with my own rural experience. Much of his attention is focused on the rural landscape near his farm – a place that his photos show he obviously knows extremely well. To photograph congested woodlands and mixed agrarian areas, you must have an eye for subtlety. These are not great sky scraping mountains that beckon adventurers from across the globe. No, these are the quiet places – the slow breath – that cannot be consumed in a weeklong vacation, but rather in seasons of wax and wane.

I caught up with Paul over email over the course of a couple weeks, and he was gracious enough to provide some great answers to my questions. Read on to learn about his path in photography, what drives his creativity, his self portraits, and more.

On your blog you mention that you’ve gone through different phases in photography, from film SLR’s to digital. What attracts you to pinhole photography today?
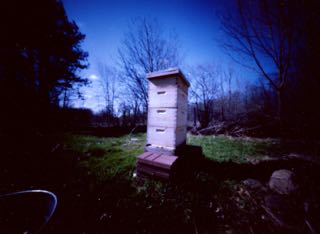
[singlepic id=63 w=250 float=left][/singlepic]My return to working with pinhole technology is just that; a return. In the 1980s I was working with home-made cameras quite a bit as an aspect of my study at the Ontario College of Art (now known as OCADU). However, at that time I didn’t have the luxury of time to devote more than a fraction of my study time to pinhole alone, so it was something I enjoyed a lot but couldn’t invest in heavily at that time.

In 2011 I found myself very dissatisfied with digital imaging technology because I found it was too sterile for my tastes; it lacked a sense of craft. Around 2000, I was enthusiastic to embrace the new sensor-based cameras and set aside my Nikon FM2 for good, and for over a decade my workflow was entirely electronic. But over the years my dissatisfaction grew as I increasingly felt the DSLR was too cold, too impersonal for my liking. There was none of the “alchemy” that traditional silver halide image making offered. I think it’s interesting to see digital photographers so enthusiastic about High Dynamic Range technology, when in fact, film has an incredible dynamic range that you can manipulate with ease. I’ve also come to find importance in the fact that film photography produces a physical object (the negative) whereas what digital image-making produces is ephemeral, and digital files face an uncertain future in a way that film negatives don’t. I’m not suggesting that my negatives are ever going to be of value to anyone but me, but I’m more comfortable with knowing that my negatives have a future that has a proven track record.

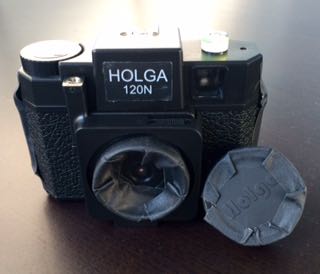
My response was to pick up the least advanced silver-based technology I knew, and that was the pinhole camera. Not only did it allow me a chance to revive my traditional skill set, but I felt compelled to experiment once more with hand made cameras of various designs – the wilder, the better!

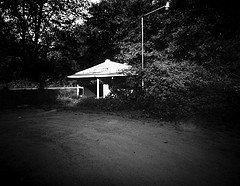
[singlepic id=60 w=250 float=right][/singlepic]What has pinhole photography helped you to see that you don’t think you would have otherwise?
Pinhole work by its very nature demands that the photographer abandoned certain precepts, which can be very liberating. I am free to make choices at multiple points on the path of crafting a photograph that a digital camera does not permit. (“Farmhouse”, right)

Looking at your pinhole landscapes, one gets the sense that this is a land that is very very familiar to you. Where are you shooting typically? What is your connection to this place?
People who advocate working with film often state that they like working with traditional film technology because it prompts them to “slow down” and exercise greater care in crafting an image. In a similar way, I reject the notion that to create interesting landscape-based work you have to travel far and wide to find worthwhile subject matter. Of course, there are millions of amazing places on this planet to render on film, but I have chosen to restrict myself to a limited palette; most of what I photograph is within walking distance of my home, and in fact, much of my work is done here on the farm, nested in the creases of the Mary’s River. In the same way that film technology places different, less casual demands on a photographer, I find value in exploring my immediate environment – it pushes me to look more closely and carefully at the richness of this home of mine. I have recently found myself saying to people “If you can’t find anything to photograph within forty feet of where you’re standing right now, then you’re just not seeing what’s there.”

[singlepic id=67 w=650]Northeast Riverbed[/singlepic]


What is your workflow process? (e.g. all darkroom? do you scan and use a digital darkroom?)
I do have a darkroom I do my film-related work in, but I do not currently have an enlarger. I process all my film and paper myself, but once I have a negative of some sort, I move to a scanner (an Epson V-750) and from there I process my imagery in Lightroom. I won’t go into detail about my post- processing technique since I’ve discovered in recent times that there are sometimes harsh feelings coming from some of the strictly non-digital practitioners.

I understand the reasoning (and strong emotions) behind the uncompromising “silver only” premise, but I do not care to impose those restrictions on my own creative endeavors. I worked for fifteen years as a professional darkroom technician and spend thousands of hours making prints the traditional way. I decided long ago that I had been exposed to enough print making chemistry for one lifetime and so I embrace the opportunity to make prints in a new way – with inks and dyes on photo rag paper. With all my darkroom experience, I know exactly how I want my prints to look and it’s very easy for me to accomplish my goals with other (non-silver) materials. I see no need to discount new technologies when – for many photographers – they offer an expansion of their creative vocabulary. I think an overly militant “silver only” mindset can be stifling to the creative process, but I do not begrudge the practitioners of this wonderful technology the option of setting limits that are meaningful to their workflow.

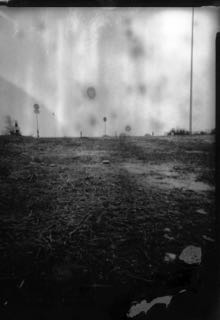
[singlepic id=69 w=650]Westview Swale[/singlepic]


Who were your biggest influences in your photographic style?
This is going to seem like an incongruous mix of influences, but…. Minor White. Larry Clarke. Edward Weston. Arno Maggs. Deborah Samuel. Share Corsaut. Miroslav Tichý, Joseph Bryson, Cindy Sherman, April Hickox and numerous friends and acquaintances. I’ve found that many times I’m deeply struck by lone images I encounter, made by people I never encountered before and whose work may be of the most casual sort. Sometimes the simplest candid snapshot reveals more to me than the most carefully planned image might. However, I have recently discovered Gregory Crewdson and find his work very compelling too.

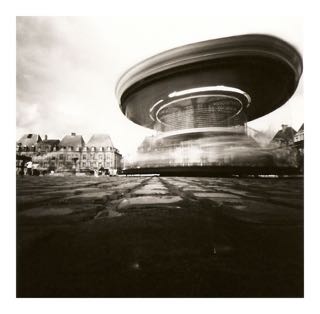
[singlepic id=58 w=650]Access Road[/singlepic]


What is the image that you’re most proud of, that you keep coming back to?
I find that difficult to answer, honestly. My emotional response to individual pieces changes from day to day – month to month. I see my work through the lens of shifting goals and unsettled process. I used to think that it was important to arrive at a clearly defined goal before you set out to start a body of work, but for me, that imposes limitations that I’m not comfortable with. I think it’s more valuable to explore possibilities unencumbered by “goal” and “intent” and discover the connections between certain pieces through editing and selecting a body of work. Sometimes you can’t see what you’ve been doing until you’ve completed it.

However, recent pieces I’ve done with extended sensitivity films (infrared emulsions) have become very meaningful to me, partly because there is a nostalgic component to working in this style – I shot 35mm Kodak HIE a lot back in the 1980s and enjoyed it immensely for its altered tonality and spooky feel.

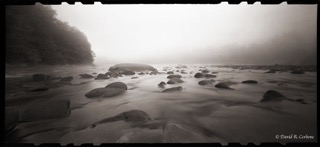
[singlepic id=66 w=650]North Riverbed[/singlepic]


I’m finding recent panoramic landscapes done on Rollei Infrared 120 roll film very appealing, with their gently skewed horizons and peculiar tonality. Last fall I did a piece I titled “Glowtree”, which has a strong graphic quality that appeals to me.

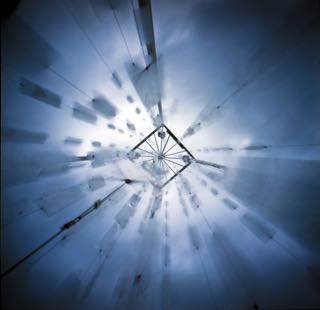
[singlepic id=62 w=650]Glowtree[/singlepic]


How do you best deal with creative impediments, such as feeling “blocked” or uninspired to shoot?
I think inspiration comes from doing – its not something that leaps out of your subconscious to set your imagination alight, its something you conjure by taking action. The act of picking up a camera and starting the process often leads to discovery, and discovery – for me – fuels inspiration. Photography is a discovery-based craft, I think.

The photo that brought my attention to your work was, “Walking the Dead”, which appears to be a handheld self portrait. Further, it appears that you’ve done several of these handheld self portraits. I find “Clipper Paul” to be a particularly excellent insight into your context with the landscape you photograph. Can you talk about what led you to try these handheld self portraits and how your experimentation with them has evolved?
[singlepic id=65 w=250 float=right][/singlepic]This started with a series of tests done with a recently acquired camera, the Nopo 6×6 pinhole camera, made in Spain from Walnut, Cherry and other woods. The first test roll produced this image was “Mask of Leaves” (Right)

And from there, I went on to produce the second one of similar intent; “Walking The Dead” (top of article, right), which you referred to. I’ve since decided that this camera is going to be dedicated to pursuing more portraits in this style, but turning more towards creating characters to investigate my state of mind from day to day. (I am thinking this is going to take the form of Totem Animals from the dark brambles of my subconscious! This is where Cindy Sherman is likely to speak to me) I’m thinking of this camera not so much as a camera in the standard sense, but more as a kind of one-eyed diagnostic tool – like a light sensitive divining rod.

It can be very liberating to stop thinking of your tools as defined by their names and titles, and let them take on different roles. I think many pinhole photographers do this to some extent. I mean, its exciting to transform an old cookie tin into a camera that you can use to produce viable, exciting imagery.[singlepic id=70 w=250 float=right][/singlepic]I’m quite pleased with my Big Cookie Tin pinhole image I produced for World Pinhole Day this year (April 26, 2015) (right). I originally made this camera for making Solargraphs. (I did make one four-month exposure during the winter) For WPD I loaded it with an 8X10 sheet of Ilford Delta 100, which was the first time I’ve worked with film that size! (Expensive stuff, at $4.50 a sheet) I had to sit for 29 minutes to get that exposure, and I am very pleased to find that Delta has excellent latitude, which helped compensate for the fact that the film plane varied in distance from the pinhole. I’m excited to use the old Cookie Tin 8X10 with Ilford’s Delta 100 again soon.

I should mention that a significant part of the enjoyment for me is making the camera. I have some excellent cameras made by skilled people (my Clipper 3D printed camera, and my 6X17 Vermeer by Cezary Bartczak are both excellent cameras), and I’m very pleased to work with my home-printed copy of Todd Schlemmer’s Pinh5ad 4×5 camera but my Zero Image cameras get used less and less often, because in a way they are less personal and certainly less quirky than some of my other cameras. For me, the Zero Image was a great starter pinhole camera when I bought it in 2012, but I soon felt the desire to make odd cameras to my own specifications. (I think Miroslav Tichý was guiding my hands at that point!)

The Zero Image cameras (and the Nopo and the Ondu, etc.) are excellent devices, and the fact that there are so many clever designers making them in recent years is very encouraging and suggests that film photography has entered a kind of renaissance period. It seems that it was inevitable that it would reach this point. If you look at the history of photographic techniques and materials, its been a cycle of new technology replacing older materials, and eventually the obscure, older technology is discovered by a new generation of artists and it explodes into a wave of renewed enthusiasm. I see plenty of young photographers who were “born digital” discovering silver-based photography and they are experiencing it not as I am – as someone returning to familiar territory – but as newborns discovering a strange and magic realm for the first time, and for them, its pure alchemical magic. Thats a very exciting shift to see happening. It makes me very hopeful that film technology will be around for a long, long time.

[singlepic id=59 w=650]Clipper Paul [/singlepic]


You have two images, “Fireflies” and “Judy Goes Walking”, for which your experimentation takes a a slightly different direction. Can you talk about your process for these images?
[singlepic id=61 w=450 float=right][/singlepic]The “Fireflies” (right) panorama is a proof of concept piece that predates the piece titled “Judy Walking” (below). “Fireflies” was shot using my Clipper 6X17 panoramic curved-plane camera designed and 3D-printed by Clint O’Connor (pinholeprinted.com). Exposing for about 15 minutes at dusk, I experimented with a Vivitar flash unit, aiming it at the camera from about 15 feet and firing it manually, then moving my position and repeating the process. The idea was to determine to what degree the flash would make a usable exposure, and what kind of mark it would leave.

From there, I moved to my Zero Image 4X5 pinhole camera to expand on the idea. In making “Judy Walking”, I first exposed the riverbed scene at dusk for about ten minutes using the pinhole “lens”, then closed the dark slide on the film holder, removed the film holder, switched the “lens” to the Zone Plate, replaced the film holder and made a new exposure after dark.[singlepic id=64 w=400 float=right][/singlepic] The “figures” in the image are an empty translucent dish detergent bottle illuminated by multiple firings of the flash unit. The Zone Plate lends the glowing quality to the image.

Thematically, “Judy Walking” is a re-envisioning of a photo I made in the mid-1980s in art college. It is talking about how we anthropomorphize manufactured objects – specifically addressing my memories of a dressmakers form – called a “Judy” – my Mother used for her clothing alteration jobs when I was a child. This piece also reflects my appreciation for the locomotion studies of Edward Muybridge and superficially, it echoes the aesthetic quality of some of his wonderful work.


Many thanks to Paul for subjecting himself to the ƒ/D interview process! Got more questions for him? Feel free to put them in the comments below. If you’d like to stay tuned to Paul’s ongoing work, he can be found on Twitter, Flickr and his personal blog.


Building Pinhole Cameras: The Meta-How-To

One of the coolest things about pinhole photography – and honestly a key component that got me hooked – is the fact that you can build pinhole cameras yourself and out of anything that you can make light-tight!

Your imagination and craftsmanship are the only limits in this game!

There are already tons of links out there about how to build a pinhole camera. You can spend DAYS reading about how to build a pinhole camera. Believe me – I have. If you have a knack for DIY, figuring out how to blend multiple plans into a single Frankencamera is a lot of fun too!

It is not my intention to add to the piles of how-to articles. We’re going to add something different – this is going to be a Meta-How-To (yeah I just made that term up).

In this article I’m going to arm you with the info you need so that you can decide what type of camera to build.

Modifications, Freshly Built or Modifying an Existing Camera

Some plans require you build a camera body; while others have you repurpose an existing container. Depending on your tools, abilities, or available time one approach may be more appealing than the other. Let’s look at some options and considerations for each choice.

Building a container yourself

  • At a minimum, you must be able to make the camera body light tight.
  • If you’re going to use paper negatives, the film holder can be fairly simplistic.
  • If you’re going to use roll film, consideration needs to be made for the winding mechanism (more on that below).

Using a prebuilt container

  • Feel free to repurpose anything, an old tea tin, a ceramic tchotchke, an old shoe box…
  • You’ll need to paint the interior to make it flat black (no reflections!)
  • You can make a camera out of any oddball thing you find, making you the hippest kid on the block.
  • The same considerations will still need to be made in regards to film holder mechanisms.

Modifying An Existing Camera

  • My favorite option because part of my joy is to pull apart the camera to see how it worked.
  • One advantage is that your film handling structure is already installed –  for film this is a huge advantage
  • Old cameras can be found in the attic or the antique store – often for under $10!

Paper vs Film vs Instant

On it’s surface, your choice of film or, more technically, sensitized material, seems simple.  And it is simple!  It is important, though, to choose a medium that you’ll enjoy. Choosing the right materials will increase your likelihood of enjoying this pinhole journey you’re embarking on.

Paper Negatives

  • Can be used in many different cameras
  • Needs to be processed at home
  • Requires the tools, chemistry, and skills needed to develop photo paper
  • Black and white only

How to use:  

Paper negatives involve using black and white photographic paper in your camera as a negative. The paper is cut down to size and placed inside the camera body and used like you would film.  Remember to keep the paper under safelight while you are doing the cutting and placing into your camera.  We don’t want to ruin the paper before we expose it! After you expose the negative and develop it, you can either contact print it with another piece of photo paper or use a scanner to digitize and invert the photo on your computer. Paper negatives are the slowest film type, usually about 6 ISO, however they provide a great and unique image quality that you’ll get from nothing else!

Film

  • Camera design needs to have considerations for film handling.
  • Multitude of films to choose from:  Eg. 35mm, 120 (medium format), or large format (such as 4”x5”)
  • Can easily be sent to a lab for processing and scanning, or black and white can be processed at home
  • Black and white or color

How to use:

When building a film fed pinhole camera, the important thing to consider is the winding mechanism. We’ll set aside the use of large format film for now because that’s very specialized. If you don’t have good structural support for the 35mm canister or 120 spool, you can run into binding issues making it difficult or impossible to wind the film. The film must have a sturdy holding mechanism and also a smooth method of winding the film without disturbing the light tightness of the camera body.  If this makes you nervous, modifying an existing film camera might be more your speed until you have gotten more comfortable with your creations. 35mm and 120 are both roll format films – 35mm being the common canister you’ve often seen; and 120 being a larger film on a spool with paper backing. Both 35mm and 120 are fairly economical, with 35mm being the cheaper option. Both films can be sent to a number of labs around the country for processing and scanning before returning to you.

Instant Film (e.g. Polaroid):

  • It’s easiest for processing so long as your camera must have proper roller system for it
  • Want your photos now? This is super easy – snap in a pack, take the pic, rip the film out, and wait 60 seconds!
  • Black and white or color

The right equipment is necessary. Don’t worry – finding it is not that hard. Hit the antique store and look for old Polaroid Land Cameras. When you find one, open the back and make sure the rollers are clean. Then Google the model number and see if it takes Polaroid 669 film. If it does, you’re in luck – Fuji’s got your film needs covered! All you have to do is remove the lens and put in a pinhole.

Other Considerations

Whatever your film choice, consideration must be given to how your camera will be used “in the field”. Are you ok with only changing the film or paper negative at home? Then little consideration is needed. However if you want to be able to change sheets of paper, rolls of film, or packs of instant film, some forethought is necessary for your design. All this means is – think about your camera design and what it will take to change the film. Is this a process you’re comfortable with doing in the field? Do you care?

Pinhole Sources

The traditional way to get yourself a pinhole is to literally take a tiny pin and slowly bore a pinhole into a piece of aluminum. Here’s a bunch of videos to help you with that. If you’re just toying around, this is a great way to get started.

When you get a little more serious, and want your pinholes to be more precise, you can get laser drilled pinholes to exact diameters.  You can sometimes get these mounted onto a larger disc for easier handling, while others will just be a tiny piece of aluminum. There are lots of options for you to choose the type that suite your own needs.Here’s a Google to get you started.

You might be wondering what size pinhole you should use. Well, lucky for you, there’s a calculator for that!  Just plug in your camera measurements and it’ll guide you towards the right size. Just note – laser cut pinholes are usually measured in microns, and 100 microns is a tenth of a mm (e.g. 100 microns = 0.1mm).

Random Features

There’s lots of room for creativity in your designs.

  • Try a  panoramic camera with a curved film plane to avoid distortion and vignetting over a long film plane.
  • Integrate a film mask to get a super crisp edge or custom image markings
  • Bullseye bubble levels for quick level reference
  • Cable release adaptors are by no means a must-have, but sure can be nice in certain situations.

Questions?

I hope that I’ve helped you leap a few steps down the path to figuring out which plan works best for you. But, this is just one article, so I’m sure there’s other questions. Feel free to put them in the comments below and I’ll get to them soon!


Get Inspired – Carrousel à la Place Ducale – Charleville-Mézières

Today’s featured photo is dizzying in it’s energy!

Carrousel à la Place Ducale – Charleville-Mézières
[singlepic id=56]Carrousel à la Place Ducale – Charleville-Mézières, Zero Image 2000, TMax 100, ©Joël Lintz 2015[/singlepic]

This wonderful capture of a carousel in the French town of Charleville-Mézières was produced by Joël Lintz. We love the use of pinhole to grab the motion and energy of this fun childhood memory! Clearly, as we’ve seen before, one can get some fantastic results when the fair is in town!

More of Joël’s work can be found on Flickr.


Get Inspired – The Spells of the North Wind

Sometimes the best inspiration is a different perspective.

The Spells of the North Wind
[singlepic id=54 w=600]The Spells of the North Wind, 6*6, MO pinhole camera, Riga, Latvia, ©Inga Dinga 2015[/singlepic]

In this fine example of pinhole photography, Inga Dinga shows us what joys come from finding different angles with your pinhole camera. Because of the near infinite depth of field of pinhole photography, the format frees you to put your camera in any odd place and find some wonderful new results.

You can find more of Inga’s work on Flickr and the Facebook Pinhole Group.


Jan Geisen: Stormy Pinholes

These dark and moody photographs were made at the docks at the new building area “Überseestadt” in the north of the City of Bremen, Germany and the harbor of Brake, Germany. Jan would head there after throwing his clothes in at the laundromat. Having time to kill, he would arrange his pinhole cameras there even in the most miserable of conditions. Most of us wouldn’t bother to set out cameras in a huge storm, however Jan was pleasantly surprised in the way that some photos came out spectacularly in that they conveyed more about the storms than they did about the scene.

“I think [the pictures] are more “whole”, because they show not only the physics of light, but -by accident- even the physics of humidity or even wetness chemically reacting with the photo-sensitve paper in the camera (add to it the poor developement technique and its imprints on the negative they became in a “Berthold Brecht Way” epical).”

Photos 1 – 3
Jan set up his camera in a heavy downpour, and then waited in his car with a beer and the radio on for about 15 minutes while making the exposure on Ilford multigrade paper. During the exposure, the rain became even heavier, and a thunderstorm started, before he left his car again to retrieve the cameras. The wood box cameras had become soaked through. He headed for home, grabbing his laundry on the way, to develop the paper negatives.

On #1 there were some sprinkles of water from the rain that got in the camera. The uneven sky, water stains, and dark foreground bring the stormy situation together.

#1
[singlepic id=44 w=400]#1, ©Jan Geisen 2015[/singlepic]


Photo #2 was taken by a camera placed underneath a small dock for yachts. This camera also had some water issues, causing parts of the image to be brightened, reminiscent of the lightning of the storm.  As luck would have it, the water stains add to the linear feel of this image and help with the contrast. The lasting impression is of the moody, violent storm that had washed through during the exposure.

#2
[singlepic id=45 w=400]#2, ©Jan Geisen 2015[/singlepic]


The camera for #3 takes in the broader scene that was detailed in photos #1 and #2, and it too took in rainwater. Again we see more of the staining and bright streaks that were shown in the previous photos. The distant buildings are softened by the rain, and one feels the blanketing of this storm.

#3
[singlepic id=46 w=400]#3, ©Jan Geisen 2015[/singlepic]


Jan returned to the scene another time for #4, this time under different weather conditions. He set up the camera under sunny conditions, but in the distance there were dark clouds forming for another storm. The exposure was just a few minutes, but in that time the weather had turned measurably worse, and Jan collected his camera just as the heavy rains moved in on him.

#4
[singlepic id=47]#4, ©Jan Geisen 2015[/singlepic]


Now in photo #5, Jan set up to capture another perspective – this time at the harbor of Brake, a town near Bremen – and again, the storms came too. But unlike in #5, Jan wasn’t as lucky with his timing. Just as Jan started the exposure, the hardest rains yet soaked him through, and again he waited in his car for 15 minutes during the exposure. When he did retrieve his camera, he found it face down in the mud. The final image being very dark and foreboding, with but a streak of light in the middle to give a tease of what he came for.

#5
[singlepic id=48 w=400]#5, ©Jan Geisen 2015[/singlepic]


Circles of Confusion

At ƒ/D our mission is not only to inspire, but to inform in a way that we hope leads to further discovery. Today I want to dive into some of the details of how a pinhole camera “works” so that we can all better wield this tool we’ve chosen. This is a somewhat technical subject, but I’m going to do my best to stay above water. I’m going to do the math for you – but there’s a link at the end of this for those that revel in complicated math and details.

Circles of Confusion

In photography, “Circles of Confusion” (CoC) are what make up the image that you see in the final photo. Blurry portions of photos taken with a lensed camera are made by large CoC, and sharp portions of a photo are made by small CoC. So what are CoC? In a word: points. Fine detail is produced by the optics of the camera resolving the many rays of light that make up that detail into many tiny tiny points. Blur (not including motion blur) is produced by out of focus areas that are resolved into much larger spots. If you get your face super close to your screen, you’ll see everything is made of thousands of little dots, called pixels – this is very similar to a photo’s CoC.

A pinhole camera works by creating CoC’s that are all the size of the pinhole. Light travels in a straight line, and in a scene there’s gazillions of straight lines reflecting off of your subject. Those straight lines travel through the pinhole, at the size of the pinhole, and then hit your film. Contrast this with a camera that uses a lens – that lens works by bending the light and focusing it to a much smaller CoC, and thus a much greater amount of detail onto the film plane.

The Pinhole Look

First, let’s take a second to define what the “pinhole look” is. I believe it can be characterized by 2 things:

  • infinite softness and
  • infinite Depth of Field

There are those that would argue that qualities such as vignetting, distortion, and long exposure are also part of the pinhole look, but each of those qualities can either be designed out of a pinhole camera or mitigated with light and film speed.

Infinite Softness

Now that we know what a CoC is (again, Circle of confusion), let’s take a second to understand how that translates into the aesthetics of a pinhole photo. Your typical pinhole is going to range from 0.2mm to 0.5mm. Because of the physics involved, your CoC is going to be roughly the same size – not exactly the same size, but close enough for this article. So a pinhole camera that has a 0.2mm pinhole will have CoC that are about 0.2mm as well. By comparison, a typical DSLR with lens is producing CoC that are about 0.019mm. That’s 10 times smaller! That’s also 10 times sharper.

Since the CoC produced by a pinhole camera must be many times larger than those produced by a DSLR or just about any other well designed lensed camera, we get softness at all points of the photo as a result of the pinhole photograph.

“Infinite” Depth of Field and the Real Limitations

Now we know that the resolving sharpness (CoC) of a pinhole camera is much less than that of a DSLR. But what does that really mean? Well, the first impact is in Depth of Field. Recall that Depth of Field is the distance over which parts of your subject will appear to be in focus. It’s often said that pinhole cameras have an infinite Depth of Field, but that’s a little misleading.

It’s misleading to say that pinhole cameras have an infinite Depth of Field because while that is technically true, the practical Depth of Field is limited by the CoC. Why? Consider a landscape photo, with some trees that are 500 yards away. Let’s say you’re shooting this scene with 2 cameras: one a medium format pinhole camera with a 0.3mm pinhole and the other and the other a medium format lensed camera set on f/22 for maximum Depth of Field. Imagine those trees, when projected onto the film, are 1mm tall. In your pinhole camera, those trees are going to be represented by about 3 CoC (1/0.3 = 3.3). In your lensed medium format camera, which produces CoC of 0.053mm, there will be about 20 CoC. Remember, more circles equals more sharpness! So while the pinhole camera has infinite Depth of Field, it runs into a limitation of resolving power because of the CoC.

At this point, you might get the bright idea to just use a smaller pinhole. Hold your horses! If you go smaller than the prescribed pinhole for your camera, physics is going to put a stop to you right there. But the reason why is whole ‘nother article. Suffice to say, for now, go with the size pinhole that’s prescribed for the dimensions of your camera.

The Impact of Circles of Confusion

So what does all this mean? What the hell is the point? What are you getting in exchange for this headache? Armed with this information, we can make better choices for our artistic vision.

Digital Workflows

If you’re like many pinhole photographers today, you are shooting with film or paper negatives, and then scanning them into your computer where you apply some digital touching up before publishing. CoC make it all the more important in this workflow to really nail your exposures. Having less detail in the negative means there’s less detail to work with later. Dodges and burns that would have worked on a DSLR photo will look fake on a pinhole photo, because there’s less detail to manipulate. This means that you’ll want to ditch that habit of telling yourself you’ll photoshop it later, and instead take up the mantra: “Get it in camera!”. Perhaps a refresher in ole Ansel Adams’s classic, The Negative.

Film Formats

Your choice of film format can have a great impact on your level of sharpness. This is true in all photography, but especially true in pinhole. Consider our previous example – the medium format pinhole camera with the 0.3mm pinhole. All things being equal – the scene, the exposure, an appropriate pinhole size, and the angle of view of the camera – a 4×5 camera will produce 2.5x more detail than the medium format camera! Now of course we’re not in pinhole photography for the sharpness. But there are times when sharpness needs to be considered. If your subject, or the scene, includes lots of details and, further, you want to highlight some of those details, you may want to consider using a 4×5 or even 8×10 camera. At other times, when the scene or your vision is free of fine details, you can safely use your medium format or 35mm pinhole camera.

Composing a Shot

What do you envision from the final print from the photo you’re taking? If the magic in this shot is depending on some distant or small piece being recognizable, consider the amount of resolution your film will have based on your pinhole size. No way does this mean get out the ruler and old trigonometry textbooks – but rather take a moment to visualize how large that detail will be on the film plane and if you’re going to have the desired detail needed. Granted – much of this relies on practice, but we’re here to flatten the learning curve, not remove it!

Wrap Up

Hopefully this helps you be a better pinholer now and for many years to come. Again, in short:

  • The softness in the details of pinhole photography means you have less detail to work with during burning and dodging, so get the exposure right!
  • If you need more detail, use a larger format
  • Visualize the final print and make sure that you’re framing for the detail that you feel is needed to make the photo work!

As promised, if you need further info, including the detailed math behind CoC, there’s a very good write-up on Wikipedia.

Did I bring clarity or stir up the mud? Let me know in the comments below, or hit me on twitter @fslashd


Worldwide Pinhole Photography Day

Well, the sun is almost set here at ƒ/D headquarters (for the curious: near Cleveland, OH). It was a beautifully sunny day and one filled with possibilities. Of course, there was also some tribulations: my beloved pinhole-converted Polaroid 335 Land Camera camera sucked in 3 frames at once through the rollers. She’s always been a cantankerous old gal, but I think she’s telling me it’s time to hang up her rollers. I’m gonna miss her.

I did still get some shots today though. A few Polaroids and some other items that I’ll need to process later. Below are the Polaroids – they’ve not been cleaned up at all, so apologies for dust and such. Stay tuned after the jump – a legit reciprocity failure table for Fuji’s FP-100C film (it is cantankerous as well).

Beehive
[singlepic id=41]Beehive, Pinhole converted Polaroid, FP-100C, ©Kier Selinsky 2015[/singlepic]


Chickens (who don’t stay still for nothing)
[singlepic id=42]Chickens, Pinhole converted Polaroid, FP-100C, ©Kier Selinsky 2015[/singlepic]


Field
[singlepic id=43]Field, Pinhole converted Polaroid, FP-100C, ©Kier Selinsky 2015[/singlepic]


Fuji FP-100C – Reciprocity Failure Table

Ever wonder why your FP-100C pinholes come out so dark? The reciprocity failure rate on it is EXTREME! I found this at apug.org and have verified it’s accuracy. Copy/paste this for future reference:

Metered Seconds :: Corrected Seconds
1 :: 3
1.25 :: 4.06
1.5 :: 5.25
2 :: 8
2.5 :: 11.25
3 :: 15
4 :: 24
5 :: 35
6 :: 48
8 :: 80
10 :: 120
12 :: 168
15 :: 255
18.75 :: 389.06
22.5 :: 551.25
30 :: 960


Happy Shooting!!

Get Inspired – River Rocks

David Cerbone provides this moody river scene for today’s inspiration.

River Rocks
[singlepic id=26]River Rocks, Zero Image 612B, Kodak T400CN, ©David Cerbone[/singlepic]

David made this capture of the Cheat River in Albright, West Virginia. It’s a beautiful part of the country and David has created a lot of excellent work studying that rugged landscape.

This photo was chosen because of how well it represents the feel you get in the river valleys of West Virginia. I’ve backpacked in the nearby Monongahela National Forest and can attest to the dreamy and misty mornings.

You can find more of David’s work on his Flickr page.

Get Inspired – House

Today’s photo takes us into the world of wetplate collodion!

House
[singlepic id=22]House, Leonardo Pinhole Camera, Wetplate Collodion on black glass, ©Joanna Epstein[/singlepic]

Joanna Epstein made this wonderful image in La Rioja, Spain. She used her Leonardo 4×5 camera to produce the image on wetplate collodion with black glass. The combination of techniques produces a truly one of a kind image!

We chose this image because of the way Joanna combined pinhole photography with wetplate collodion in order to produce the image she envisioned. Combining pinhole with various techniques can produce wonderful results!

Joanna can be found on Flickr, Twitter, and Blogger.


Get Inspired – Movements 7 – arriving at the airport

Movement comes to the forefront in today’s featured pinhole photo.

Movements 7 – arriving at the airport
[singlepic id=21]Movements 7 – arriving at the airport, P-sharan pinhole camera, Fuji Provia 400, ©Martin Martinsson 2015[/singlepic]

Martin is a passionate amateur photographer and never leaves his home in Malmö, Sweden without his trusty P-sharan paper pinhole camera, usually loaded with slide film. He got hooked on pinholing a few years ago when a friend lent him a paper camera, lured in by the dreamy quality of the photos.

We chose to highlight this photo because of the unique way that movement is highlighted. It’s always fun to have movement in a pinhole photo, and sometimes even more fun when it’s the camera that’s on the move!

You can find more of Martin’s work on Flickr, lomography, and Tumblr.