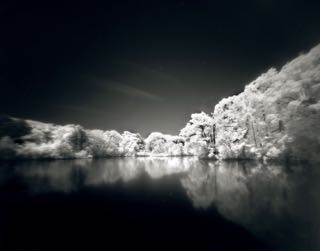
Tag Archives: infrared

July Recap

July was a busy month! We covered a lot of ground in pinhole – opening up some very interesting perspectives and adding to our catalog of technical articles. Check below to make sure you didn’t miss anything.

Have you responded to our Call for Entry? If not, have a look! Entry is free!

[spacer height=”20px”]

Brussels Rd Point - Rue Antoine Labarre - Jeanus Loctet - thumbAs always, we found some great fresh pinhole work. You can see July’s full gallery and links to past months here.

[spacer height=”40px”]

Ljusets Hastighet - Lena Källberg 2016 - thumbWe explored the impressionistic views of life slipping by in Lena Källberg’s Decisive Movement work.

[spacer height=”40px”]

NEW DAY - Michael D Hawley - thumbWe interviewed Michael D Hawley, the talented professional photographer from the Pacific Northwest, and learned how he grew up in photography and how it shaped his pinhole work.

[spacer height=”40px”]

On the Move - Howard Mosier - thumbHoward Moiser brought us a new perspective on movement in his Relative Movement series.

[spacer height=”40px”]

Finally, guest author Delio Ansovini shared with us his journey in IR pinhole, and shared some great data to get you started exploring the medium yourself.

[spacer height=”40px”]

Be sure to sign up for our newsletter (on the right) so that you get weekly updates sent straight to your inbox!

[spacer height=”20px”]

Pinhole Infrared by Delio Ansovini

Over a year ago we presented a fantastic guest article by Delio Ansovini covering the important aspects of camera geometry in pre-visualization of your pinhole photos. Today we are rejoined by Delio as he walks us through his IR process.

IR, or Infrared, is one of the more dramatic techniques available in film. Rather than exposing on the visible light spectrum that we see, Infrared film is exposed by the invisible Infrared waves that have just a bit longer wavelength than we can see. More importantly, to our purposes, the aesthetic of IR is dramatic because of the way that certain materials reflect more IR than others.

Shooting IR with a normal camera is a challenge, doubly so with a pinhole camera. The wavelength properties of pinhole, the film handling of IR, and reciprocity failure all combine to make a unique problem set. Below, Delio has put together his notes on learning IR pinhole. We hope this helps you on your journey to IR pinhole greatness!

On B/W Infrared Photography with 4×5 pinhole cameras

By Delio Ansovini

I started experimenting with infrared films using a pinhole camera in 2012 with a lens-less 6×9 Ikonta. It came out as an f316 with the R72 filter taped on to the mechanical shutter, all in front of the pinhole plate. Certainly it was awkward but…a functional arrangement. The Efke 820 was still ready available in the local stores so I made it my choice for infrared work.

There followed a couple of weeks of shooting around the local parks, all in the mid-daysun; high winds pushed the white clouds high in the sky across the frame creating very blurred streaked photographs. The poignant images were published in Blur Magazine in 2012.

Encouraged by how successfully they turned out, I ventured into the 4×5 format thinking that: aside from the much extended exposure time, there was not much difference in infrared photography between using a pinhole or a camera with a lens. What blessed ignorance; but here is the story one step at a time.

The film speed and exposure

It’s difficult to pinpoint an ISO rating for IR film because the ratio of infrared to visible light varies greatly from scene to scene and of course we can’t judge the difference since we can’t see IR reflections (IR frequencies are out of range for our eyes); nor can your off-the-shelf light meter help since it is calibrated for visible light.

Other factors affecting speed are the type of filter, the developer being used, and how you process the film. Some broad assumptions and decisions had to be made to eliminate the multitude of variables. Here’s my quick guide on how I initially approached the issues (since then revised):

  • I assumed that the sensitivity to visible light of the Efke IR820 was ISO100,
  • I used only the R72 filter and I assumed that factor was 5 stops.
  • I set the light-meter (L358) to ISO3, the lowest setting available. That is 5 stops from ISO100 using incident readings
  • I limited the pinhole 4×5 cameras to be used to the f175 and f250 only.
  • I used incident light readings at f22 and converted the exposure time from f22 to the pinhole camera f# using the following factors:
    • for f175 multiply the f22 exposure time by 63.3
    • for f250 multiply the f22 exposure time by 129.1
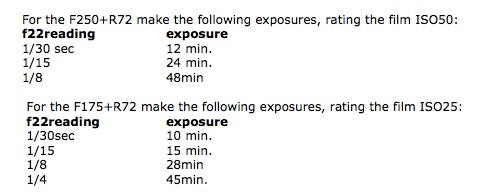
  • Add the reciprocity correction as in the following table.

recip correction efke


Development process

With the exposure method as established above, the first few 4×5 exposures were developed in a Unicolor tank using the Kodak Tmax Developer, 1+4 for 7minutes, all at 20C, in a continuous reversing agitation mode. I used 2 baths of water as stop wash for 3 minutes in total; fixed in Kodak Fixer for 10 minutes; washed for 20 min and hung to dry for 2 hours.

The results or lack of them

The negatives were underexposed; furthermore I noticed serious IR seepage through the camera’s felt gasket on both cameras and film holders dark slide when the camera was positioned in full sun for the required exposure.

I also felt that the TMax developer had no compensating properties at all, in fact rather useless for the application!

In short: neither my 4×5 cameras made in wood and Gator foam board, nor the old 4×5 dark slide in the aging film holders were infrared-proof. The relatively aggressive Tmax developer did not help either.

The fixes

The following procedural changes were implemented with good results with the 4×5 Efke IR820 film and the unmodified existing cameras and film holders.

  • Wearing latex gloves to handle the IR film for loading in full darkness, my fingerprints somehow became visible on the developed negatives if I did not use gloves.
  • Carry 3 film holders in an aluminum foil covered black plastic envelope. I used a recycled 8×10 film black plastic pouch, lined on the exterior with aluminum foil and double-sided sticky tape.
  • Load the film holder onto the camera in the shade and wrap the aluminum shield around the 3 sides of the camera covering the felt edge. Making sure the shutter is closed and locked in place, remove the blind slide and cover the top of the film holder with the shield.
  • Position the camera on the tripod in the sun for the shot.

Calculate the exposure as before but rating the film as follows:

corrections2


• Open the shutter for the timed exposure.

Revised development process

Blown-out highlights are not my favorite attribute in a photograph, so I tried what I know works well with panchromatic films. My notes on the revised process read:

Film used: 4×5 Efke 820IR rated ISO25, f175, Filter R72, Exposure 15 minutes.
Film development: AdoxAPH09 1+100 for 15min In Rotary tank, continuous reversing; water wash 3 min; fixing 10 min.

The results after the fixes

All much better, no blow-out of the highlights, no elaborate PS editing with curves or masking, therefore I was quite happy.
However; the aluminum foil wrapping of the camera sitting on a tripod for 20 minutes or so did generate some amusing conversation with the curious (or alarmed?) passersby.
For that I devised a wooden back cover lined with foil, as shown in the photo. It is classier…

[singlepic id=415 w=600] [/singlepic]

Illustration legend:
1. The f250 back with the aluminum lining of the back cover
2. The back cover mounted on the camera
3. The camera front with the shutter (aluminum foil is lining the inside of the cap)
4. The R72 filter mounted in the camera inside. One of the three tabs is rotating so that the filter can be removed and the camera used with normal Pan film

Good things don’t last very long

First they discontinued the 4×5 Efke 820IR film, and then some chemist decided to change the formulation of the Adox APH09 so that what I used to dilute 1:100 I now have to dilute 1:40.

And yet I do sympathize with the individual in the German laboratory. I use only 120cc of APH09 working solution to develop 4-4×5 negatives. At 1:100 dilution it means 24 drops of APH09 concentrate from the 500cc bottle available. However; the compensating characteristics of the APH09 previous version are no longer there.

Fortunately we can be resourceful

Just a few weeks ago, I decided to revive two chemicals that I stored in glass jars- one is Sodium sulfite and the other is Metol. I purchased some distilled water and that’s all I needed to make the old D23 and, try it on a new Maco IR 820c.

New? Not quite, just new on eBay and available at a reasonable price. I did find this link to the film datasheet useful; in fact, I wish I had come across it earlier, although I enjoy the experimentation process.
http://www.maco-photo.de/files/images/MACO_TA820c_ENG.pdf

In reference to the making of the D23

It’s easy, even I can do it; and very economical. As far as I know there is only one formula for making this developer, the one listed in Ansel Adams’s book “The Negative”.

D23

Both chemicals can be purchased in powder form from Photographer’s Formulary, or as prepared solutions from B&H and others.

Well, the results of these two last process changes are shown in the photographs accompanying this article, and the details for each photograph are listed in my usual cryptic fashion. At least now you know what’s behind all the puzzling verbiage.

A warning to all that intend to use the data in this article: it works for me but it may be quite different for you. The major difference is in the agitation of my rotating developing tank which is quite unusual and energetic and cannot be controlled. At least the developing times, contrast and sharpness all reflect that.

In reviewing my writing along with the data published on the MACO IR820c data sheet referenced above, I become aware of a great discrepancy in the reciprocity factor to be used. This subjects maybe something to look into closer.

IR Sample Images

[singlepic id=422 w=600]The Midle of the Swamp, ©Delio Ansovini[/singlepic]


[singlepic id=418 w=600]The Ducks Pond, ©Delio Ansovini[/singlepic]


[singlepic id=417 w=600]Seat in the sun, ©Delio Ansovini[/singlepic]


[singlepic id=419 w=600]The Dunes, ©Delio Ansovini[/singlepic]


[singlepic id=421 w=600]The Rivulet, ©Delio Ansovini[/singlepic]


[singlepic id=420 w=600]The House on Fire, ©Delio Ansovini[/singlepic]


[singlepic id=416 w=600]Casa Loma Stables, ©Delio Ansovini[/singlepic]


Data for the photos presented

The swamp
The Duck Pond
Seat in the sun
The dunes
The rivulet

4×5 Pinhole
f175, L=35mm, Photo location: H. Park, Ontario
Date: June 2016
Film used: MACOPHOT-IR820c
Rated ISO 25 Exposure: 30 minutes
Filter.R72; Lighting: None;
Negative development: D23 1:1 for 11min In a Unicolor Rotary tank, continuous reversing agitation; no water wash; Neg. scanned 1200 dpi, RGB, spotted, duotone; framed to size.
——————————————-
The house on fire
Casa Loma

4×5 Pinhole
F250, L=50mm, Photo location: Casa Loma, Ontario
Date July 2016
Film used: MACOPHOT-IR820c
Rated ISO50, Exposure: 24minutes
Filter.R72; Lighting: None;
Negative development: D23 1:1 for 11min In a Unicolor Rotary tank, continuous reversing agitation; no water wash; Neg. scanned 1200 dpi, RGB, spotted, duotone; framed to size.

Inspiration Week of 4/25

For this week’s inspiration photos, we bring you five excellent pieces showing some great captures in wide open expanses. The weather in the Northern Hemisphere has warmed up, but the sun is still a little lower, making dramatic lighting more accessible than in the summer. If we do our job right, this week’s selection will get you motivated to get out there and make some fresh pinhole captures this weekend. Enjoy!


Evening
[singlepic id=306 w=600]Evening, ©Don Pyle 2016[/singlepic]

Don Pyle is a Washington based pinholer who captured this excellent vantage point of the Hawthorne Bridge in Portland, OR using a camera he builds called the Innova. A number of these Innova cameras are used in the wild by pinhole photographers around the world. The excellent results photographers are making with these cameras can be seen in the Innova Pinhole group collection on Flickr. Don captured this image on Ektar 100 film in 120 format. You can find more of his photos on Flickr.


*
[singlepic id=305 w=600]*, ©Pavel Apleton 2016[/singlepic]

Pasha Apletin is a talented photographer from St. Petersburg, Russia who’s been working on a series about the ships there. He made this photo during an early summer morning at the banks of the historic center there. He captured this on 5×7 film, which he sometimes uses for cyanotype printing. You can purchase this print here, or learn more about him and his work at his website, Facebook, Tumblr, Instagram, or Flickr


Jack’s Rake
[singlepic id=308 w=600]Jack’s Rake, ©Andy Werner 2016[/singlepic]

Andy Werner is as equally talented behind the camera as he is building one in his cabinetry shop. He made this photo of Jack’s Rake – the diagonal path running across the face of the rock – in the Langdale Valley in the Lake District, UK. The rock is known as Pavey Ark, and you can see the camera he used here. Andy has been shooting and building pinhole cameras for about ten years. So far the cameras have been for his own use primarily, and is currently working on selling small batches of his cameras.

You can find more of Andy’s work on his website, Facebook, and Flickr. His cameras will soon be available here, or you can get updates on Facebook.


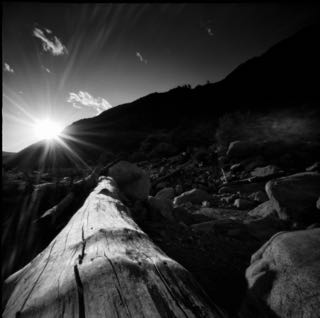
Photograph After Visiting My Mother’s Grave
[singlepic id=309 w=600]Photograph After Visiting My Mother’s Grave, ©Cameran Ashraf 2016[/singlepic]

I love this powerful landscape capture that Cameran Ashraf made using his Zero Image 2000 pinhole camera on Acros 100 film. He made this photo while reflecting on his mother’s life and passing, and provided the following text to accompany:

“I took this photograph after visiting my mother’s grave on what would have been her 70th birthday. She had long feared growing old, never did, and passed away at 67. I didn’t say much to her at the grave, and though it had been years since she passed, I was still angry she didn’t stick around.

In the mountains north of her grave, I sat on this long dead log and let the day reach its close. The silence of the setting sun strongly called me to take a photograph, and as set up my pinhole camera I began to weep and said many things which my heart had desired to say to her.”

You can view more of Cameran’s excellent work on Flickr, Instagram, or follow him on Twitter.


Impressionistic Field in IR
[singlepic id=307 w=600]Impressionistic Field in IR, ©Marie Westerbom 2016[/singlepic]

Marie Westerbom made this awesome, ephemeral capture using IR film in her Zero Image 2000. She hand held the camera while making the photo over a 2 minute exposure. The result is a practically translucent impression of the field in a breeze. You can see more about the background of this photo on Marie’s blog, or see more of her work on Flickr.


Get Inspired – Week of June 22

This week we bring you 6 photos representing some of the best that we’ve found on the web in the last week. Part of what we enjoy about curating these images from far and wide is that they truly are from the far and wide – from the Far East of Korea to the Baltic States region of Lithuania, and points in between.

So kick back and take in these scenes. Find something new in their work and open yourself to a new way of seeing!


beim “Opfermoor” (ohne Eiche)
[singlepic id=227 w=600]beim “Opfermoor” (ohne Eiche), ©Katja Fleig 2015[/singlepic]
Katja Fleig made this wonderful capture of a wispy bog scene in Germany using a Holga WPC loaded with EFKE Aura IR820 film. You can find more of Katia’s work on Flickr.


img058
[singlepic id=226 w=600]img058, ©Michele Welponer 2015[/singlepic]
Michele Welponer is an Italian photographer that captured this serene scene in Trentino, near Caldonazzo lake. Michele used EFKE 25 film in a handmade wooden camera. More of Michele’s work can be found on Flickr, Instagram, and Facebook.


Caution Tape
[singlepic id=225 w=600]Caution Tape, ©Ross Togashi 2015[/singlepic]
Ross Togashi wielded his self-made wooden pinhole camera and Kodak Ektar to make this sweeping photo, part of his series, “Pinholes at High-Tide”. He’s wonderfully conveyed the sense of the tide rushing out at your feet after the wave has receded. You can find more of his work on Flickr.


Biking Mangrove
[singlepic id=224 w=600]Biking Mangrove, ©Ross Togashi 2015[/singlepic]
This is the second photo today from Ross Togashi, this one from his series “Pinholes Makai”. You can feel the heat and humidity, and dream of how this bike arrived in this situation.


A Feather
[singlepic id=222 w=600]A Feather, ©James Shin 2015[/singlepic]
James Shin made this photo in Ganggoo, Kyongsangbukdo, Korea just after sunset, with an exposure of about 2 minutes, wonderfully capturing the sense of soft darkness at sunset on the shore. You can find more of his work on Flickr, his personal website, or Facebook. He was also interviewed by Parallel Planets.


1+4
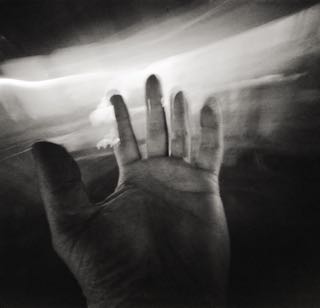
[singlepic id=221 w=600]1+4, ©Arturas Meskauskas 2015[/singlepic]
Artūras Meškauskas is a photographer based out of Panevezys, Lithuania, that we’ve featured before, and here again we find ourselves very impressed by his vision. He made this photo of his hand in January 2014 using a MO Pinhole 6×6 with Shanghai GP3 100 film.  You can find more of his work on Flickr and Facebook.


Paul Barden: Rural Pinholes

Note: all images in this article are ©Paul Barden

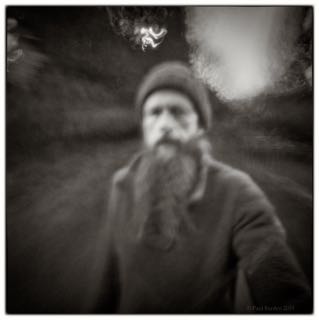
[singlepic id=68 w=250 float=right][/singlepic]I first came across Paul’s images while perusing the Flickr Pinhole Photography Group pool. As I scrolled through the page I came across this arresting self portrait, “Walking the Dead”, (right) of a bearded man that had this quality to it that just stopped me in my tracks. I think it’s because, for me, it represented a feeling you get when you’re walking a wilderness or rural area around dusk. Nothing is out of focus, but nothing is clear.

This image drew me to Paul’s work and, as I looked through his images, I found a certain familiarity with my own rural experience. Much of his attention is focused on the rural landscape near his farm – a place that his photos show he obviously knows extremely well. To photograph congested woodlands and mixed agrarian areas, you must have an eye for subtlety. These are not great sky scraping mountains that beckon adventurers from across the globe. No, these are the quiet places – the slow breath – that cannot be consumed in a weeklong vacation, but rather in seasons of wax and wane.

I caught up with Paul over email over the course of a couple weeks, and he was gracious enough to provide some great answers to my questions. Read on to learn about his path in photography, what drives his creativity, his self portraits, and more.

On your blog you mention that you’ve gone through different phases in photography, from film SLR’s to digital. What attracts you to pinhole photography today?
[singlepic id=63 w=250 float=left][/singlepic]My return to working with pinhole technology is just that; a return. In the 1980s I was working with home-made cameras quite a bit as an aspect of my study at the Ontario College of Art (now known as OCADU). However, at that time I didn’t have the luxury of time to devote more than a fraction of my study time to pinhole alone, so it was something I enjoyed a lot but couldn’t invest in heavily at that time.

In 2011 I found myself very dissatisfied with digital imaging technology because I found it was too sterile for my tastes; it lacked a sense of craft. Around 2000, I was enthusiastic to embrace the new sensor-based cameras and set aside my Nikon FM2 for good, and for over a decade my workflow was entirely electronic. But over the years my dissatisfaction grew as I increasingly felt the DSLR was too cold, too impersonal for my liking. There was none of the “alchemy” that traditional silver halide image making offered. I think it’s interesting to see digital photographers so enthusiastic about High Dynamic Range technology, when in fact, film has an incredible dynamic range that you can manipulate with ease. I’ve also come to find importance in the fact that film photography produces a physical object (the negative) whereas what digital image-making produces is ephemeral, and digital files face an uncertain future in a way that film negatives don’t. I’m not suggesting that my negatives are ever going to be of value to anyone but me, but I’m more comfortable with knowing that my negatives have a future that has a proven track record.

My response was to pick up the least advanced silver-based technology I knew, and that was the pinhole camera. Not only did it allow me a chance to revive my traditional skill set, but I felt compelled to experiment once more with hand made cameras of various designs – the wilder, the better!

[singlepic id=60 w=250 float=right][/singlepic]What has pinhole photography helped you to see that you don’t think you would have otherwise?
Pinhole work by its very nature demands that the photographer abandoned certain precepts, which can be very liberating. I am free to make choices at multiple points on the path of crafting a photograph that a digital camera does not permit. (“Farmhouse”, right)

Looking at your pinhole landscapes, one gets the sense that this is a land that is very very familiar to you. Where are you shooting typically? What is your connection to this place?
People who advocate working with film often state that they like working with traditional film technology because it prompts them to “slow down” and exercise greater care in crafting an image. In a similar way, I reject the notion that to create interesting landscape-based work you have to travel far and wide to find worthwhile subject matter. Of course, there are millions of amazing places on this planet to render on film, but I have chosen to restrict myself to a limited palette; most of what I photograph is within walking distance of my home, and in fact, much of my work is done here on the farm, nested in the creases of the Mary’s River. In the same way that film technology places different, less casual demands on a photographer, I find value in exploring my immediate environment – it pushes me to look more closely and carefully at the richness of this home of mine. I have recently found myself saying to people “If you can’t find anything to photograph within forty feet of where you’re standing right now, then you’re just not seeing what’s there.”

[singlepic id=67 w=650]Northeast Riverbed[/singlepic]


What is your workflow process? (e.g. all darkroom? do you scan and use a digital darkroom?)
I do have a darkroom I do my film-related work in, but I do not currently have an enlarger. I process all my film and paper myself, but once I have a negative of some sort, I move to a scanner (an Epson V-750) and from there I process my imagery in Lightroom. I won’t go into detail about my post- processing technique since I’ve discovered in recent times that there are sometimes harsh feelings coming from some of the strictly non-digital practitioners.

I understand the reasoning (and strong emotions) behind the uncompromising “silver only” premise, but I do not care to impose those restrictions on my own creative endeavors. I worked for fifteen years as a professional darkroom technician and spend thousands of hours making prints the traditional way. I decided long ago that I had been exposed to enough print making chemistry for one lifetime and so I embrace the opportunity to make prints in a new way – with inks and dyes on photo rag paper. With all my darkroom experience, I know exactly how I want my prints to look and it’s very easy for me to accomplish my goals with other (non-silver) materials. I see no need to discount new technologies when – for many photographers – they offer an expansion of their creative vocabulary. I think an overly militant “silver only” mindset can be stifling to the creative process, but I do not begrudge the practitioners of this wonderful technology the option of setting limits that are meaningful to their workflow.

[singlepic id=69 w=650]Westview Swale[/singlepic]


Who were your biggest influences in your photographic style?
This is going to seem like an incongruous mix of influences, but…. Minor White. Larry Clarke. Edward Weston. Arno Maggs. Deborah Samuel. Share Corsaut. Miroslav Tichý, Joseph Bryson, Cindy Sherman, April Hickox and numerous friends and acquaintances. I’ve found that many times I’m deeply struck by lone images I encounter, made by people I never encountered before and whose work may be of the most casual sort. Sometimes the simplest candid snapshot reveals more to me than the most carefully planned image might. However, I have recently discovered Gregory Crewdson and find his work very compelling too.

[singlepic id=58 w=650]Access Road[/singlepic]


What is the image that you’re most proud of, that you keep coming back to?
I find that difficult to answer, honestly. My emotional response to individual pieces changes from day to day – month to month. I see my work through the lens of shifting goals and unsettled process. I used to think that it was important to arrive at a clearly defined goal before you set out to start a body of work, but for me, that imposes limitations that I’m not comfortable with. I think it’s more valuable to explore possibilities unencumbered by “goal” and “intent” and discover the connections between certain pieces through editing and selecting a body of work. Sometimes you can’t see what you’ve been doing until you’ve completed it.

However, recent pieces I’ve done with extended sensitivity films (infrared emulsions) have become very meaningful to me, partly because there is a nostalgic component to working in this style – I shot 35mm Kodak HIE a lot back in the 1980s and enjoyed it immensely for its altered tonality and spooky feel.

[singlepic id=66 w=650]North Riverbed[/singlepic]


I’m finding recent panoramic landscapes done on Rollei Infrared 120 roll film very appealing, with their gently skewed horizons and peculiar tonality. Last fall I did a piece I titled “Glowtree”, which has a strong graphic quality that appeals to me.

[singlepic id=62 w=650]Glowtree[/singlepic]


How do you best deal with creative impediments, such as feeling “blocked” or uninspired to shoot?
I think inspiration comes from doing – its not something that leaps out of your subconscious to set your imagination alight, its something you conjure by taking action. The act of picking up a camera and starting the process often leads to discovery, and discovery – for me – fuels inspiration. Photography is a discovery-based craft, I think.

The photo that brought my attention to your work was, “Walking the Dead”, which appears to be a handheld self portrait. Further, it appears that you’ve done several of these handheld self portraits. I find “Clipper Paul” to be a particularly excellent insight into your context with the landscape you photograph. Can you talk about what led you to try these handheld self portraits and how your experimentation with them has evolved?
[singlepic id=65 w=250 float=right][/singlepic]This started with a series of tests done with a recently acquired camera, the Nopo 6×6 pinhole camera, made in Spain from Walnut, Cherry and other woods. The first test roll produced this image was “Mask of Leaves” (Right)

And from there, I went on to produce the second one of similar intent; “Walking The Dead” (top of article, right), which you referred to. I’ve since decided that this camera is going to be dedicated to pursuing more portraits in this style, but turning more towards creating characters to investigate my state of mind from day to day. (I am thinking this is going to take the form of Totem Animals from the dark brambles of my subconscious! This is where Cindy Sherman is likely to speak to me) I’m thinking of this camera not so much as a camera in the standard sense, but more as a kind of one-eyed diagnostic tool – like a light sensitive divining rod.

It can be very liberating to stop thinking of your tools as defined by their names and titles, and let them take on different roles. I think many pinhole photographers do this to some extent. I mean, its exciting to transform an old cookie tin into a camera that you can use to produce viable, exciting imagery.[singlepic id=70 w=250 float=right][/singlepic]I’m quite pleased with my Big Cookie Tin pinhole image I produced for World Pinhole Day this year (April 26, 2015) (right). I originally made this camera for making Solargraphs. (I did make one four-month exposure during the winter) For WPD I loaded it with an 8X10 sheet of Ilford Delta 100, which was the first time I’ve worked with film that size! (Expensive stuff, at $4.50 a sheet) I had to sit for 29 minutes to get that exposure, and I am very pleased to find that Delta has excellent latitude, which helped compensate for the fact that the film plane varied in distance from the pinhole. I’m excited to use the old Cookie Tin 8X10 with Ilford’s Delta 100 again soon.

I should mention that a significant part of the enjoyment for me is making the camera. I have some excellent cameras made by skilled people (my Clipper 3D printed camera, and my 6X17 Vermeer by Cezary Bartczak are both excellent cameras), and I’m very pleased to work with my home-printed copy of Todd Schlemmer’s Pinh5ad 4×5 camera but my Zero Image cameras get used less and less often, because in a way they are less personal and certainly less quirky than some of my other cameras. For me, the Zero Image was a great starter pinhole camera when I bought it in 2012, but I soon felt the desire to make odd cameras to my own specifications. (I think Miroslav Tichý was guiding my hands at that point!)

The Zero Image cameras (and the Nopo and the Ondu, etc.) are excellent devices, and the fact that there are so many clever designers making them in recent years is very encouraging and suggests that film photography has entered a kind of renaissance period. It seems that it was inevitable that it would reach this point. If you look at the history of photographic techniques and materials, its been a cycle of new technology replacing older materials, and eventually the obscure, older technology is discovered by a new generation of artists and it explodes into a wave of renewed enthusiasm. I see plenty of young photographers who were “born digital” discovering silver-based photography and they are experiencing it not as I am – as someone returning to familiar territory – but as newborns discovering a strange and magic realm for the first time, and for them, its pure alchemical magic. Thats a very exciting shift to see happening. It makes me very hopeful that film technology will be around for a long, long time.

[singlepic id=59 w=650]Clipper Paul [/singlepic]


You have two images, “Fireflies” and “Judy Goes Walking”, for which your experimentation takes a a slightly different direction. Can you talk about your process for these images?
[singlepic id=61 w=450 float=right][/singlepic]The “Fireflies” (right) panorama is a proof of concept piece that predates the piece titled “Judy Walking” (below). “Fireflies” was shot using my Clipper 6X17 panoramic curved-plane camera designed and 3D-printed by Clint O’Connor (pinholeprinted.com). Exposing for about 15 minutes at dusk, I experimented with a Vivitar flash unit, aiming it at the camera from about 15 feet and firing it manually, then moving my position and repeating the process. The idea was to determine to what degree the flash would make a usable exposure, and what kind of mark it would leave.

From there, I moved to my Zero Image 4X5 pinhole camera to expand on the idea. In making “Judy Walking”, I first exposed the riverbed scene at dusk for about ten minutes using the pinhole “lens”, then closed the dark slide on the film holder, removed the film holder, switched the “lens” to the Zone Plate, replaced the film holder and made a new exposure after dark.[singlepic id=64 w=400 float=right][/singlepic] The “figures” in the image are an empty translucent dish detergent bottle illuminated by multiple firings of the flash unit. The Zone Plate lends the glowing quality to the image.

Thematically, “Judy Walking” is a re-envisioning of a photo I made in the mid-1980s in art college. It is talking about how we anthropomorphize manufactured objects – specifically addressing my memories of a dressmakers form – called a “Judy” – my Mother used for her clothing alteration jobs when I was a child. This piece also reflects my appreciation for the locomotion studies of Edward Muybridge and superficially, it echoes the aesthetic quality of some of his wonderful work.


Many thanks to Paul for subjecting himself to the ƒ/D interview process! Got more questions for him? Feel free to put them in the comments below. If you’d like to stay tuned to Paul’s ongoing work, he can be found on Twitter, Flickr and his personal blog.


Get Inspired – Whitby Abbey

Today’s featured pinhole photo is rather awe inspiring.

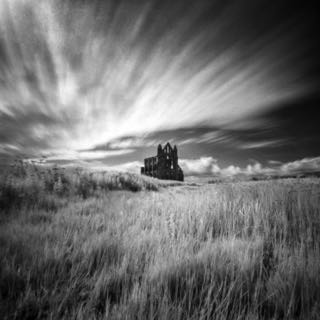
Whitby Abbey
[singlepic id=86 w=600]Whitby Abbey, Zero Image 2000, Rollie IR 400, ©Alastair Ross 2015[/singlepic]

Alastair Ross produced this wonderful image using his Zero Image 2000 loaded with Infrared (IR) film. IR pinhole is a very powerful combination, especially for subject matter such as this. The feelings of movement, and a broody darkened sky, bring about a sense of foreboding around a house of God. Quite the delightful composition, I’d say!

You can find more of Alastair’s work on his blog, Facebook, Twitter, Google Plus, or Flickr.