For those of us not endowed with fine builder skills, converting an existing camera into a pinhole camera is one of the surest ways to get yourself a reliable rig for shooting pinhole. In addition to taking care of the camera housing for you, a camera conversion can add other advantages such as reliable film transport, a viewfinder, and built-in tripod adaptor. In this article, I’ll cover how to convert a Holga camera into a pinhole camera.
Holga made a couple different pinhole variants of their popular camera, so why would I convert a lens-based one into a pinhole version? I had several of them sitting around, and I didn’t care for the particular vignetting on this one, so I decided to rip it apart and document the process for you. Some of what I’m going to cover here can be applied to any camera conversion.
[singlepic id=365 w=200 float=left][/singlepic]Start by removing the two screws – one above the square and one below – and the entire front of the camera will come off. That’s all it takes to remove the lens and shutter housing on the Holga! With other cameras it’s not as common to be able to remove the whole housing with just a couple screws. Evaluate the camera construction to see how to remove the lens.
[singlepic id=362 w=200 float=left][/singlepic]With the lens and shutter housing removed, you have access to the most important part of this build on the Pinholga. For other camera types, this is where your most important decisions come into play. Will you use the lens housing at all? If so, you need to figure out how to remove the glass. Will you ditch the lens housing and just use the shutter? Then you’ll need to mount the pinhole with room for shutter action. Or you can ditch the whole lens and shutter housing and mount the pinhole straight to the camera body. But doing that will mean you have to figure out an alternate shutter – not difficult, but a consideration all the same.
[singlepic id=363 w=100 float=left][/singlepic]For the Pinholga, I’ll be ditching the lens, but keeping the shutter mechanism. To get rid of the Holga lens, it’s as easy as unscrewing it enough that it pops off. You’ll unscrew it (focus towards infinity) till you feel it stop – then turn it some more. With the lens out of the picture, you can reassemble just the shutter and housing and mount it back to the camera. You’ll find that the aperture gives plenty of room for the pinhole.
[singlepic id=366 w=200 float=left][/singlepic]On the Holga, the lens focus was stopped by a peg, basically to keep you from unscrewing the lens every time you focus on infinity. But it’s not conducive to pinhole – it’ll be in your field of view, and it’s a light leak. My solution: chop it off with the Dremel tool. But you can use anything that can slice through plastic. Just get rid of it.
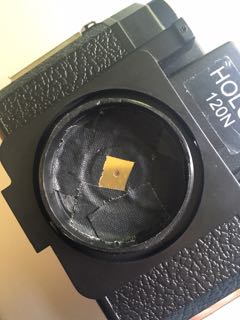
[singlepic id=364 w=200 float=left][/singlepic]For the pinhole, I had a couple options. One option was to use some laser drilled pinholes I had from eBay. Another option was a pinhole ordered from RealitySoSubtle. I decided to go with the RealitySoSubtle pinhole largely because it comes premounted on a disk that makes it much easier to mount nice and flat. If you’re working on a different camera conversion, consider what will mount easiest and how you’ll secure it nice and flat – the photo quality will turn out much higher with a flat pinhole.
[singlepic id=367 w=200 float=left][/singlepic]Gaffer’s tape – I could write poetry about gaffer’s tape. If you don’t have any, buy a lot. You’ll use it for years. It’s great because it doesn’t leave residue, but is strong as duct tape. Here you can see that’s what I’ve used to secure the pinhole.
[singlepic id=368 w=200 float=left][/singlepic]Once your pinhole is on there, you’re basically done. But if you’re looking for extras – you can buy a gross of bullseye levels on the cheap from eBay, and it can be perfectly secured with a healthy dollop of epoxy. One addition that I consider a must-have for the Pinholga – if you keep the shutter in tact – is to use the cable release adaptor.
Finally, a bonus feature of the Pinholga: a 46mm filter will screw right into the plastic adaptor that the (now discarded) lens used to attach to. Hello B&W filters!
That’s it – the relatively simple Pinholga build! Once you have the materials assembled, I’ll bet you can get it done in under an hour. Happy pinholing!

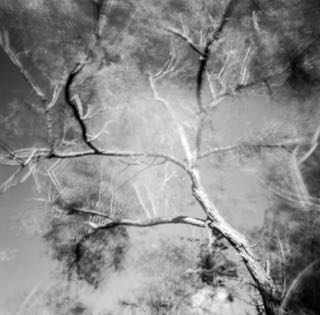
 We added a healthy bunch to our collection of favorite inspiring pinhole photos. I’m happy to say that the quality of pinhole photos being produced today is, on the whole, elevating quite a bit. I’m inspired every day by your creativity!
 We revisited the topic of smartphone apps for pinhole photography, noting some new features and a new player in the market.
 We interviewed the magnificent Jana Obscura and learned about her unique perspectives in pinhole and pinhole community.
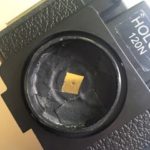 We covered the conversion of a Holga camera into a pinhole camera, demonstrating some of the techniques that are useful for other camera conversions as well.