Category Archives: Articles

Your Best Work is Yet to Come

When I started pinhole, you could say it was a reaction to everything else going on in my photographic life. I had been building a commercial photography practice and was doing well in digital photography. That was, until the great recession swallowed my practice in what felt like an instant.

As 2008 came to a close, I had a heap of ashes that had for years been one of my deepest passions. Life had put me in a position where I could do nothing but self reflect on what went right and what went oh so wrong. I quickly realized that I had developed an obsession with pixel perfection. I was in desperate need of an antidote. I knew “everything” about the mechanics of photography – ratios, numbers, formulas – but was losing perspective on the importance of photography.

I’m not sure I shot a single photo in 2009 or 2010. I didn’t even own a DSLR. But in 2011 I dug out some old pinhole cameras that I had just started to play with years before. My incredible wife and son gifted me my first Zero Image at that time as well. Having kept myself away from the art long enough, I started to pull at the old heartstring again.

One of the best ways to keep moving forward in your personal growth is to jump into things that make you a rookie again. While pinhole is photography, the “rules”, mechanisms, and aesthetics are so different from digital photography that it really is a different art. The first rolls came out so boring. Pinhole’s lack of detail quickly showed everything that was going wrong with my digital photography. For this reason, making pinhole my only photographic tool has been therapeutic in clearing out the creative blockage.

In sports, athletes often isolate a technique in order to focus on improving. For me, pinhole has acted in much the same way. By freeing myself from pixel perfection and techno features, I’ve been able to focus more on the creative side of things.

Elliott Bay at Dusk
[singlepic id=484 w=600]Shot around the time that I finally started figuring out this pinhole thing. Elliott Bay at Dusk, ©Kier Selinsky 2016[/singlepic][spacer height=”20px”]

“It is good to have an end to journey toward; but it is the journey that matters, in the end.” -Ursula K. Le Guin, The Left Hand of Darkness

Up until a month or two ago, I hadn’t shot a DSLR in years. I’m trying to bring my photography back into balance now. While I still shoot plenty of pinhole, I’m using the DSLR again. I’ve found that this time around, I’m able to see better much better. I check more angles, concern myself with light and movement more, and my ability to previsualize is greatly improved.

I won’t be dropping pinhole. Not now, not ever. It’s too important to me to have that reminder of what this art is about. That’s what ƒ/D has really been about. If pinhole is your only photographic practice and you’re happy with that, great. But for many of us, it is important to have a reminder of what’s important. Like getting out into the country for some fresh air – your soul needs this.

Work the pinhole process. Shoot a lot. Challenge your boundaries. No matter what you shot yesterday, your best work is yet to come.

12 Shots to Stretch Out

Summer is basically over, and if you’re like me, you’re damn happy for it too! Something about the steady march towards winter sets the senses alive. So let’s capitalize on the sense of invigoration.

Here at ƒ/D, we’re all about inspiring you to reach for the pinhole camera and gain perspectives you didn’t have before. In that vein, I have assembled an assignment, if you will, for pinhole newbies and vets alike: 12 shots to stretch out your creative brain! Why 12? Cause there’s 12 exposures on a 120 roll when shooting in 6×6. (As editor I reserve the right to be arbitrary haha!)

Don’t try to do all of these on one roll. Unless you hate yourself. Or you’re just so creative you make the rest of us sick. Cheers!

Handheld

Have you been using a tripod all the time? Or always setting your camera on a sturdy surface? You don’t know what you’re missing! Examples: Lena Källberg’s Decisive Movement

[singlepic id=470 w=600]Mickey Skipping Stones, ©Kier Selinsky 2016[/singlepic]

Double Exposure

Double exposures can be completely unpredictable, at least until you get a good amount of practice in. But they’re always joyful! Look for highlights in one shot to fill in the shadows of another. Examples: On Travel – Markus Kaesler

Stepped Exposure

Do you ever feel like you’re wasting an opportunity when you progress the roll one whole exposure? Sometimes, you’re right. To execute a stepped exposure, advance the film a fraction of the distance to the next frame, take another exposure, and repeat until your film indicates you’re at the next frame (don’t forget to advance to the next frame!). This technique often works well with cityscapes and other scenes with lots of lines. Example:

[singlepic id=469 w=600]City Step, ©Kier Selinsky 2016[/singlepic]

Sun flare

Sun flare is a truly unique pinhole effect. The refraction of sunlight causes a ring of light on the film that can be very flattering to some scenes if used right. To get the effect properly, get the sun off to the side, just at the edge of the frame or even just outside the frame. If you shoot the sun straight on, you’ll get a starburst, but not a flare. Example: Get Inspired – Poppies & Flare

Relative Movement

Moving the subject and camera in relation to each other can create an extremely dramatic scene. In a previous article, I described it as a way to get depth of field in your pinhole photos. And Howard Moiser has built a fine catalog of such imagery. Example: Howard Moiser – Relative Movement

Free Movement

Contrary to relative movement, free movement is where only the camera or the subject is in motion. I suppose they could be both in motion so long as they’re not moving together. In any case, the effect is lots of linear streaking. Examples: several fine examples in the May 2016 Gallery

Light painting

Light painting is a technique that is applied very often in other forms of photography. One bonus of pinhole is that it’s easier to pull off light painting during the daytime, which can bring a whole new suite of possibilities to your light painting desires. Example: Get Inspired – Pinholeshot

So Close

With a near infinite depth of field comes a remarkable ability to get up close. In addition, many pinhole cameras have a super wide angle, exaggerating the close up effect. Use this perspective to your advantage to find new ways of looking. Example:

[singlepic id=343 w=600]Smoked Ribs, ©Kier Selinsky 2016[/singlepic]

Yet so far away

Create a big sweeping landscape or seascape with that wide angle pinhole and details just wash away. It’s a great way to achieve zen like simplicity and concentrate on major shape. Example: Paul Bender’s Bear Creek Lake Park shared in Inspiration Week of 5/16

Multi-lapse

Multi-lapse is a technique I’ve written about before. See, pinhole is what many feel is a sort of time lapse format due to the long exposures. In multi-lapse, you break up the exposure into fractions. This can take an exposure where the people would normally disappear and time your fractional exposures so that people are in the same general spots every time, creating a clustering of movement instead of a disappearing act. Examples: Technique: Multi-LapseStudies in Motion – Jean-Christophe Denis

Portraiture

Portraiture is something that often gets left by the way side with pinhole. I’ll admit it’s tough – you have to ask people to stay still, and if they’re at all camera shy, they tend to really not like what a pinhole makes them look like. But there’s definitely some great room for experimentation here. Examples: photos by Bernie Vander Wal and Victor Senkov in Inspiration Week of 8/8

Your favorite lensed photo

Surely you’ve taken some lensed photos. Probably a lot of them. Take a handful of your favorite ones and see if you can recreate them with pinhole. If at first it doesn’t seem like you can, try mixing in techniques like multi-lapse and relative movement. Or try a pinhole take on the subject, bend the “rules”, and get creative! Examples: Send us yours!

[spacer height=”20px”]

Accurate Pinhole Exposure Measurement

Almost every pinhole photographer I talk to today is using a smart phone app to do their exposure measurement. There’s some holdouts who use the Sunny 16 rule. There’s the occasional pinholer who’s got a trusty Pentax Spotmeter or the latest Sekonic digital meter. But by and large, pinholers today are using smartphone apps, and so am I.

The smartphone apps are an amazing development of convenience – nobody leaves their house without their phone anymore, so it just makes sense. Getting a passable exposure is a no brainer. But we’re not here today to talk “passable” – no, today we’re going to talk about wielding this tool to create the image you’ve pre-visualized. Have you ever taken a shot where you expected a one portion of the scene to be rich in detail and tone, but what you get back from the lab in either unusably dark or completely blown out? Yep, we’re gonna fix that today!

Grab a cup of coffee or tea – this is a lengthy one

Deceptions in Smartphone Apps

The first step is to understand that while your smartphone app is amazing, if you don’t know some details, it’s lying to you. Here’s some of the ways:

  • If auto-brightness is turned on, the screen display is almost always going to be brighter than what the reading says
  • Without the spot meter enabled, it can be difficult to make decisions on the scene you want
  • Your smartphone screen has a different dynamic range than film
  • Certain screens have inherent color casts
  • Reflections off the screen can mean that problem areas of the scene aren’t noticed

Solution: Return of the Zone System

I grew up before digital, when you had to sweat it out in a darkroom for hours trying to rescue a bad exposure. While film was cheap, time wasn’t, so Ansel Adams’s Zone System was a great shorthand in that day. Lately, a lot of photographers eschew the Zone system referring to it as antiquated – in many situations, they’re right. The light meters these days are better, film and digital latitudes are longer, and if you’re shooting digital, you can “chimp” the histo till you’ve got the exposure.

But of course there’s no light meter in our pinhole cameras. And the apps have the shortcomings noted above. So once again, the Zone System becomes a useful shorthand to ensuring you have the exposure you want.

What I’m going to describe here is what I call a “loose” Zone System. Why “loose”? Because the Zone System should be used with a spot meter, and that “spot meter” on your phone isn’t a true 1º spot meter – the iPhone is more like a 10º spot, maybe even 15º. This means that when you read areas for a Zone, you’re going to be reading more than you might want to be. So Zone System purists I apologize, but everything relies on that bigger swath of metering.

What is the Zone System?
If you’re not familiar with the Zone System, I’m not going to do a full write up here – plenty others have done that job extremely well already. Here’s a very very brief shorthand:

  • There’s 10 zones, or distinct exposure levels, in print latitude. Zones correlate to stops in exposure
  • Zone 0 is pure black
  • Zone III is the lowest shadow value with detail
  • Zone V is “middle gray”, what your light meter reads, and what you expose at
  • Zone VI is typical caucasian or asian skin, while Zone V is typical African American skin, and darker skin types can be as low as III
  • Zone VII is the typical highlight value with detail – but if you know what you’re doing, you can get detail in IX or X
  • Zone X is pure white

Want to learn more? The rabbit hole is deep – here’s a good primer: Norman Koren Simplified Zone System

Applying the Zone System with a Smartphone App

As I alluded above, typically the Zone System calls for a 1º spot, but a smartphone has a 10º or 15º spot. Traditionally you use the 1º spot meter so that when you read a portion of your scene, you’re just getting that Zone of exposure. Since smartphone apps have such a large “spot”, we need to slightly adjust how we use the Zone System to get the exposure we want.

So here’s my process to get loose on this concept and still get the details I want:

  1. Determine the composition of the scene
  2. Open my smartphone app and turn on the spot meter setting
  3. Meter every area of the scene that you want detail in, writing down the EV values
  4. Mark the lowest EV value you read as Zone III
  5. Add 2 to the EV value in step 4 and that is my Zone V
  6. Add 4 to the EV value in step 4 and that is my Zone VII

Now that you have your scene “mapped” by zones, you can evaluate the exposure. If based on the above you have the shadow and highlight details you want, and your mid ranges are right, then you can expose for the reading at Zone V. However if your shadows will be too light or your detailed highlight above Zone VII, you might want to reduce the Zone V exposure by one or more stops before shooting that reading. Alternatively, if your shadows are too dark or highlights will be on Zone V, you may want to expose your Zone V reading longer. Remember when making these adjustments: 1 zone = 1 stop of exposure!

Zone system purists would tell you to get your smartphone closer to try and get more detailed reading on the shadow and highlight detail areas. For lens based photography I would agree, however for pinhole I feel that the larger sensing area of the smartphone app “spot” is appropriate due to the reduced detail available in pinhole photos.

Real World Example 1

If this your first foray into Zone System photography, the above was probably confusing to you. The following example may shed some needed light on the process.

Near my office I wanted to take a photo of some old smoke stacks. I’ve photographed them before, but they’ve always come out boring. Today was a windy day, so I thought I’d take a stab at using the wind-whipped branches blurred in the foreground to add some drama. I’ll know in a few weeks if it worked. In the meantime…

I approached the scene knowing my framing and wanting to see the range of values. I got the lowest value in the base area of the tree. I got mid values in the upper area of the tree. I got high values in the sunny mid-day sky. Here’s my readings:

[bscolumns class=”one_third”][singlepic id=441 w=200][/bscolumns][bscolumns class=”one_third”][singlepic id=442 w=200][/bscolumns][bscolumns class=”one_third_last”][singlepic id=443 w=200][/bscolumns][bscolumns class=”clear”][/bscolumns]

Note that these readings line up almost perfectly to my process:

  • Zone III: EV 13
  • Zone V: EV 15 1/3
  • Zone VII: EV 17 1/3

Also note that if I weren’t using Zones and just relying on the full screen or even on a single reading:

  • The sky would have been blown out in the EV 13 example
  • The smoke stacks and foliage would have been darker than I wanted in the EV 17 1/3 example

Ultimately I made a 1 second exposure for the photo. Since everything was going to be in motion, I was OK with losing a smidge of shadow detail, but I could gain some better cloud streaks.

Real World Example 2

I know you’re thinking that that example was just too damn convenient, because of the way the zones lined up just right. Honestly, they often do in outdoor scenes, but in this example let’s look at how zones help us when things aren’t just right.

In this indoor scene, I want to capture some details of the radiator and wall inside the stairwell as well as some of the clouds streaking by outside. When I look at the scene through my phone, it looks like it should be possible, but lets see how some of the reading stack up:

[bscolumns class=”one_fourth”][singlepic id=444 w=150][/bscolumns][bscolumns class=”one_fourth”][singlepic id=445 w=150][/bscolumns][bscolumns class=”one_fourth”][singlepic id=446 w=150][/bscolumns][bscolumns class=”one_fourth_last”][singlepic id=447 w=150][/bscolumns][bscolumns class=”clear”][/bscolumns]

If I map this the way I did in example 1, then I’d get:

  • Zone III: EV 7 1/3
  • Zone V: EV 10 1/3
  • Zone VII: EV 12
  • Zone X: EV 15 1/3

Hmm… that might not quite be the exposure I was hoping for, because I do want the clouds to streak by some, but putting the upper window are on Zone X would probably blow them out. Then again, if I put the upper window on Zone VII, that will knock the radiator down to Zone 0. A creative decision needs to be made here – the important thing to take away is that without understanding how to map these readings to Zones, my creative decision would just be a guess.

Closing Notes

I hope this walkthrough helps your creative journey. Once you understand how to apply the zones to your pinhole photography, you’ll be able to get more full rolls of “winners” and reduce your reliance on luck. My single biggest piece of advice is this: Take detailed notes! Even if you don’t use the Zone System to drive your exposure decisions, a few notes about different EV readings in the scene will help you review later what went right or wrong with the exposure decision. I keep a notebook in my back pocket constantly just for this purpose.

[singlepic id=448 w=300 float=center]My exposure notebook,
rides in my back pocket every damn day[/singlepic]

[spacer height=”20px”]

Pinhole Infrared by Delio Ansovini

Over a year ago we presented a fantastic guest article by Delio Ansovini covering the important aspects of camera geometry in pre-visualization of your pinhole photos. Today we are rejoined by Delio as he walks us through his IR process.

IR, or Infrared, is one of the more dramatic techniques available in film. Rather than exposing on the visible light spectrum that we see, Infrared film is exposed by the invisible Infrared waves that have just a bit longer wavelength than we can see. More importantly, to our purposes, the aesthetic of IR is dramatic because of the way that certain materials reflect more IR than others.

Shooting IR with a normal camera is a challenge, doubly so with a pinhole camera. The wavelength properties of pinhole, the film handling of IR, and reciprocity failure all combine to make a unique problem set. Below, Delio has put together his notes on learning IR pinhole. We hope this helps you on your journey to IR pinhole greatness!

On B/W Infrared Photography with 4×5 pinhole cameras

By Delio Ansovini

I started experimenting with infrared films using a pinhole camera in 2012 with a lens-less 6×9 Ikonta. It came out as an f316 with the R72 filter taped on to the mechanical shutter, all in front of the pinhole plate. Certainly it was awkward but…a functional arrangement. The Efke 820 was still ready available in the local stores so I made it my choice for infrared work.

There followed a couple of weeks of shooting around the local parks, all in the mid-daysun; high winds pushed the white clouds high in the sky across the frame creating very blurred streaked photographs. The poignant images were published in Blur Magazine in 2012.

Encouraged by how successfully they turned out, I ventured into the 4×5 format thinking that: aside from the much extended exposure time, there was not much difference in infrared photography between using a pinhole or a camera with a lens. What blessed ignorance; but here is the story one step at a time.

The film speed and exposure

It’s difficult to pinpoint an ISO rating for IR film because the ratio of infrared to visible light varies greatly from scene to scene and of course we can’t judge the difference since we can’t see IR reflections (IR frequencies are out of range for our eyes); nor can your off-the-shelf light meter help since it is calibrated for visible light.

Other factors affecting speed are the type of filter, the developer being used, and how you process the film. Some broad assumptions and decisions had to be made to eliminate the multitude of variables. Here’s my quick guide on how I initially approached the issues (since then revised):

  • I assumed that the sensitivity to visible light of the Efke IR820 was ISO100,
  • I used only the R72 filter and I assumed that factor was 5 stops.
  • I set the light-meter (L358) to ISO3, the lowest setting available. That is 5 stops from ISO100 using incident readings
  • I limited the pinhole 4×5 cameras to be used to the f175 and f250 only.
  • I used incident light readings at f22 and converted the exposure time from f22 to the pinhole camera f# using the following factors:
    • for f175 multiply the f22 exposure time by 63.3
    • for f250 multiply the f22 exposure time by 129.1
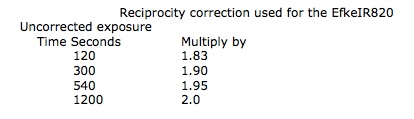
  • Add the reciprocity correction as in the following table.

recip correction efke


Development process

With the exposure method as established above, the first few 4×5 exposures were developed in a Unicolor tank using the Kodak Tmax Developer, 1+4 for 7minutes, all at 20C, in a continuous reversing agitation mode. I used 2 baths of water as stop wash for 3 minutes in total; fixed in Kodak Fixer for 10 minutes; washed for 20 min and hung to dry for 2 hours.

The results or lack of them

The negatives were underexposed; furthermore I noticed serious IR seepage through the camera’s felt gasket on both cameras and film holders dark slide when the camera was positioned in full sun for the required exposure.

I also felt that the TMax developer had no compensating properties at all, in fact rather useless for the application!

In short: neither my 4×5 cameras made in wood and Gator foam board, nor the old 4×5 dark slide in the aging film holders were infrared-proof. The relatively aggressive Tmax developer did not help either.

The fixes

The following procedural changes were implemented with good results with the 4×5 Efke IR820 film and the unmodified existing cameras and film holders.

  • Wearing latex gloves to handle the IR film for loading in full darkness, my fingerprints somehow became visible on the developed negatives if I did not use gloves.
  • Carry 3 film holders in an aluminum foil covered black plastic envelope. I used a recycled 8×10 film black plastic pouch, lined on the exterior with aluminum foil and double-sided sticky tape.
  • Load the film holder onto the camera in the shade and wrap the aluminum shield around the 3 sides of the camera covering the felt edge. Making sure the shutter is closed and locked in place, remove the blind slide and cover the top of the film holder with the shield.
  • Position the camera on the tripod in the sun for the shot.

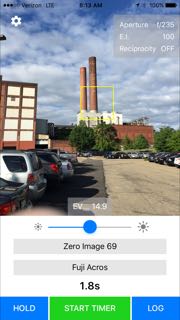
Calculate the exposure as before but rating the film as follows:

corrections2


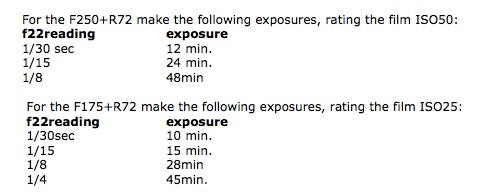
• Open the shutter for the timed exposure.

Revised development process

Blown-out highlights are not my favorite attribute in a photograph, so I tried what I know works well with panchromatic films. My notes on the revised process read:

Film used: 4×5 Efke 820IR rated ISO25, f175, Filter R72, Exposure 15 minutes.
Film development: AdoxAPH09 1+100 for 15min In Rotary tank, continuous reversing; water wash 3 min; fixing 10 min.

The results after the fixes

All much better, no blow-out of the highlights, no elaborate PS editing with curves or masking, therefore I was quite happy.
However; the aluminum foil wrapping of the camera sitting on a tripod for 20 minutes or so did generate some amusing conversation with the curious (or alarmed?) passersby.
For that I devised a wooden back cover lined with foil, as shown in the photo. It is classier…

[singlepic id=415 w=600] [/singlepic]

Illustration legend:
1. The f250 back with the aluminum lining of the back cover
2. The back cover mounted on the camera
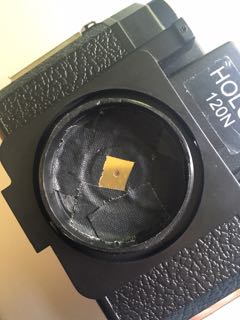
3. The camera front with the shutter (aluminum foil is lining the inside of the cap)
4. The R72 filter mounted in the camera inside. One of the three tabs is rotating so that the filter can be removed and the camera used with normal Pan film

Good things don’t last very long

First they discontinued the 4×5 Efke 820IR film, and then some chemist decided to change the formulation of the Adox APH09 so that what I used to dilute 1:100 I now have to dilute 1:40.

And yet I do sympathize with the individual in the German laboratory. I use only 120cc of APH09 working solution to develop 4-4×5 negatives. At 1:100 dilution it means 24 drops of APH09 concentrate from the 500cc bottle available. However; the compensating characteristics of the APH09 previous version are no longer there.

Fortunately we can be resourceful

Just a few weeks ago, I decided to revive two chemicals that I stored in glass jars- one is Sodium sulfite and the other is Metol. I purchased some distilled water and that’s all I needed to make the old D23 and, try it on a new Maco IR 820c.

New? Not quite, just new on eBay and available at a reasonable price. I did find this link to the film datasheet useful; in fact, I wish I had come across it earlier, although I enjoy the experimentation process.
http://www.maco-photo.de/files/images/MACO_TA820c_ENG.pdf

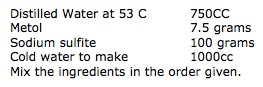
In reference to the making of the D23

It’s easy, even I can do it; and very economical. As far as I know there is only one formula for making this developer, the one listed in Ansel Adams’s book “The Negative”.

D23

Both chemicals can be purchased in powder form from Photographer’s Formulary, or as prepared solutions from B&H and others.

Well, the results of these two last process changes are shown in the photographs accompanying this article, and the details for each photograph are listed in my usual cryptic fashion. At least now you know what’s behind all the puzzling verbiage.

A warning to all that intend to use the data in this article: it works for me but it may be quite different for you. The major difference is in the agitation of my rotating developing tank which is quite unusual and energetic and cannot be controlled. At least the developing times, contrast and sharpness all reflect that.

In reviewing my writing along with the data published on the MACO IR820c data sheet referenced above, I become aware of a great discrepancy in the reciprocity factor to be used. This subjects maybe something to look into closer.
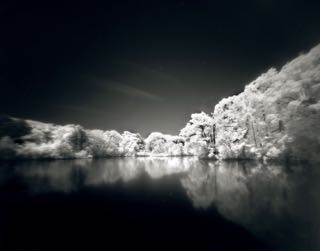
IR Sample Images

[singlepic id=422 w=600]The Midle of the Swamp, ©Delio Ansovini[/singlepic]


[singlepic id=418 w=600]The Ducks Pond, ©Delio Ansovini[/singlepic]


[singlepic id=417 w=600]Seat in the sun, ©Delio Ansovini[/singlepic]


[singlepic id=419 w=600]The Dunes, ©Delio Ansovini[/singlepic]


[singlepic id=421 w=600]The Rivulet, ©Delio Ansovini[/singlepic]


[singlepic id=420 w=600]The House on Fire, ©Delio Ansovini[/singlepic]


[singlepic id=416 w=600]Casa Loma Stables, ©Delio Ansovini[/singlepic]


Data for the photos presented

The swamp
The Duck Pond
Seat in the sun
The dunes
The rivulet

4×5 Pinhole
f175, L=35mm, Photo location: H. Park, Ontario
Date: June 2016
Film used: MACOPHOT-IR820c
Rated ISO 25 Exposure: 30 minutes
Filter.R72; Lighting: None;
Negative development: D23 1:1 for 11min In a Unicolor Rotary tank, continuous reversing agitation; no water wash; Neg. scanned 1200 dpi, RGB, spotted, duotone; framed to size.
——————————————-
The house on fire
Casa Loma

4×5 Pinhole
F250, L=50mm, Photo location: Casa Loma, Ontario
Date July 2016
Film used: MACOPHOT-IR820c
Rated ISO50, Exposure: 24minutes
Filter.R72; Lighting: None;
Negative development: D23 1:1 for 11min In a Unicolor Rotary tank, continuous reversing agitation; no water wash; Neg. scanned 1200 dpi, RGB, spotted, duotone; framed to size.

20 Questions About Pinhole

Here at ƒ/D, we’re all pinhole, all the time. Looking back at our posts, we’ve recognized that everything we say expects a certain level of understanding. So in an effort to help along those who are just getting interested in pinhole, we wanted to take a moment to address some of those burning questions that might seem like big obstacles to getting started. Have additional questions? Ask them in the comments. Or if you have a hurdle to pinholing that you overcame and would like to share – add those to the comments as well! It’s all about helping the next “generation” (whatever age they may be) of pinholers.

So here we go: 20 Beginner’s Questions About Pinhole

1. How does pinhole work?
Pinhole photography takes advantage of the fact that all light travels in a straight line. There’s a teeny tiny pinhole that only allows a projection of one very small beam of light from the scene you are photographing to hit the film or sensor plane. So with pinhole, you’re using all those beams of light to comprise the image.

2. Does it have to be film?
Nope – it can be film, photographic paper, a digital camera (a DSLR with a pinhole body cap), Polaroid (or instant) film, or alternative photography sensitized materials (such as cyanotype or wet plate). The pinhole just needs to project on something light sensitive for the capture of the image. However, film or paper are the easiest ways to start your pinhole adventure.

[bscolumns class=”one_third”][singlepic id=228 w=150]Mickey on the Merry Go Round, ©Kier Selinsky (Polaroid)[/singlepic][/bscolumns][bscolumns class=”one_third”][singlepic id=314 w=200]Still From a Dream, ©Steven Dempsey (DSLR)[/singlepic][/bscolumns][bscolumns class=”one_third_last”][singlepic id=121 w=200]Under the Trees, ©Marko Umicevic (Paper Negative)[/singlepic][/bscolumns][bscolumns class=”clear”][/bscolumns]


3. What kind of film can be used?
Any kind – 35mm, 120, 220, large format, black and white or color or even IR – so long as it works with your camera, it’ll work for pinhole.

4. Where do I buy film?
Lots of places online such as Amazon (usually more expensive), B&H, and Freestyle Photographic. Film is still widely used!

5. What is reciprocity failure and does it apply to pinhole?
It’s easiest to explain reciprocity failure in relation to normal film performance. Normally, when exposing films, the exposure progresses in a linear fashion, meaning that as you double the exposure time, you double the exposure (brightness) of the image on the film. It’s a reciprocal relationship. Reciprocity failure is when that reciprocal relationship breaks down and doubling the exposure time no longer doubles the exposure. When this happens, you have a correction factor to apply to get the desired exposure level. Reciprocity failure definitely comes into play when shooting pinhole because of the longer exposure times. Don’t worry! There are very cheap tools to help deal with this – see the question on figuring out exposure below. Note: reciprocity failure is why many pinhole photographers use Fuji Acros 100 – it has no reciprocity failure up until 2 minutes of exposure, covering a great many exposure situations without failure compensation.

6. Do I have to have a darkroom?
Nope! Most of us don’t. If you do have one, great! You have more options. Otherwise, this brings us to the next question…

7. Where can I get my film or paper developed and scanned? Is this like a disposable camera?
Film can be developed at home or sent to a lab. It’s worth doing a little Google to see if there’s a film lab in your area – it’s not as uncommon as you might think. If you go local, try to find a pro photo lab, not a drug store, as pro labs will have better scanning services. Another option is mail order labs, such as Richard Photo Lab, Little Film Lab, Indie Film Lab, The Darkroom, and North Coast Photo. If you don’t have a film scanner, have the lab scan your film at the time of development for the most cost effective turnaround. I also recommend getting the highest resolution scan for the whole roll right off the bat. Scanning the whole roll at the highest resolution at development time will usually save you money and time over sending the film back later for a rescan at a higher resolution.

Paper will need to be developed in a dark room. Note that I didn’t say a darkroom – rather, a dark room. It can be a real darkroom if you have access to one. What I do is set up trays in my bathtub, and hang light tight cloth over the door and window, put in a safelight, and I’m ready to process my paper negatives.

In the end though, this is not like a disposable camera where you send the whole thing in to a lab. Whatever film format you use, if you use film, you’ll only be getting the film processed.

8. What gear is required?
A camera and the film or other light sensitive material to go in it. That’s all that’s really required. Also, “camera” in this case can literally just be a shoebox with a pinhole – it doesn’t need to be fancy. Some prefer that it’s not!

9. Do I have to use a tripod?
Only if you want the camera to be steadied and above the ground and other platforms. Otherwise you can handhold it for a cool shaky effect or just set it on the ground or other surface.

10. Do I have to build a camera? How dark does the box need to be?
You don’t have to build a camera – they can be purchased as well. Some of our fave vendors for built cameras are Zero Image, Ondu, NOPO, and RealitySoSubtle. This list is not exhaustive, and there are plenty of boutique makers as well as some “big boys” – the point is, you have options. You could even just buy a pinhole body cap for your DSLR – certainly the cheapest DSLR “lens” you’ll ever buy! If you do build one, it needs to be absolutely light tight to avoid light leaks streaking your film or paper. Do you have access to a 3D Printer? You could just print a camera!

11. Are there lenses for pinhole photography? What if I want to zoom in?
There are 3 ways you can zoom in pinhole:

  1. Build a camera with bellows (or use a large format camera with bellows). Be sure to change the pinhole diameter for different focal lengths.
  2. Build or buy a system like the Zero Image 4×5 with multiple focal length frames that can be applied
  3. Use the “foot zoom” – as in use your feet to walk closer 🙂

12. Can I pinhole without a pinhole camera?
Actually you can! By creating a whole room “pinhole camera”, you can project the outside world in a relatively light tight room, and capture the image with a DSLR. Here’s some Google Image search results to inspire what’s possible.

13. How do you figure out the exposure?
When you get a camera, you’re provided with the ƒ number. Alternatively if you build a camera, you can use a pinhole calculator to find out your ƒ number. The ƒ number is your aperture, and for pinhole they’re typically in the ƒ/100 to ƒ/300 range. Once you have that ƒ number, theres a few ways to calculate exposure:

  1. Easiest: use a smartphone app
  2. Printed: make a conversion chart so that you can meter a scene with your regular camera and convert the exposure time from that to your pinhole camera’s needs
  3. Sunny 16: for the minimalist route, use the “sunny 16” rule and a printed conversion chart to figure your exposures. By learning through experimentation and leveraging film latitude, you can achieve very useable exposures. PhotographyTalk.com has a great write up on how to use the technique.

14. How difficult is it to get an acceptable image?
It’s deceivingly easy. The hard(er) part is learning the unique properties of pinhole and wielding them effectively to make remarkable images. That being said, plenty of photographers get some real zingers from their first roll.

15. Why are some pinhole photos very unusable and blurry, while others are quite sharp?
There’s a few factors involved here. The first is the quality of the pinhole itself. Many people make their own pinholes using a pin to drill through a piece of an aluminum can. While many people are successful with this, the less round that hole is, the more it will distort the image; instead of perfect circles of light making the image, it will be some other shape. Other pinholers (myself included) buy laser drilled or chemically etched pinholes because they are perfectly round. Another factor is how steady the camera was during the exposure – some people have sturdy tripods, while others handhold the camera to create blur and shake. Finally, the pinhole being used might not be the ideal size for the focal length – if it’s too big, the images will be very “soft” and can be perceived as blurry. But again, some people like that and use it very effectively.

16. What types of subjects work well for pinhole?
That depends on your imagination. Anything can be shot well with pinhole, it’s about utilizing the properties of the camera and the long exposure to create the effect you want. Our featured artists give some great examples of the medium’s capabilities. It’s easiest to start with scenes that mix subjects in motion with other elements that stay still (moving clouds over a landscape is a great learning tool). Another great starter recipe is utilizing a super wide angle pinhole camera on super close ups (think inches away) for new and interesting perspectives.

17. Why are some people so focused on pinhole photography?
I can’t speak for all, but I can paint some broad strokes. Some photographers focus only on pinhole because the aesthetic matches their vision. Others like it because the very limited complexity and controls can be liberating in today’s pixel perfect DSLR world. Personally, I enjoy pinhole because it helps me see differently, and the long exposures help me be more mindful of the shot I’m taking.

18. How do some pinhole photos get such extreme wide angles?
Since pinhole has near infinite depth of field, this means that you can get the film plane very close to the pinhole. The closer it is, the wider that angle will be. Since we’re freed from the constraints of having to figure out the complex math in lens creation, you can just try building a camera with a super short focal length and see what you get! Scott Speck is a master of super wide angle.

19. How do some pinhole photos seem warped?
Some pinhole cameras, such as the Pinhole Blender, wrap the film around a curved object inside the camera. Other folks will use paper negatives and crumple the paper in a bowl shape and stuff that into the camera. Some camera, particularly super wide format like 6×12, will have a concave curve to the film plane to try and reduce warp while other 6×12’s will have a flat film plane to accentuate the edge distortion. The near infinite depth of field of pinhole allows camera makers and pinholers to experiment with film plane shapes and angles to come up with some very cool combinations.

20. Why do people disappear in some longer exposures?
Let’s imagine a photo that requires 6 or 7 minutes for the exposure. The scene is filled with people. Remember that when you metered the scene at 6 or 7 minutes, that was what was required to register the objects in that scene at a normal tone (middle gray or middle color value). If a person stays still for that entire exposure, they’ll show up at a normal tone; if they stay in place for 1/2 the exposure, they’ll be half as dark; 1/4 the time, 1/4 the tone. Over the course of that 6 minute exposure, it’s likely that they’ll stay in one place for no more than 30 seconds – that’s 1/12 the time – not enough time to make a meaningful registration on the film. This is exactly what happened in my West Side Market photo – the market was packed full of people, but a 6 or 7 minute exposure erased almost all of them!

[singlepic id=27 w=600]West Side Market, ©Kier Selinsky[/singlepic]


I hope this gets some of those hard-to-ask questions out of the way so that you can start to explore pinhole photography! If you have other questions, you’re surely not the only one – put them in the comments below and I’ll answer ASAP. Cheers!


Build a Pinholga!

For those of us not endowed with fine builder skills, converting an existing camera into a pinhole camera is one of the surest ways to get yourself a reliable rig for shooting pinhole. In addition to taking care of the camera housing for you, a camera conversion can add other advantages such as reliable film transport, a viewfinder, and built-in tripod adaptor. In this article, I’ll cover how to convert a Holga camera into a pinhole camera.

Holga made a couple different pinhole variants of their popular camera, so why would I convert a lens-based one into a pinhole version? I had several of them sitting around, and I didn’t care for the particular vignetting on this one, so I decided to rip it apart and document the process for you. Some of what I’m going to cover here can be applied to any camera conversion.

[singlepic id=365 w=200 float=left][/singlepic]Start by removing the two screws – one above the square and one below – and the entire front of the camera will come off. That’s all it takes to remove the lens and shutter housing on the Holga! With other cameras it’s not as common to be able to remove the whole housing with just a couple screws. Evaluate the camera construction to see how to remove the lens.


[singlepic id=362 w=200 float=left][/singlepic]With the lens and shutter housing removed, you have access to the most important part of this build on the Pinholga. For other camera types, this is where your most important decisions come into play. Will you use the lens housing at all? If so, you need to figure out how to remove the glass. Will you ditch the lens housing and just use the shutter? Then you’ll need to mount the pinhole with room for shutter action. Or you can ditch the whole lens and shutter housing and mount the pinhole straight to the camera body. But doing that will mean you have to figure out an alternate shutter – not difficult, but a consideration all the same.


[singlepic id=363 w=100 float=left][/singlepic]For the Pinholga, I’ll be ditching the lens, but keeping the shutter mechanism. To get rid of the Holga lens, it’s as easy as unscrewing it enough that it pops off. You’ll unscrew it (focus towards infinity) till you feel it stop – then turn it some more. With the lens out of the picture, you can reassemble just the shutter and housing and mount it back to the camera. You’ll find that the aperture gives plenty of room for the pinhole.


[singlepic id=366 w=200 float=left][/singlepic]On the Holga, the lens focus was stopped by a peg, basically to keep you from unscrewing the lens every time you focus on infinity. But it’s not conducive to pinhole – it’ll be in your field of view, and it’s a light leak. My solution: chop it off with the Dremel tool. But you can use anything that can slice through plastic. Just get rid of it.


[singlepic id=364 w=200 float=left][/singlepic]For the pinhole, I had a couple options. One option was to use some laser drilled pinholes I had from eBay. Another option was a pinhole ordered from RealitySoSubtle. I decided to go with the RealitySoSubtle pinhole largely because it comes premounted on a disk that makes it much easier to mount nice and flat. If you’re working on a different camera conversion, consider what will mount easiest and how you’ll secure it nice and flat – the photo quality will turn out much higher with a flat pinhole.


[singlepic id=367 w=200 float=left][/singlepic]Gaffer’s tape – I could write poetry about gaffer’s tape. If you don’t have any, buy a lot. You’ll use it for years. It’s great because it doesn’t leave residue, but is strong as duct tape. Here you can see that’s what I’ve used to secure the pinhole.


[singlepic id=368 w=200 float=left][/singlepic]Once your pinhole is on there, you’re basically done. But if you’re looking for extras – you can buy a gross of bullseye levels on the cheap from eBay, and it can be perfectly secured with a healthy dollop of epoxy. One addition that I consider a must-have for the Pinholga – if you keep the shutter in tact – is to use the cable release adaptor.

Finally, a bonus feature of the Pinholga: a 46mm filter will screw right into the plastic adaptor that the (now discarded) lens used to attach to. Hello B&W filters!

That’s it – the relatively simple Pinholga build! Once you have the materials assembled, I’ll bet you can get it done in under an hour. Happy pinholing!


Smartphone Apps – Revisited

About this time last year we put together a piece showcasing a handful of the many apps that are available for pinholers with smartphones. So as things tend to go in cycles, we thought a year was a good time to look back and see how things may have changed.

The practice of using a smartphone as a tool to aid in your pinhole photography has become rather commonplace. Everyone has their favorite apps to use. But just as the pinhole camera gives you a new way of seeing, we’re here to round up some of the changes in the landscape and show what you might be missing. (full disclosure, ƒ/D participated in Beta testing and feedback with several app makers reviewed below)

Do Meter Apps Work?

One quick note before we discuss apps individually. The most common question regarding light meter apps I get is “Do they actually work?” After a few years of using apps for my own pinhole photography, I can confidently say “mostly, if used right…” First, they do work in general, and it makes sense that they would, as they’re just reading the exposure value that the device’s camera reads and converting it into an exposure value that would work for pinhole. Light, conveniently obeying physics, should have universal values. Where pinhole meter apps fall down is in tricky lighting situations, such as backlit translucent materials, or direct light reflections.

This brings me to my second point, about using light meter apps “correctly” – learn how to use the spot meter function correctly and always use it. The problem with apps as light meters is the pesky variable brightness of a smartphone screen. Without the spot meter function, you will invariably run into situations where an exposure on the app only looks right because of the auto brightening feature of the phone, but your exposure will come back dark. I’ve had entire rolls turn out thin because of this. Use the spot meter and measure an area in the scene that you want to come through as a middle value and expose for that. Or take it one step further and learn the zone system and use the app to grab your III and VII values (it can be done, I do it regularly).

If you’d like to really dive down the rabbit hole, I recommend this article by Ryan Walters – he uses the Pocket Light Meter app mentioned below, but the same principles apply to all smartphone meters. To get the most out of any light meter, smartphone or not, I recommend learning the Zone System. A quick Google will give you more links on it than you could read in a year – find the one that makes sense to you and check it out. Note that I said to “learn the Zone System” – while I personally apply the Zone System regularly, I think what’s more important than using it is understanding it because of what it teaches you about how light meters, exposure, and film latitude all play together.

Exposure Meters

Pinhole Master (iOS only $3.99)

[singlepic id=346 w=225 float=left] [/singlepic]Pinhole Master is the new kid on the block, having just made it’s V1 debut in the last few weeks. Like other light meter apps, the camera view dominates the app interface. Tap once on the screen and you get a spot meter, tap again to move it to another place in the view. The app includes heads up info on EI, EV, compensation, aperture, and film.

It’s not till you use Pinhole Master that it becomes clear what makes this app different – it’s strengths are in the experience. Instead of an aperture value and film speed, the app displays the camera and film name. If you have a repertoire of cameras and films that you cycle through, this is a nice double check while in the field. Additionally, EV readings are in tenths of a value, which is very useful when shadow values count. The timer is a nice big wheel, easier to read than count downs, and the log includes map and geotagging info. Film entry is a double edged sword: on the one hand there are no preconfigured reciprocity curves (but they might be coming soon), but on the other hand, reciprocity entry is done in an easy to understand way. Another very important feature is the ability to set sensor boundaries in the app settings. This is important so that if something wonky is happening with your camera, or the reading, the app tells you, rather than leading you astray. Finally, the app natively supports the Lumu incident light meter tool, which I haven’t tried personally, but have seen some very promising data on.


Pinhole Assist (iOS only $2.99)

[singlepic id=345 w=225 float=right] [/singlepic]We reviewed Pinhole Assist (available on the app store) last year as the clear frontrunner in the dedicated pinhole app category. V4 of the app was just released earlier this month, and includes some very important updates. To me, an important update is the breakup of EV values into thirds – like we see in Pinhole Master, this important detailed info helps determine some borderline exposures. Pinhole Assist V4 now provides easy access to a number of predefined cameras in addition to it’s existing set of films and reciprocity curves. It’s a solid update to the heavyweight contender in the pinhole app marketplace.


Pocket Light Meter (iOS Free, Android $0.99)

[singlepic id=209 h=200 float=left] [/singlepic]Pocket Light Meter, while a solid app for the simple feature set it delivers, has not been updated since before last year’s article. It is available for both iOS (app store) and Android (Google Play). But it’s lack of updating isn’t a knock – Pocket Light Meter is there in absolute simplicity, ideally suited for those pinhole photographers that stick to one camera and one film.


Reciprocity Management

Reciprocity Timer (iOS only $1.99)

[singlepic id=211 h=200 float=right] [/singlepic]Reciprocity Timer also has not been updated since before last year’s article, though I’m told by the developer that they hope to make an update in the near future. Reciprocity Timer’s strength is in it’s extensibility – from the films covered to built in filter compensation, it covers everything from the film side and is worth a look.


In the Darkroom

Massive Dev Chart (iOS $8.99, Android $8.99)

[singlepic id=210 h=200 float=left] [/singlepic]Massive Dev Chart (iOS, Android) made one small update this year since my article last year to add some more film and developer combinations. If you’re a film fanatic and want to develop your own film, you’ll be hard pressed to find a better app.


Book Review: Letting Go of the Camera

“Letting Go of the Camera” is the second Brooks Jensen book that I’ve read. Like the other book, Creative Life in Photography, this is a collection of essays and ruminations. But this time he’s turned his attention more towards the meta of creativity in photography.

He’s touching on a lot of concepts in creativity and photography that, honestly, are what led to my taking up pinhole in the first place. It’s been nearly a decade since I built my first pinhole camera (outside of a photo class) and fell in love with the process. Pinhole for me was a response to the rising trend in DSLR shooting and perfection. At the time, there was so much volume in my shooting. I was filling memory disks like mad. But there was rarely time that I was taking to see. Like a junky, I was voraciously consuming, and the DSLR gave me a fix.

So it is in that spirit that pinhole provided a very needed detox from this habit. Suddenly I wasn’t shooting bursts of photos but rather waiting seconds or minutes for a single exposure. I wasn’t obsessively composing but rather guesstimating based on angles. And I wasn’t filling memory cards but rather mindfully choosing compositions to use precious film on.

The result, for me at least, is that pinhole photography is a much more meditative process than any other form of photography. Several days ago I was at the West Side Market in Cleveland making an indoor exposure that, once corrected for reciprocity, took 18 minutes. That was 18 minutes of observance that I could do. Looking at what to shoot next. Watching the crowds. Observing how people shopped. Seeing. It was 18 minutes of the compassionate observance that David Foster Wallace described in “This is Water”. If I had shot that with a DSLR, I would have cranked up the ISO and opened the aperture enough to get me 1/60th exposure and just moved on.

So what the hell does watching people for 18 minutes have to do with “Letting Go”? Brooks Jensen is asking us to take this time, so that we may be better photographers. He’s not only a photographer, he’s also the publisher of Lens Work magazine, and the host of a number of workshops. In these workshops he’s seen tons of work, but “rarely see photographs that relate to [photographers’] lives, thoughts, feelings, or experiences.” Throughout the book, he’s practically begging us to take a little extra time and look at things differently.

Brooks argues for mastering the craft of photography so that we can let go as, “the true master is one who, indeed, has total control and then lets go and allows an accident to happen.” That’s practically a mantra for excellent pinhole photography. He challenges photographers to photograph what you feel, so that you “let go of yourself and let your subject speak directly to your audience.”

We all know that travel to an unfamiliar place can help spur the creative spirit, but Brooks challenges us to be better in this regard as well, noting that:

It seems that photography presents us with a choice unique in the field of art. We can work to find something new that has never been photographed before and claim it as our unique photographic turf or we can accept the challenge to use our tools as merely tools and realize that the real task of being a photographer is to develop ourselves as conduits for the inspiration that creates artwork. One path leads to tomorrow’s clichés. The other path leads to artwork that seems to endure. One eventually is easy; one is profound.

Brooks absolutely pulls no punches in this regard, also noting that “a great deal of what passes for fine art photography today is not based on vision, talent, or craft; it is based simply on access.” This is a notion that I identify with strongly, and am also toiled by. In our daily lives, hustling about with work and family duties, it can be extremely hard to develop a vision in the seemingly mundane.

However Brooks too understands this struggle, and provides guidance there. Noting examples such as Sudek and Wynn Bullock as great examples of photographers that have realized that “the key is to integrate our art into our life, not the other way around.” Even so, shooting over and over the same areas of our lives can be drivel, right? But no, says Brooks, noting that “Weston took 29 photos of peppers before he finally took his famous Pepper No. 30, and he may have taken many more afterwards.” Brooks expands to note that:

The paradox is simply this: repetition of what has already been done is a useful technical exercise but rarely produces artwork of merit. Repetition of your own creative vision however, leads to refinement, increased depth and sensitivity, and generally does produce better artwork.

It’s that refinement of craft that he’s really driving at. It’s this level of dedication to a topic, and staying to what you know, that is so readily apparent in the wonderful collection that Andy Adams curated in “Looking at the Land”.

There’s so much more to this book then I could possibly cover here. Brooks has been through the ups and downs of a photographic career that has spanned just about every perspective in photography, and has done an excellent job of compiling the many perspectives that come with that career. This is a great read for any photographer – pinholer or not. I encourage you to give it a read – it’s an easy and accessible one – and pursue your photography with increased passion and mindfulness.

“Letting Go of the Camera” is available at Amazon ($5.95 Kindle edition/other formats available)


Book Review: The Creative Life in Photography

In photography, perhaps more than other visual arts, it can be very easy to slip away from what makes it an art. We spend so much time analyzing films, chemistry, physics, and gear (all the glorious gear!) that sometimes we don’t leave any time to think about why we may have gotten into this mess in the first place.

So today I wanted to take a moment to discuss a photography book that left all of that behind. Not only is there not a single paragraph detailing technology in Brooks Jensen’s The Creative Life in Photography, there’s not even a single photograph! In many ways, this is exactly the photography book that many of us need.

If you’re not familiar with Brooks, he’s the founder and editor of Lenswork magazine, a publication I’ve respected greatly over the years. He’s also a very accomplished photographer in his own right. Although he’s not a pinhole photographer (nobody’s perfect), his years as a professional photographer and curator of photography have given him some very valuable insights into how to be a better photographer and how to be a successful photographer (whatever that means for you).

In Creative Life in Photography, he’s collected for the reader a number of his editorial essays from Lenswork over the years. This makes the book exceptionally easy to read – 15 minutes gets you through an editorial to think about for a day or two before you return for the next one. What follows are some of my favorite excerpts from the book. Not to worry – I left plenty out for you to discover and explore yourself.

On making great artistic accomplishments:

Great art always works on multiple levels. It appeals to the sophisticated aficionado, the superbly trained and appreciative peer, and at the same time to the masses who have less appreciation of the intricacies, but nonetheless respond at a level appropriate to their training. I am reminded of the portrayal of Mozart in the fictionalized movie Amadeus. His work was appreciated (well, actually despised ) for its fine subtleties of genius by his peer Salieri, and at the same time enjoyed by the masses for its sheer enjoyability and accessibility.

On the importance of art teaching us to see that which we overlooked before:

Landscapes were just background until artists taught us to see them. Those monks who crossed the Alps in medieval times didn’t look to the hills as beautiful examples of nature. They thought those mountains were a burden and would have liked to flatten them out into nice rolling plains that would be easier to traverse. Now we look at the Alps and say they are beautiful precisely because the artists have taught us to see them as beautiful.

On discovery and seeing:

One of my favorite quotes is from Nobel Prize winner Albert SzentGyorgyi: “Discovery consists of seeing what everybody has seen and thinking what nobody has thought.”

On finding great photographs within your own surroundings, and resisting the temptation to find greatness in unfamiliar lands:

Could it be that the great photographers make their great images because they spring from their life, whereas the majority of “amateurs” fail to make great photographs because they are too busy trying to photograph someone else’s life, someone else’s landscape, someone else’s experience? Perhaps instead of going out looking for subject matter, we should simply try to clearly see our life as it is and find the images of significance that surround us.

One passage I found particularly interesting was about his process when he does go to a new place. He found that, like myself and I’m sure many others, he would have a hard time seeing beyond the straightforward and obvious. For a time, this frustrated him. Eventually though he learned to cope with this tendency – he now sets about getting the obvious shots out of his system. He indulges the urge to get the first 10 or 20 obvious shots out of the way. This accomplishes two things.

First, it allows him to move past the obvious, rather than spend the mental energy to fight the urge. Second, he uses these shots to get more familiar with the place, so that by the time he’s done with these shots, he’s got a better understanding of what he’s seeing. Pinhole takes some time to do these photos, especially if you know you’re going to not like them later. So I adapted his process – I shoot these photos with my phone. This way I get to see the obvious, explore for the less than obvious, and get a quick check on my exposure settings.

Over the years, I’ve learned that such obvious compositions are an important part of the “loosening up” phase of my process, like limbering stiff joints after a long drive. I photograph with self- indulgent patience, but universally find these images of little use. They are too predictable.

The final piece of his book that really got me was his discussion of artist statements. He’s read a lot of artist statements in his day, and in a nutshell, detests most of them. If you’re a serious artist, his discussion on artist statements alone is worth the few bucks for the book.


Technique: Controlling Depth of Field in Pinhole Photos

In this article, I’m not going to show you anything new. Rather, my goal is to help us think of an existing technique in a new way.

I imagine the knee jerk response to the title of this article is a chorus of befuddled pinholers worldwide shouting in unison, “CONTROLLING DEPTH OF FIELD IN PINHOLE PHOTOS?!?!”

Yep, we’re diving in, with incredulous abandon. But rest easy, we’re not going to change the physics of light. Rather, we’re going to discuss how we can leverage composition to “shorten” the depth of field in a pinhole photograph. Got your attention? Read on…

[singlepic id=228 w=300 float=right] [/singlepic]First, what is “Depth of Field”? Wikipedia defines it as “the distance between the nearest and farthest objects in a scene that appear acceptably sharp in an image.” Note that in that definition, there’s not a single mention of bokeh, aperture, or even Circles of Confusion. That’s kind of liberating, no? So, we shall free ourselves of the technical aspects of the customary understanding of depth of field, and let’s focus on the aesthetic.

Let’s pick apart the definition of Depth of Field, from an aesthetic perspective, for just a moment. We have “the distance between the nearest and farthest objects in a scene” – that’s classic 2D art composition: a foreground, middle ground, background. And then there’s “appear acceptably sharp in an image” – well that’s just a matter of being able to distinguish what those objects are, right? So, Depth of Field is, at it’s simplest, choosing what objects, if any, will be distinguishable in the foreground, middle ground, and background.

How do we control which objects will be distinguishable in these planes of the finished pinhole photo? In a word: motion! In a few more words: the relative motion between the camera, the subject, and the background. The closer that background motion is to your subject, the shorter your depth of field. The further away, the deeper your depth of field. Got something in motion between the camera and your subject? Even better – you have a foreground depth of field effect.

Of course this isn’t something new, right? Any of us that have looked at pinhole photography long enough have seen sweeping clouds over landscapes, moving objects in the foreground, wisping trees to and fro. This is not a new effect. But, this is a change of mindset.

Portrait photographers have long since figured out that a portrait can be made *that* much more dynamic through careful use of depth of field. Want to take a great pinhole portrait? Consider a windy day with foliage in the background. Or you can get playful, the way Darren Constantino did his photo, Pinhole Seesaw.

Want a pinhole photo of an object that really pops? Put that object in motion and lock the camera to that motion, such as what James Guerin did in his Twilight Cycle diptych. Artūras Meškauskas also leveraged this technique very effectively in his photo, 1+4 (bottom of linked page).

Again, this isn’t a new technique, just a different mindset – something to keep in mind when you’re afield and are considering how to make a subject really stand out. How have you leveraged this technique? Tell us in the comments!

Self Portrait with Guitar
[singlepic id=229 w=600]Self Portrait with Guitar, ©Kier Selinsky 2015[/singlepic]