Category Archives: General

20 Questions About Pinhole

Here at ƒ/D, we’re all pinhole, all the time. Looking back at our posts, we’ve recognized that everything we say expects a certain level of understanding. So in an effort to help along those who are just getting interested in pinhole, we wanted to take a moment to address some of those burning questions that might seem like big obstacles to getting started. Have additional questions? Ask them in the comments. Or if you have a hurdle to pinholing that you overcame and would like to share – add those to the comments as well! It’s all about helping the next “generation” (whatever age they may be) of pinholers.

So here we go: 20 Beginner’s Questions About Pinhole

1. How does pinhole work?
Pinhole photography takes advantage of the fact that all light travels in a straight line. There’s a teeny tiny pinhole that only allows a projection of one very small beam of light from the scene you are photographing to hit the film or sensor plane. So with pinhole, you’re using all those beams of light to comprise the image.

2. Does it have to be film?
Nope – it can be film, photographic paper, a digital camera (a DSLR with a pinhole body cap), Polaroid (or instant) film, or alternative photography sensitized materials (such as cyanotype or wet plate). The pinhole just needs to project on something light sensitive for the capture of the image. However, film or paper are the easiest ways to start your pinhole adventure.

[bscolumns class=”one_third”][singlepic id=228 w=150]Mickey on the Merry Go Round, ©Kier Selinsky (Polaroid)[/singlepic][/bscolumns][bscolumns class=”one_third”][singlepic id=314 w=200]Still From a Dream, ©Steven Dempsey (DSLR)[/singlepic][/bscolumns][bscolumns class=”one_third_last”][singlepic id=121 w=200]Under the Trees, ©Marko Umicevic (Paper Negative)[/singlepic][/bscolumns][bscolumns class=”clear”][/bscolumns]


3. What kind of film can be used?
Any kind – 35mm, 120, 220, large format, black and white or color or even IR – so long as it works with your camera, it’ll work for pinhole.

4. Where do I buy film?
Lots of places online such as Amazon (usually more expensive), B&H, and Freestyle Photographic. Film is still widely used!

5. What is reciprocity failure and does it apply to pinhole?
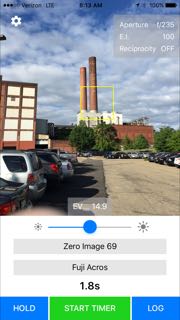
It’s easiest to explain reciprocity failure in relation to normal film performance. Normally, when exposing films, the exposure progresses in a linear fashion, meaning that as you double the exposure time, you double the exposure (brightness) of the image on the film. It’s a reciprocal relationship. Reciprocity failure is when that reciprocal relationship breaks down and doubling the exposure time no longer doubles the exposure. When this happens, you have a correction factor to apply to get the desired exposure level. Reciprocity failure definitely comes into play when shooting pinhole because of the longer exposure times. Don’t worry! There are very cheap tools to help deal with this – see the question on figuring out exposure below. Note: reciprocity failure is why many pinhole photographers use Fuji Acros 100 – it has no reciprocity failure up until 2 minutes of exposure, covering a great many exposure situations without failure compensation.

6. Do I have to have a darkroom?
Nope! Most of us don’t. If you do have one, great! You have more options. Otherwise, this brings us to the next question…

7. Where can I get my film or paper developed and scanned? Is this like a disposable camera?
Film can be developed at home or sent to a lab. It’s worth doing a little Google to see if there’s a film lab in your area – it’s not as uncommon as you might think. If you go local, try to find a pro photo lab, not a drug store, as pro labs will have better scanning services. Another option is mail order labs, such as Richard Photo Lab, Little Film Lab, Indie Film Lab, The Darkroom, and North Coast Photo. If you don’t have a film scanner, have the lab scan your film at the time of development for the most cost effective turnaround. I also recommend getting the highest resolution scan for the whole roll right off the bat. Scanning the whole roll at the highest resolution at development time will usually save you money and time over sending the film back later for a rescan at a higher resolution.

Paper will need to be developed in a dark room. Note that I didn’t say a darkroom – rather, a dark room. It can be a real darkroom if you have access to one. What I do is set up trays in my bathtub, and hang light tight cloth over the door and window, put in a safelight, and I’m ready to process my paper negatives.

In the end though, this is not like a disposable camera where you send the whole thing in to a lab. Whatever film format you use, if you use film, you’ll only be getting the film processed.

8. What gear is required?
A camera and the film or other light sensitive material to go in it. That’s all that’s really required. Also, “camera” in this case can literally just be a shoebox with a pinhole – it doesn’t need to be fancy. Some prefer that it’s not!

9. Do I have to use a tripod?
Only if you want the camera to be steadied and above the ground and other platforms. Otherwise you can handhold it for a cool shaky effect or just set it on the ground or other surface.

10. Do I have to build a camera? How dark does the box need to be?
You don’t have to build a camera – they can be purchased as well. Some of our fave vendors for built cameras are Zero Image, Ondu, NOPO, and RealitySoSubtle. This list is not exhaustive, and there are plenty of boutique makers as well as some “big boys” – the point is, you have options. You could even just buy a pinhole body cap for your DSLR – certainly the cheapest DSLR “lens” you’ll ever buy! If you do build one, it needs to be absolutely light tight to avoid light leaks streaking your film or paper. Do you have access to a 3D Printer? You could just print a camera!

11. Are there lenses for pinhole photography? What if I want to zoom in?
There are 3 ways you can zoom in pinhole:

  1. Build a camera with bellows (or use a large format camera with bellows). Be sure to change the pinhole diameter for different focal lengths.
  2. Build or buy a system like the Zero Image 4×5 with multiple focal length frames that can be applied
  3. Use the “foot zoom” – as in use your feet to walk closer 🙂

12. Can I pinhole without a pinhole camera?
Actually you can! By creating a whole room “pinhole camera”, you can project the outside world in a relatively light tight room, and capture the image with a DSLR. Here’s some Google Image search results to inspire what’s possible.

13. How do you figure out the exposure?
When you get a camera, you’re provided with the ƒ number. Alternatively if you build a camera, you can use a pinhole calculator to find out your ƒ number. The ƒ number is your aperture, and for pinhole they’re typically in the ƒ/100 to ƒ/300 range. Once you have that ƒ number, theres a few ways to calculate exposure:

  1. Easiest: use a smartphone app
  2. Printed: make a conversion chart so that you can meter a scene with your regular camera and convert the exposure time from that to your pinhole camera’s needs
  3. Sunny 16: for the minimalist route, use the “sunny 16” rule and a printed conversion chart to figure your exposures. By learning through experimentation and leveraging film latitude, you can achieve very useable exposures. PhotographyTalk.com has a great write up on how to use the technique.

14. How difficult is it to get an acceptable image?
It’s deceivingly easy. The hard(er) part is learning the unique properties of pinhole and wielding them effectively to make remarkable images. That being said, plenty of photographers get some real zingers from their first roll.

15. Why are some pinhole photos very unusable and blurry, while others are quite sharp?
There’s a few factors involved here. The first is the quality of the pinhole itself. Many people make their own pinholes using a pin to drill through a piece of an aluminum can. While many people are successful with this, the less round that hole is, the more it will distort the image; instead of perfect circles of light making the image, it will be some other shape. Other pinholers (myself included) buy laser drilled or chemically etched pinholes because they are perfectly round. Another factor is how steady the camera was during the exposure – some people have sturdy tripods, while others handhold the camera to create blur and shake. Finally, the pinhole being used might not be the ideal size for the focal length – if it’s too big, the images will be very “soft” and can be perceived as blurry. But again, some people like that and use it very effectively.

16. What types of subjects work well for pinhole?
That depends on your imagination. Anything can be shot well with pinhole, it’s about utilizing the properties of the camera and the long exposure to create the effect you want. Our featured artists give some great examples of the medium’s capabilities. It’s easiest to start with scenes that mix subjects in motion with other elements that stay still (moving clouds over a landscape is a great learning tool). Another great starter recipe is utilizing a super wide angle pinhole camera on super close ups (think inches away) for new and interesting perspectives.

17. Why are some people so focused on pinhole photography?
I can’t speak for all, but I can paint some broad strokes. Some photographers focus only on pinhole because the aesthetic matches their vision. Others like it because the very limited complexity and controls can be liberating in today’s pixel perfect DSLR world. Personally, I enjoy pinhole because it helps me see differently, and the long exposures help me be more mindful of the shot I’m taking.

18. How do some pinhole photos get such extreme wide angles?
Since pinhole has near infinite depth of field, this means that you can get the film plane very close to the pinhole. The closer it is, the wider that angle will be. Since we’re freed from the constraints of having to figure out the complex math in lens creation, you can just try building a camera with a super short focal length and see what you get! Scott Speck is a master of super wide angle.

19. How do some pinhole photos seem warped?
Some pinhole cameras, such as the Pinhole Blender, wrap the film around a curved object inside the camera. Other folks will use paper negatives and crumple the paper in a bowl shape and stuff that into the camera. Some camera, particularly super wide format like 6×12, will have a concave curve to the film plane to try and reduce warp while other 6×12’s will have a flat film plane to accentuate the edge distortion. The near infinite depth of field of pinhole allows camera makers and pinholers to experiment with film plane shapes and angles to come up with some very cool combinations.

20. Why do people disappear in some longer exposures?
Let’s imagine a photo that requires 6 or 7 minutes for the exposure. The scene is filled with people. Remember that when you metered the scene at 6 or 7 minutes, that was what was required to register the objects in that scene at a normal tone (middle gray or middle color value). If a person stays still for that entire exposure, they’ll show up at a normal tone; if they stay in place for 1/2 the exposure, they’ll be half as dark; 1/4 the time, 1/4 the tone. Over the course of that 6 minute exposure, it’s likely that they’ll stay in one place for no more than 30 seconds – that’s 1/12 the time – not enough time to make a meaningful registration on the film. This is exactly what happened in my West Side Market photo – the market was packed full of people, but a 6 or 7 minute exposure erased almost all of them!

[singlepic id=27 w=600]West Side Market, ©Kier Selinsky[/singlepic]


I hope this gets some of those hard-to-ask questions out of the way so that you can start to explore pinhole photography! If you have other questions, you’re surely not the only one – put them in the comments below and I’ll answer ASAP. Cheers!


Smartphone Apps – Revisited

About this time last year we put together a piece showcasing a handful of the many apps that are available for pinholers with smartphones. So as things tend to go in cycles, we thought a year was a good time to look back and see how things may have changed.

The practice of using a smartphone as a tool to aid in your pinhole photography has become rather commonplace. Everyone has their favorite apps to use. But just as the pinhole camera gives you a new way of seeing, we’re here to round up some of the changes in the landscape and show what you might be missing. (full disclosure, ƒ/D participated in Beta testing and feedback with several app makers reviewed below)

Do Meter Apps Work?

One quick note before we discuss apps individually. The most common question regarding light meter apps I get is “Do they actually work?” After a few years of using apps for my own pinhole photography, I can confidently say “mostly, if used right…” First, they do work in general, and it makes sense that they would, as they’re just reading the exposure value that the device’s camera reads and converting it into an exposure value that would work for pinhole. Light, conveniently obeying physics, should have universal values. Where pinhole meter apps fall down is in tricky lighting situations, such as backlit translucent materials, or direct light reflections.

This brings me to my second point, about using light meter apps “correctly” – learn how to use the spot meter function correctly and always use it. The problem with apps as light meters is the pesky variable brightness of a smartphone screen. Without the spot meter function, you will invariably run into situations where an exposure on the app only looks right because of the auto brightening feature of the phone, but your exposure will come back dark. I’ve had entire rolls turn out thin because of this. Use the spot meter and measure an area in the scene that you want to come through as a middle value and expose for that. Or take it one step further and learn the zone system and use the app to grab your III and VII values (it can be done, I do it regularly).

If you’d like to really dive down the rabbit hole, I recommend this article by Ryan Walters – he uses the Pocket Light Meter app mentioned below, but the same principles apply to all smartphone meters. To get the most out of any light meter, smartphone or not, I recommend learning the Zone System. A quick Google will give you more links on it than you could read in a year – find the one that makes sense to you and check it out. Note that I said to “learn the Zone System” – while I personally apply the Zone System regularly, I think what’s more important than using it is understanding it because of what it teaches you about how light meters, exposure, and film latitude all play together.

Exposure Meters

Pinhole Master (iOS only $3.99)

[singlepic id=346 w=225 float=left] [/singlepic]Pinhole Master is the new kid on the block, having just made it’s V1 debut in the last few weeks. Like other light meter apps, the camera view dominates the app interface. Tap once on the screen and you get a spot meter, tap again to move it to another place in the view. The app includes heads up info on EI, EV, compensation, aperture, and film.

It’s not till you use Pinhole Master that it becomes clear what makes this app different – it’s strengths are in the experience. Instead of an aperture value and film speed, the app displays the camera and film name. If you have a repertoire of cameras and films that you cycle through, this is a nice double check while in the field. Additionally, EV readings are in tenths of a value, which is very useful when shadow values count. The timer is a nice big wheel, easier to read than count downs, and the log includes map and geotagging info. Film entry is a double edged sword: on the one hand there are no preconfigured reciprocity curves (but they might be coming soon), but on the other hand, reciprocity entry is done in an easy to understand way. Another very important feature is the ability to set sensor boundaries in the app settings. This is important so that if something wonky is happening with your camera, or the reading, the app tells you, rather than leading you astray. Finally, the app natively supports the Lumu incident light meter tool, which I haven’t tried personally, but have seen some very promising data on.


Pinhole Assist (iOS only $2.99)

[singlepic id=345 w=225 float=right] [/singlepic]We reviewed Pinhole Assist (available on the app store) last year as the clear frontrunner in the dedicated pinhole app category. V4 of the app was just released earlier this month, and includes some very important updates. To me, an important update is the breakup of EV values into thirds – like we see in Pinhole Master, this important detailed info helps determine some borderline exposures. Pinhole Assist V4 now provides easy access to a number of predefined cameras in addition to it’s existing set of films and reciprocity curves. It’s a solid update to the heavyweight contender in the pinhole app marketplace.


Pocket Light Meter (iOS Free, Android $0.99)

[singlepic id=209 h=200 float=left] [/singlepic]Pocket Light Meter, while a solid app for the simple feature set it delivers, has not been updated since before last year’s article. It is available for both iOS (app store) and Android (Google Play). But it’s lack of updating isn’t a knock – Pocket Light Meter is there in absolute simplicity, ideally suited for those pinhole photographers that stick to one camera and one film.


Reciprocity Management

Reciprocity Timer (iOS only $1.99)

[singlepic id=211 h=200 float=right] [/singlepic]Reciprocity Timer also has not been updated since before last year’s article, though I’m told by the developer that they hope to make an update in the near future. Reciprocity Timer’s strength is in it’s extensibility – from the films covered to built in filter compensation, it covers everything from the film side and is worth a look.


In the Darkroom

Massive Dev Chart (iOS $8.99, Android $8.99)

[singlepic id=210 h=200 float=left] [/singlepic]Massive Dev Chart (iOS, Android) made one small update this year since my article last year to add some more film and developer combinations. If you’re a film fanatic and want to develop your own film, you’ll be hard pressed to find a better app.


Book Review: Letting Go of the Camera

“Letting Go of the Camera” is the second Brooks Jensen book that I’ve read. Like the other book, Creative Life in Photography, this is a collection of essays and ruminations. But this time he’s turned his attention more towards the meta of creativity in photography.

He’s touching on a lot of concepts in creativity and photography that, honestly, are what led to my taking up pinhole in the first place. It’s been nearly a decade since I built my first pinhole camera (outside of a photo class) and fell in love with the process. Pinhole for me was a response to the rising trend in DSLR shooting and perfection. At the time, there was so much volume in my shooting. I was filling memory disks like mad. But there was rarely time that I was taking to see. Like a junky, I was voraciously consuming, and the DSLR gave me a fix.

So it is in that spirit that pinhole provided a very needed detox from this habit. Suddenly I wasn’t shooting bursts of photos but rather waiting seconds or minutes for a single exposure. I wasn’t obsessively composing but rather guesstimating based on angles. And I wasn’t filling memory cards but rather mindfully choosing compositions to use precious film on.

The result, for me at least, is that pinhole photography is a much more meditative process than any other form of photography. Several days ago I was at the West Side Market in Cleveland making an indoor exposure that, once corrected for reciprocity, took 18 minutes. That was 18 minutes of observance that I could do. Looking at what to shoot next. Watching the crowds. Observing how people shopped. Seeing. It was 18 minutes of the compassionate observance that David Foster Wallace described in “This is Water”. If I had shot that with a DSLR, I would have cranked up the ISO and opened the aperture enough to get me 1/60th exposure and just moved on.

So what the hell does watching people for 18 minutes have to do with “Letting Go”? Brooks Jensen is asking us to take this time, so that we may be better photographers. He’s not only a photographer, he’s also the publisher of Lens Work magazine, and the host of a number of workshops. In these workshops he’s seen tons of work, but “rarely see photographs that relate to [photographers’] lives, thoughts, feelings, or experiences.” Throughout the book, he’s practically begging us to take a little extra time and look at things differently.

Brooks argues for mastering the craft of photography so that we can let go as, “the true master is one who, indeed, has total control and then lets go and allows an accident to happen.” That’s practically a mantra for excellent pinhole photography. He challenges photographers to photograph what you feel, so that you “let go of yourself and let your subject speak directly to your audience.”

We all know that travel to an unfamiliar place can help spur the creative spirit, but Brooks challenges us to be better in this regard as well, noting that:

It seems that photography presents us with a choice unique in the field of art. We can work to find something new that has never been photographed before and claim it as our unique photographic turf or we can accept the challenge to use our tools as merely tools and realize that the real task of being a photographer is to develop ourselves as conduits for the inspiration that creates artwork. One path leads to tomorrow’s clichés. The other path leads to artwork that seems to endure. One eventually is easy; one is profound.

Brooks absolutely pulls no punches in this regard, also noting that “a great deal of what passes for fine art photography today is not based on vision, talent, or craft; it is based simply on access.” This is a notion that I identify with strongly, and am also toiled by. In our daily lives, hustling about with work and family duties, it can be extremely hard to develop a vision in the seemingly mundane.

However Brooks too understands this struggle, and provides guidance there. Noting examples such as Sudek and Wynn Bullock as great examples of photographers that have realized that “the key is to integrate our art into our life, not the other way around.” Even so, shooting over and over the same areas of our lives can be drivel, right? But no, says Brooks, noting that “Weston took 29 photos of peppers before he finally took his famous Pepper No. 30, and he may have taken many more afterwards.” Brooks expands to note that:

The paradox is simply this: repetition of what has already been done is a useful technical exercise but rarely produces artwork of merit. Repetition of your own creative vision however, leads to refinement, increased depth and sensitivity, and generally does produce better artwork.

It’s that refinement of craft that he’s really driving at. It’s this level of dedication to a topic, and staying to what you know, that is so readily apparent in the wonderful collection that Andy Adams curated in “Looking at the Land”.

There’s so much more to this book then I could possibly cover here. Brooks has been through the ups and downs of a photographic career that has spanned just about every perspective in photography, and has done an excellent job of compiling the many perspectives that come with that career. This is a great read for any photographer – pinholer or not. I encourage you to give it a read – it’s an easy and accessible one – and pursue your photography with increased passion and mindfulness.

“Letting Go of the Camera” is available at Amazon ($5.95 Kindle edition/other formats available)


Carrying Your Kit: The Getaround

One of the most difficult aspects of practicing photography, for many photographers at some point or another, is carrying all that damn gear. “Traditional” (e.g. lensed) photographers probably have it the worst, as anyone who’s lugged a few constant aperture zoom lenses or a full large format rig can attest. While we pinholers get a break by not having to carry glass, we still have our challenges getting our kit to the photo destination.

The best camera is the one you have with you,” as the saying goes. Indeed, nothing sucks like walking by the perfect shot without your trusty pinhole at the ready. Therefore, a key to this beloved hobby of ours is keeping a camera with you as often as possible. For many of us, that means commuting to/from work, joining friends on the evenings or weekends, shopping, parks, etc.

So for today’s article, I want to share my Getaround setup in the hopes of spreading ideas to help you shoot more. As always, if you see something that could be improved? Share it in the comments and help all of us out as well.

First – here’s a picture of my Getaround:
Pack

And here it is, “exploded”:
Pack exp view


Let’s go through it piece by piece.

Cameras

I always carry at least 2 cameras, sometimes 3 or 4. Why? First off, so that I can have a color and a black and white option. At a minimum, I want that. Pictured here are my Pinholga (converted by yours truly) and my Zero Image 6×9. I tape the current film label to the back of my cameras so that I can remember which is loaded with what. Not pictured here, but often in my pack, is my Zero Image 4×5. These 3 cameras give me 5 configurations: 6×6, 6×9, and 4×5 (25mm, 50mm, & 75mm focal lengths). On particularly ambitious days, I’ll add in my Polaroid. That’s a lot of options!

Packing

Notice that I don’t use a traditional camera backpack, and that’s entirely on purpose. I have two reasons for this. First, I wanted something that didn’t scream “cameras!” but was fully featured including a laptop sleeve. Second, the backpacker and urban market has a lot more options that have better suspensions than normal camera bags. Osprey is my brand of choice and for good reason – they are well renowned for their suspension. When I lived in Seattle, I could carry this bag, loaded with 25 pounds of camera and laptop gear, for hours and still be fine. That’s a damn good suspension system.

Inside my normal backpack I have a camera bag insert. This is basically a camera bag padding system that you can stuff into any backpack. They come in a handful of shapes and sizes and will keep your gear protected in your backpack. This was key to my feeling comfy with a non-padded backpack.

The backpack and camera bag insert are very key to my Getaround. By having something that I can take everywhere, I can easily have plenty of cameras with me at all times.

Tripods

Yes, I always carry two tripods with me. What you see here are my Slik mini tripod with ballhead and the infamous Gorillapod. Why these two? First, their weight is so minuscule, there’s hardly a penalty for carrying a second one. Second, while the Gorillapod is invaluable when you need to mount on something elevated like a fence rail, it’s a complete pain in the ass when you just want to be on a flat surface and level the camera. In addition, the Gorillapod isn’t quite as stable as a normal tripod, so it’s definitely reserved for those shots that cannot be done any other way.

Not shown here is my full size tripod, which I carry when I anticipate having the need for that much flexibility. See the loop on the bottom center of the backpack? That loop, plus a tie down, allow me to mount the tripod in the centerline of the backpack. This allows for a much easier carry to your shooting location, so when you get there you still have the wherewithal to compose your shot.

Various Sundry

A regular daypack is also superior for just carrying…stuff. We all have the normal needs for a photo trek, so having flexible room for it is a big payoff. Some additional photo related things I carry with me are a pocket level for my 4×5, extra film of course, and my trusty locking cable release.

What do you carry?

I wanna hear it in the comments!