All posts by Kier

Howard Moiser – Relative Movement

Pinhole isn’t the only form of photography I practice, but it’s one of my favorite forms because of the unique creative challenges that it presents. Other forms of photography will give you controls that allow you to slow down the shutter speed and/or extend the depth of field towards infinity if you so choose. But there is something unique in the challenge when you have no choice in the matter – you have to work with that constraint on your control.

Some people get frustrated by this creative challenge. Others, however, fully embrace the form and find fantastic ways to leverage the constraints, turning them into strengths. Today’s featured artist, Howard Moiser, is such an artist. He is a prolific photographer, and his Flickr feed is overflowing with great pinhole work. Even further, he’s an experimenter, with whole albums dedicated to experimental approaches to image making in pinhole and other formats.

The result of all this work, of course, is hitting upon some truly phenomenal series of photos. One such series is his work titled “Relative Movement”. From the sampling below, I think you’ll agree. After taking in the photos below, I encourage you to take a look at his expansive collection on Flickr.


Relativity
[singlepic id=406 w=600]Relativity, ©Howard Moiser 2016[/singlepic]


Dinosaur Chase
[singlepic id=402 w=600]Dinosaur Chase, ©Howard Moiser 2016[/singlepic]


Workman
[singlepic id=408 w=600]Workman, ©Howard Moiser 2016[/singlepic]


The Axe Man
[singlepic id=407 w=600]The Axe Man, ©Howard Moiser 2016[/singlepic]


On The Move
[singlepic id=404 w=600]On The Move, ©Howard Moiser 2016[/singlepic]


Flying Low
[singlepic id=403 w=600]Flying Low, ©Howard Moiser 2016[/singlepic]


Relativity
[singlepic id=405 w=600]Relativity, ©Howard Moiser 2016[/singlepic]


Dangerously Stupid
[singlepic id=401 w=600]Dangerously Stupid, ©Howard Moiser 2016[/singlepic]


Want to see other great featured artists? You can find them here!

Have great pinhole photos of your own? Take a look at our Call For Entry!

Inspiration – Week of 7/11

This week’s inspirational imagery is all monochrome. I can never decide what I like more – color or black and white. Sometimes I waffle week to week – this week it’s mono 🙂

After checking out these awesome examples, I want you to do two things:

  1. Take a look at some of the other great inspiration we’ve shared
  2. Consider answering our free Call For Entry!


160623_apx_03
[singlepic id=397 w=600]160623_apx_03 – ©Sandeha Lynch 2016[/singlepic]

Sandeha Lynch made this photo with his “Picket Pinhole” camera, which is a panoramic camera that utilizes 3 pinholes, creating the unique overlapping image. This scene on the Tawe River and marina area in Swansea, Wales was made on Agfa APX 100 and developed in Rodinal. You can find more of his excellent work on his personal website or his Flickr account.


Untitled
[singlepic id=400 w=600]Untitled, ©Jon Burtoft 2016[/singlepic]

Jon Burtoft, based out of Cornwall, made this rough coastal image at Westward Ho! in North Devon. The low tide there exposes large black rocks with these deep fissures like the one seen. Jon likes to get to the coast to photograph when the weather turns for the worse, to capture the essence of the coast. After 13 years of photographing the area, he’s gotten to know it very well. I encourage you to check out his work on Flickr, or follow him @jburtoft on Twitter.


Spare Anchor
[singlepic id=399 w=600]Spare Anchor, ©John S Bohn 2016[/singlepic]

John S. Bohn made this image with a Skink Pinhole f71 Sieve on a Zorki 4K camera, with Fuji Superia. The image was made on the ship he’s been working on for 5 years now. John has some great work to look at over on his Flickr page.


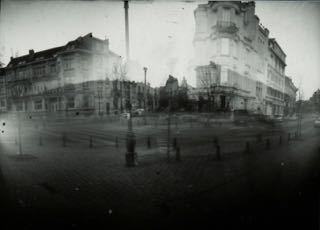
Brussels Rd Point – Rue Antoine Labarre
[singlepic id=398 w=600]Brussels Rd Point – Rue Antoine Labarre, ©Jeanus Loctet 2016[/singlepic]

Jeanus Loctet used a homemade pinhole box camera that he loaded with Ilford paper cut to 10×15. He made this image in winter, as a double exposure using the 2 pinholes he has in the camera – exposing at the same time without the camera moving. He has some very well executed photography worth checking out on his Flickr page.


Michael D Hawley – Raw Pinhole

Michael D Hawley grew up in photography. His father lugged cameras, and eventually, so did he. It’s an introduction to the art that I’m sure many of us share – I know I do.  I still have my very first photograph sitting around here somewhere – it’s a portrait of my parents and their best friend, all of them laughing and hunched down, because I kept pointing the K1000 further and further down as my 6 year old fingers fussed with the focus ring.

It’s a bond that’s formed with this art form – whether you pursue something else in life or stick with photography professionally – the smell of an old camera still brings back a lot of warm memories. Michael stuck with photography, and made it his career. He lives in Vancouver, BC and works as an independent cinematographer, photographer, and camera operator. I think you’ll see that professional discipline in the work displayed below.

After taking in the interview below, be sure to check out Michael’s website (http://www.mdhphoto.net/), filled with both lensed and lensless images, plus some great motion picture work.

Your bio mentions that you grew up in a family that often had cameras around, and your father lugging the heavy home video equipment of the day for the family goings on. Eventually your mom swapped your pellet gun for a camera. If you had to pinpoint the value you got from this early photographic experience, what do you think it would be?
Yes my Father’s love for capturing experiences was very much my introduction to cameras. He was never very interested in the art of photography but an avid documenter, both with stills and video so the camera was always around. Like many people I was fascinated as a child at magic of freezing time. I use to spend hours scanning over any old black and white image I could find, wondering who the people where in the photographs and what their lives must of been like; It was a time machine for me. When I look back there were a few moments that really turned my interest toward photography. The first was in high school I was never very good at writing so I convinced my teachers to let my friends and me produce short videos on the topic instead of writing essays. With in-camera and deck to deck editing really it was much more work then writing but we had a lot of fun; our classmates loved the videos and hey we got a good mark. The second influential time for me was when I was a teenager and my mom sent me away in the summers to work on my uncles farms. One of the ranches was in a very remote part of British Columbia’s interior called Falkland. It was a very beautiful cattle farm that lay in the bottom of a valley. There was no one around, the town only had about 500 residents and out of shear boredom I picked up my aunt’s video camera and started shooting the farm and surroundings, this was when I really began to observe light and composition even though I probably would not of been able to communicate it at the time. The next and I would say most important time of my development was when I first introduced to a Twin Lens Rolleiflex this of course was when digital had already essentially taken over. I could not believe the look of the images and how beautiful medium format film is. What followed was pivotal to my development was learning how to meter light and really understand exposure. Also shooting medium format restricted me to twelve exposures and really forced me to ask myself why I was taking this image, what did I like about it.

In the Desert
[singlepic id=387 w=600]In the Desert, ©Michael D Hawley 2016[/singlepic]


It’s not often that we see a professional photographer devoting so much of their portfolio and online presence to pinhole. What is it that draws you to pinhole?
After the Rolleiflex I became a camera junkie and with digital taking over I found many cheap sales on incredible second hand film cameras some really wonderfully crafted tools. Which took me all the way to the earliest and most primitive camera the pinhole camera. I instantly fell in love with pinhole it was so raw and basic. To me when the elements all come together the images just feel so surreal, like stepping into a dream. Because pinhole is so simple of a camera with a fixed aperture and self controlled shutter, no focusing, no choice of lenses you can really just think about placement. I have always felt that getting a really good wide angle shot is much more difficult to achieve because you have many more three dimensional elements to consider in composition but can be much more rewarding for the viewer. Since pinhole is super wide angle when you bring your eyes right up to the camera essentially what you see is what you get and with its long exposures I love how the pinhole camera captures motion, like paint strokes on a canvas.

A Perfect Night
[singlepic id=385 w=600]A Perfect Night, ©Michael D Hawley 2016[/singlepic]


Floating
[singlepic id=386 w=600]Floating, ©Michael D Hawley 2016[/singlepic]


How did you discover pinhole photography?
I discovered pinhole photography while visiting my local camera shop Beau Photo in Vancouver. Beau sold Holga pinhole cameras and I thought it would be fun to play around with one and a camera for $50 did not seem like much risk. I love the Holga 120PC the camera is awesome it gave me some of my favourite pinhole shots. I really like the F192 aperture on it allowing for some long exposures. I also picked up the Holga 120WPC panoramic camera and had great success with it. I often found that Holga cameras would either give me my best shots or ruin them with light leaks, backs falling off, forgetting to take the lens cap off etc. so I wanted to find a camera I knew was not going cause quite so many problems. Which lead me to the Zero Image 612F multi format camera. The Zero Image is a handmade camera and it’s polished teak wood finish and brass controls are almost as beautiful as the photographs it takes.

Time Travel
[singlepic id=396 w=600]Time Travel, ©Michael D Hawley 2016[/singlepic]


New Day
[singlepic id=392 w=600]New Day, ©Michael D Hawley 2016[/singlepic]


Do you feel that pinhole improves your professional photography? How so?
Yes I do feel pinhole has improved my professional work. It has really taught me how important camera placement is and further to that it has taught me a great deal about what makes for an interesting wide angle shot. Pinhole has also showed me the benefits to keeping things simple and exploring new mediums. I often wish the professional world would be more open to taking creative risks and trusting an older, slower process.

Kilmainham Jail
[singlepic id=390 w=600]Kilmainham Jail, ©Michael D Hawley 2016[/singlepic]


Siwash Rock
[singlepic id=395 w=400]Siwash Rock, ©Michael D Hawley 2016[/singlepic]


One of the hardest aspects of pinhole photography is the visualization before the shot. The “seeing”, as it were. How do you approach your shot visualization?
I try to approach locations and scenes that will utilize the camera’s strengths which I feel are it’s long exposures and super wide perspective. I will look for things that are in motion and will give the viewer as sense of movement, like clouds, trees or water. I will also look for locations that will create a good sense of depth and height. I always move the camera in a little closer to the scene then what would appear natural to the eye. Pinhole is always a bit of guess work and with time the guessing becomes less.

Saturna East Point Pinhole
[singlepic id=394 w=600]Saturna East Point Pinhole, ©Michael D Hawley 2016[/singlepic]


What do you find to be the biggest challenge with pinhole photography? What stops you?
I do not find many challenges with shooting pinhole photography as the camera is very simple. However since the pinhole camera has many limitations in its simplicity it is not the best tool for many projects. The biggest challenge for me with pinhole is in the printing. The camera vignettes heavily and more so with panoramic, the exposure varies greatly from the center to the edges and I find it is very hard to strike that balance when it comes to the print. However when everything comes together the prints to me are stunning and feel so unique. Another challenge with pinhole and which I think might be its greatest is trying to get people to look at the camera as a legitimate camera and art form, I find it is often dismissed too easily.

Late Light
[singlepic id=391 w=600]Late Light, ©Michael D Hawley 2016[/singlepic]


Palace Window
[singlepic id=393 w=600]Palace Window, ©Michael D Hawley 2016[/singlepic]


You’ve photographed some notable actors – Gary Oldman, Pierce Brosnan – how soon till we see you attempting this with a pinhole? 🙂
I have been fortunate to photograph some very talented people and even though I really love pinhole photography I don’t think I would use it much for portraiture. Pinhole with its wide perspective and warped edges is not very forgiving on the face. Perhaps if the scene called for a dramatic surreal effect, or perhaps I would maybe mix some elements in the post work. There is a pinhole photographer I follow on Flickr Scott Speck who has shot some interesting portraits with pinhole, I enjoy seeing his work.

There are so many talented pinhole photographers out there and I am always excited to see what they come up with next, always an inspiration to me!


In the Morning
[singlepic id=388 w=600]In the Morning, ©Michael D Hawley 2016[/singlepic]


Kilauea Volcano
[singlepic id=389 w=600]Kilauea Volcano, ©Michael D Hawley 2016[/singlepic]


June Recap

June 2016 was a great month here at ƒ/D. We spent the month mostly on educational topics, and I expect that July will be more focused on the artists. Here’s a look back on what was covered, in case you missed anything:


Pinhole No.1 - Christian Schaus - thumbWe added a healthy bunch to our collection of favorite inspiring pinhole photos. I’m happy to say that the quality of pinhole photos being produced today is, on the whole, elevating quite a bit. I’m inspired every day by your creativity!


IMG_0739We revisited the topic of smartphone apps for pinhole photography, noting some new features and a new player in the market.


Sagrada Familia - thumbWe interviewed the magnificent Jana Obscura and learned about her unique perspectives in pinhole and pinhole community.


IMG_0664-thumbWe covered the conversion of a Holga camera into a pinhole camera, demonstrating some of the techniques that are useful for other camera conversions as well.


f/D - Exploring the art of pinhole photographyFinally, we answered some of the most common questions that new pinholers have about the artform, to help the uninitiated get started.


Thanks for sticking with us! Look forward to great things coming in June and beyond!


Lena Källberg – Decisive Movement

The potential for versatility in pinhole photography is often overlooked by the general public. Most people have an idea of pinhole images being somewhat fuzzy and flat, a poor substitute for a digital camera. Maybe a poorly exposed and dirty attempt at an otherwise normal photo. A school project to teach about light and exposure, and where photography began, before jumping straight into DSLRs and Photoshop. But then they see some of the truly inspiring pinhole work on Flickr, 500px, or a dozen other sharing sites. Or they come across some of the amazing artists that’s been featured on ƒ/D or other publications, and imaginations are opened.

Lena Källberg is a pinhole artist sure to take the imagination one step further. Her series, The Decisive Movement, taken with a handheld matchbox type of pinhole camera, brings us into the moments of our time that slip away. Many of these photos were presented in a solo show she had, called “The art of remembering exactly what it was like” – a title that was borrowed from a 1970’s Agfa Swedish advertisement. However instead of remembering “exactly what it was like” in a direct sense, her work seeks instead to recall the times we have to let go, when we cannot hold on. It is “the passing of time…not isolated to 1/125 of a second.”

Lena’s images below thoughtfully explore the evaporation of our time here; our time together. Each image is filled with a tension for what may never happen again, what should have been said, or who we’ve lost. They are wondrous language to express these emotions, and therefore a wondrous example of what pinhole can do.

After enjoying these images, you can explore more from the series, see other work on her website, or peruse the other wonderful imagery on her Swedish pinhole site.


Fan Vi Glömde Tryffel
[singlepic id=377 w=600]Fan Vi Glömde Tryffel, ©Lena Källberg 2016[/singlepic]


Herr Gårman
[singlepic id=378 w=600]Herr Gårman, ©Lena Källberg 2016[/singlepic]


Ljusets Hastighet
[singlepic id=379 w=600]Ljusets Hastighet, ©Lena Källberg 2016[/singlepic]


PicknickI Berlin
[singlepic id=380 w=600]PicknickI Berlin, ©Lena Källberg 2016[/singlepic]


Southbound
[singlepic id=381 w=600]Southbound, ©Lena Källberg 2016[/singlepic]


Suit And Tied
[singlepic id=382 w=600]Suit And Tied, ©Lena Källberg 2016[/singlepic]


Vägen Hem
[singlepic id=383 w=600]Vägen Hem, ©Lena Källberg 2016[/singlepic]


Vid Trappen
[singlepic id=384 w=600]Vid Trappen, ©Lena Källberg 2016[/singlepic]


Inspiration – Week of 6/27

This week’s inspiration set is crowded with solitude. Whether a peaceful mountain lake, a respite in blue, a hangout spot, or a summer wind in the park – pinhole delivers! After enjoying these, if you need more, head over to our archive of previous inspiration pieces.

Passage
[singlepic id=374 w=600]Passage, ©Daniel Rock 2016[/singlepic]

Daniel Rock captured this stunning scene of Lake Louise with his favorite pinhole camera, the Holga WPC 120. He had it loaded with Fuji Acros, which he prefers for its acutance and exceptional reciprocity characteristics. He pursues images like this because they “reveal the hidden layer that await in every photographic opportunity. Although Lake Louise has been shot by thousands, few get past the surface.” He certainly achieved his goal on this shot, and you can find more of Daniel’s work on his Flickr page.


All space manifests full of blue light
[singlepic id=373 w=600]All space manifests full of blue light, ©Nils Karlson 2016[/singlepic]

Nils Karlson created this minimalist image with his RealitySoSubtle 4×5 loaded with expired Fuji160NPS, which happened to go through some botched chemistry. The title comes from the Tibetan Book of the Dead – appropriate for the contemplative mood of this image. Keep an eye on Nils as he’s going to be publishing some great work in the future. You can follow him on Flickr, Facebook, and Instagram.


Windy Locust
[singlepic id=375 w=600]Windy Locust, ©Kier Selinsky 2016[/singlepic]

I shot this photo with the Pinholga conversion that I documented previously. The camera is equipped with a RealitySoSubtle 0.3mm pinhole and I had a red filter on for this exposure. It was a very windy day and the young Black Locust tree was whipping around. I used the multi-lapse technique to bring a little stutter to the feeling and I really enjoy the frenetic feel of the result. You can connect with me on Instagram or on Flickr (my Flickr account is woefully out of date, hopefully I’ll have that updated soon!).

OHSU
[singlepic id=376 w=600]OHSU, ©Emre Vildirim 2016[/singlepic]

Emre Yildirim is based in Portland, OR and is a very accomplished photographer. He captured this geometric scene with TMAX 400. Skinny on commentary, but heavy on great imagery, I suggest you check out his Flickr profile to see what I mean.


20 Questions About Pinhole

Here at ƒ/D, we’re all pinhole, all the time. Looking back at our posts, we’ve recognized that everything we say expects a certain level of understanding. So in an effort to help along those who are just getting interested in pinhole, we wanted to take a moment to address some of those burning questions that might seem like big obstacles to getting started. Have additional questions? Ask them in the comments. Or if you have a hurdle to pinholing that you overcame and would like to share – add those to the comments as well! It’s all about helping the next “generation” (whatever age they may be) of pinholers.

So here we go: 20 Beginner’s Questions About Pinhole

1. How does pinhole work?
Pinhole photography takes advantage of the fact that all light travels in a straight line. There’s a teeny tiny pinhole that only allows a projection of one very small beam of light from the scene you are photographing to hit the film or sensor plane. So with pinhole, you’re using all those beams of light to comprise the image.

2. Does it have to be film?
Nope – it can be film, photographic paper, a digital camera (a DSLR with a pinhole body cap), Polaroid (or instant) film, or alternative photography sensitized materials (such as cyanotype or wet plate). The pinhole just needs to project on something light sensitive for the capture of the image. However, film or paper are the easiest ways to start your pinhole adventure.

[bscolumns class=”one_third”][singlepic id=228 w=150]Mickey on the Merry Go Round, ©Kier Selinsky (Polaroid)[/singlepic][/bscolumns][bscolumns class=”one_third”][singlepic id=314 w=200]Still From a Dream, ©Steven Dempsey (DSLR)[/singlepic][/bscolumns][bscolumns class=”one_third_last”][singlepic id=121 w=200]Under the Trees, ©Marko Umicevic (Paper Negative)[/singlepic][/bscolumns][bscolumns class=”clear”][/bscolumns]


3. What kind of film can be used?
Any kind – 35mm, 120, 220, large format, black and white or color or even IR – so long as it works with your camera, it’ll work for pinhole.

4. Where do I buy film?
Lots of places online such as Amazon (usually more expensive), B&H, and Freestyle Photographic. Film is still widely used!

5. What is reciprocity failure and does it apply to pinhole?
It’s easiest to explain reciprocity failure in relation to normal film performance. Normally, when exposing films, the exposure progresses in a linear fashion, meaning that as you double the exposure time, you double the exposure (brightness) of the image on the film. It’s a reciprocal relationship. Reciprocity failure is when that reciprocal relationship breaks down and doubling the exposure time no longer doubles the exposure. When this happens, you have a correction factor to apply to get the desired exposure level. Reciprocity failure definitely comes into play when shooting pinhole because of the longer exposure times. Don’t worry! There are very cheap tools to help deal with this – see the question on figuring out exposure below. Note: reciprocity failure is why many pinhole photographers use Fuji Acros 100 – it has no reciprocity failure up until 2 minutes of exposure, covering a great many exposure situations without failure compensation.

6. Do I have to have a darkroom?
Nope! Most of us don’t. If you do have one, great! You have more options. Otherwise, this brings us to the next question…

7. Where can I get my film or paper developed and scanned? Is this like a disposable camera?
Film can be developed at home or sent to a lab. It’s worth doing a little Google to see if there’s a film lab in your area – it’s not as uncommon as you might think. If you go local, try to find a pro photo lab, not a drug store, as pro labs will have better scanning services. Another option is mail order labs, such as Richard Photo Lab, Little Film Lab, Indie Film Lab, The Darkroom, and North Coast Photo. If you don’t have a film scanner, have the lab scan your film at the time of development for the most cost effective turnaround. I also recommend getting the highest resolution scan for the whole roll right off the bat. Scanning the whole roll at the highest resolution at development time will usually save you money and time over sending the film back later for a rescan at a higher resolution.

Paper will need to be developed in a dark room. Note that I didn’t say a darkroom – rather, a dark room. It can be a real darkroom if you have access to one. What I do is set up trays in my bathtub, and hang light tight cloth over the door and window, put in a safelight, and I’m ready to process my paper negatives.

In the end though, this is not like a disposable camera where you send the whole thing in to a lab. Whatever film format you use, if you use film, you’ll only be getting the film processed.

8. What gear is required?
A camera and the film or other light sensitive material to go in it. That’s all that’s really required. Also, “camera” in this case can literally just be a shoebox with a pinhole – it doesn’t need to be fancy. Some prefer that it’s not!

9. Do I have to use a tripod?
Only if you want the camera to be steadied and above the ground and other platforms. Otherwise you can handhold it for a cool shaky effect or just set it on the ground or other surface.

10. Do I have to build a camera? How dark does the box need to be?
You don’t have to build a camera – they can be purchased as well. Some of our fave vendors for built cameras are Zero Image, Ondu, NOPO, and RealitySoSubtle. This list is not exhaustive, and there are plenty of boutique makers as well as some “big boys” – the point is, you have options. You could even just buy a pinhole body cap for your DSLR – certainly the cheapest DSLR “lens” you’ll ever buy! If you do build one, it needs to be absolutely light tight to avoid light leaks streaking your film or paper. Do you have access to a 3D Printer? You could just print a camera!

11. Are there lenses for pinhole photography? What if I want to zoom in?
There are 3 ways you can zoom in pinhole:

  1. Build a camera with bellows (or use a large format camera with bellows). Be sure to change the pinhole diameter for different focal lengths.
  2. Build or buy a system like the Zero Image 4×5 with multiple focal length frames that can be applied
  3. Use the “foot zoom” – as in use your feet to walk closer 🙂

12. Can I pinhole without a pinhole camera?
Actually you can! By creating a whole room “pinhole camera”, you can project the outside world in a relatively light tight room, and capture the image with a DSLR. Here’s some Google Image search results to inspire what’s possible.

13. How do you figure out the exposure?
When you get a camera, you’re provided with the ƒ number. Alternatively if you build a camera, you can use a pinhole calculator to find out your ƒ number. The ƒ number is your aperture, and for pinhole they’re typically in the ƒ/100 to ƒ/300 range. Once you have that ƒ number, theres a few ways to calculate exposure:

  1. Easiest: use a smartphone app
  2. Printed: make a conversion chart so that you can meter a scene with your regular camera and convert the exposure time from that to your pinhole camera’s needs
  3. Sunny 16: for the minimalist route, use the “sunny 16” rule and a printed conversion chart to figure your exposures. By learning through experimentation and leveraging film latitude, you can achieve very useable exposures. PhotographyTalk.com has a great write up on how to use the technique.

14. How difficult is it to get an acceptable image?
It’s deceivingly easy. The hard(er) part is learning the unique properties of pinhole and wielding them effectively to make remarkable images. That being said, plenty of photographers get some real zingers from their first roll.

15. Why are some pinhole photos very unusable and blurry, while others are quite sharp?
There’s a few factors involved here. The first is the quality of the pinhole itself. Many people make their own pinholes using a pin to drill through a piece of an aluminum can. While many people are successful with this, the less round that hole is, the more it will distort the image; instead of perfect circles of light making the image, it will be some other shape. Other pinholers (myself included) buy laser drilled or chemically etched pinholes because they are perfectly round. Another factor is how steady the camera was during the exposure – some people have sturdy tripods, while others handhold the camera to create blur and shake. Finally, the pinhole being used might not be the ideal size for the focal length – if it’s too big, the images will be very “soft” and can be perceived as blurry. But again, some people like that and use it very effectively.

16. What types of subjects work well for pinhole?
That depends on your imagination. Anything can be shot well with pinhole, it’s about utilizing the properties of the camera and the long exposure to create the effect you want. Our featured artists give some great examples of the medium’s capabilities. It’s easiest to start with scenes that mix subjects in motion with other elements that stay still (moving clouds over a landscape is a great learning tool). Another great starter recipe is utilizing a super wide angle pinhole camera on super close ups (think inches away) for new and interesting perspectives.

17. Why are some people so focused on pinhole photography?
I can’t speak for all, but I can paint some broad strokes. Some photographers focus only on pinhole because the aesthetic matches their vision. Others like it because the very limited complexity and controls can be liberating in today’s pixel perfect DSLR world. Personally, I enjoy pinhole because it helps me see differently, and the long exposures help me be more mindful of the shot I’m taking.

18. How do some pinhole photos get such extreme wide angles?
Since pinhole has near infinite depth of field, this means that you can get the film plane very close to the pinhole. The closer it is, the wider that angle will be. Since we’re freed from the constraints of having to figure out the complex math in lens creation, you can just try building a camera with a super short focal length and see what you get! Scott Speck is a master of super wide angle.

19. How do some pinhole photos seem warped?
Some pinhole cameras, such as the Pinhole Blender, wrap the film around a curved object inside the camera. Other folks will use paper negatives and crumple the paper in a bowl shape and stuff that into the camera. Some camera, particularly super wide format like 6×12, will have a concave curve to the film plane to try and reduce warp while other 6×12’s will have a flat film plane to accentuate the edge distortion. The near infinite depth of field of pinhole allows camera makers and pinholers to experiment with film plane shapes and angles to come up with some very cool combinations.

20. Why do people disappear in some longer exposures?
Let’s imagine a photo that requires 6 or 7 minutes for the exposure. The scene is filled with people. Remember that when you metered the scene at 6 or 7 minutes, that was what was required to register the objects in that scene at a normal tone (middle gray or middle color value). If a person stays still for that entire exposure, they’ll show up at a normal tone; if they stay in place for 1/2 the exposure, they’ll be half as dark; 1/4 the time, 1/4 the tone. Over the course of that 6 minute exposure, it’s likely that they’ll stay in one place for no more than 30 seconds – that’s 1/12 the time – not enough time to make a meaningful registration on the film. This is exactly what happened in my West Side Market photo – the market was packed full of people, but a 6 or 7 minute exposure erased almost all of them!

[singlepic id=27 w=600]West Side Market, ©Kier Selinsky[/singlepic]


I hope this gets some of those hard-to-ask questions out of the way so that you can start to explore pinhole photography! If you have other questions, you’re surely not the only one – put them in the comments below and I’ll answer ASAP. Cheers!
 

Inspiration Week of 6/20

For this week’s inspirational set, we bring 4 movements, all from Europe. Which is appropriate, I suppose, since the whole world is looking to Europe today due to the passage of the Brexit. No matter your political leanings on the issue, we think you’ll find these works inspiring. If you need more, as always, you can check out our recap galleries!

Pinhole No.1
[singlepic id=370 w=600]Pinhole No.1 ©Christian Schaus 2016[/singlepic]

Christian Schaus wielded his Zero Image 2000 loaded with Ilford Pan-F to make this image at Jervaulx Abbey Park, in Yorkshire Dales, England while on holiday in August last year. This trip was his first time using a pinhole camera, where he fell in love with the simplicity of it, and he hasn’t used any other format since! You can find more of his fantastic pinhole images on his Flickr page.


Stockholm Central Station
[singlepic id=371 w=600]Stockholm Central Station, ©Gunnar Eld 2016[/singlepic]

Gunnar Eld loaded his Ondu 6×6 with HP5+ for this scene of the Stockholm Central Station, and as a result of the 6 minute exposure, most of the people have vanished from the image, which “adds another dimension to images where only things more permanent stay visible. Perhaps a thought that applies to other things in life as well.” Indeed. You can find more of Gunnar’s work on his Flickr page.


Machina
[singlepic id=369 w=600]Machina,©Zoltan Adam Varga 2016[/singlepic]

Zoltan Adam Varga made this abstracted detail of a washing machine with his homemade 6×6 pinhole camera and Kodak Ektar 100. His camera is made of LEGOs, plastic sheets, a mouse pad, and aluminum beer can for the pinhole. Something to remember if you ever lament not having the shiniest and newest camera! You can find more of Zoltan’s remarkable pinhole photography on his Flickr page.


Untitled
[singlepic id=372 w=600]Untitled, ©Maciej Mucha 2016[/singlepic]

Maciej Mucha made this impressionistic capture in London with a homemade box camera loaded with Ilford IVMG paper. He held the camera for 25 seconds while making the exposure of skyscrapers. A creative boldness that has paid off very well in this case! You can find more of Maciej’s excellent pinhole work on his Flickr page and on his portfolio website.


Build a Pinholga!

For those of us not endowed with fine builder skills, converting an existing camera into a pinhole camera is one of the surest ways to get yourself a reliable rig for shooting pinhole. In addition to taking care of the camera housing for you, a camera conversion can add other advantages such as reliable film transport, a viewfinder, and built-in tripod adaptor. In this article, I’ll cover how to convert a Holga camera into a pinhole camera.

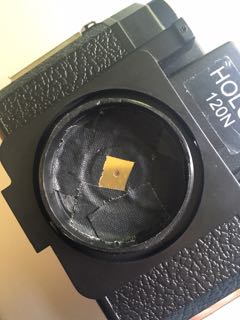
Holga made a couple different pinhole variants of their popular camera, so why would I convert a lens-based one into a pinhole version? I had several of them sitting around, and I didn’t care for the particular vignetting on this one, so I decided to rip it apart and document the process for you. Some of what I’m going to cover here can be applied to any camera conversion.

[singlepic id=365 w=200 float=left][/singlepic]Start by removing the two screws – one above the square and one below – and the entire front of the camera will come off. That’s all it takes to remove the lens and shutter housing on the Holga! With other cameras it’s not as common to be able to remove the whole housing with just a couple screws. Evaluate the camera construction to see how to remove the lens.


[singlepic id=362 w=200 float=left][/singlepic]With the lens and shutter housing removed, you have access to the most important part of this build on the Pinholga. For other camera types, this is where your most important decisions come into play. Will you use the lens housing at all? If so, you need to figure out how to remove the glass. Will you ditch the lens housing and just use the shutter? Then you’ll need to mount the pinhole with room for shutter action. Or you can ditch the whole lens and shutter housing and mount the pinhole straight to the camera body. But doing that will mean you have to figure out an alternate shutter – not difficult, but a consideration all the same.


[singlepic id=363 w=100 float=left][/singlepic]For the Pinholga, I’ll be ditching the lens, but keeping the shutter mechanism. To get rid of the Holga lens, it’s as easy as unscrewing it enough that it pops off. You’ll unscrew it (focus towards infinity) till you feel it stop – then turn it some more. With the lens out of the picture, you can reassemble just the shutter and housing and mount it back to the camera. You’ll find that the aperture gives plenty of room for the pinhole.


[singlepic id=366 w=200 float=left][/singlepic]On the Holga, the lens focus was stopped by a peg, basically to keep you from unscrewing the lens every time you focus on infinity. But it’s not conducive to pinhole – it’ll be in your field of view, and it’s a light leak. My solution: chop it off with the Dremel tool. But you can use anything that can slice through plastic. Just get rid of it.


[singlepic id=364 w=200 float=left][/singlepic]For the pinhole, I had a couple options. One option was to use some laser drilled pinholes I had from eBay. Another option was a pinhole ordered from RealitySoSubtle. I decided to go with the RealitySoSubtle pinhole largely because it comes premounted on a disk that makes it much easier to mount nice and flat. If you’re working on a different camera conversion, consider what will mount easiest and how you’ll secure it nice and flat – the photo quality will turn out much higher with a flat pinhole.


[singlepic id=367 w=200 float=left][/singlepic]Gaffer’s tape – I could write poetry about gaffer’s tape. If you don’t have any, buy a lot. You’ll use it for years. It’s great because it doesn’t leave residue, but is strong as duct tape. Here you can see that’s what I’ve used to secure the pinhole.


[singlepic id=368 w=200 float=left][/singlepic]Once your pinhole is on there, you’re basically done. But if you’re looking for extras – you can buy a gross of bullseye levels on the cheap from eBay, and it can be perfectly secured with a healthy dollop of epoxy. One addition that I consider a must-have for the Pinholga – if you keep the shutter in tact – is to use the cable release adaptor.

Finally, a bonus feature of the Pinholga: a 46mm filter will screw right into the plastic adaptor that the (now discarded) lens used to attach to. Hello B&W filters!

That’s it – the relatively simple Pinholga build! Once you have the materials assembled, I’ll bet you can get it done in under an hour. Happy pinholing!


Inspiration Week of 6/13

Today’s inspiration is in 3 movements: the scenic, the abstract, and the impressionistic. I love all 3 and, when out shooting my own pinhole camera, often get twisted up trying to decide which to do. The following are some fine examples, to help open your eyes for the weekend. Need more? Check out our galleries of prior inspiration!

Untitled
[singlepic id=360 w=600]Untitled, ©Sarah Taft 2016[/singlepic]

Sarah Taft made this soft scenic capture in North Carolina while visiting family in the Fall of last year. She made the capture with her Zero Image and Ektar 100 and the result is some very creamy colors. You can check out more of Sarah’s work on her website and on her Flickr page.


Walt Disney Concert Hall
[singlepic id=361 w=600]Walt Disney Concert Hall, ©James Thorpe 2016[/singlepic]

James Thorpe caught this abstract scene with his RealitySoSubtle 4×5 pinhole camera at the Walt Disney Concert Hall. Due to the harsh lighting in Los Angeles, James was challenged with finding a color film slow enough to get the time effects he desired. He made this capture with Fuji CDU II Duplicating stock – a film originally made for darkroom duplication work – which has an ISO of 4. James has examples on his Flickr page of other experimental films, such as Kodak Vericolor II from the 70’s, also with an ISO of 4.


Osterseen xiv
[singlepic id=359 h=600]Osterseen xiv, ©Michael Richter 2016[/singlepic]

Michael Richter captured this impressionistic scene of a forest by vertically panning his “beast” of a homemade pinhole camera, named “Vivian”. Vivian has a focal length of 35mm and was loaded with XP2 for this photo. You can check out more of Michael’s work on his flickr page or on his blog (in German).