Inspiration Week of 8/22

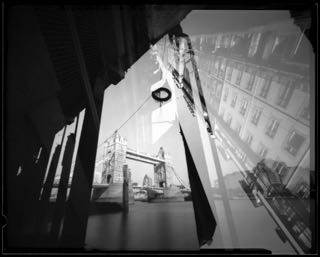
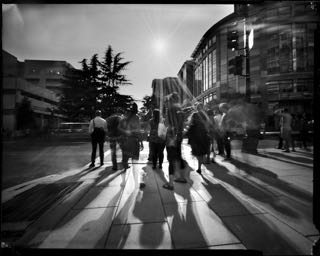
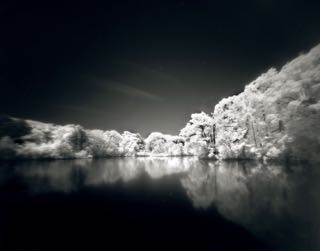
This week for our inspirational post we’re happy to bring you something on the more experimental side. Playing with these techniques will usually give mediocre results at first, but with a bit of effort, the work will pay off. Once learned, I’d love to see how you apply these techniques to your own creative vision. Don’t forget to share your new work with us – here’s the submission guidelines!

No Title
[singlepic id=467 w=600]No Title, ©Vanesa Henseleit 2016[/singlepic]

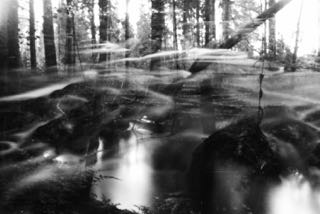
Vanesa Henseleit is a talented and stylistically unique photographer from Santiago, Chile and she made this photo using partially overlapping multi exposures. It’s a wonderful example of the technique! Vanesa also dedicates a decent amount of her energy to her group, Lucky Pinhole, which conducts workshops, projects, and calls for pinhole work. I highly recommend you check out more of her work on her website.[spacer height=”20px”]

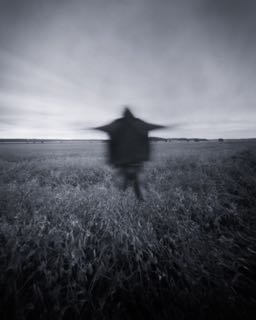
Scarecrow
[singlepic id=468 w=600]Scarecrow, ©David Stenström 2016[/singlepic]

David Stenström made this haunting image with a Robert Rigby 4×5 camera loaded with Fomapan 100. The exposure was roughly 2 minutes while the camera was pointed at a friend standing in a field of peas, whom David instructed to move slightly to bring the motion feel. David has some great work on his Flickr profile that is worth looking at![spacer height=”20px”]

Nite Flights
[singlepic id=466 w=600]Nite Flights, ©Andy Martin 2016[/singlepic]

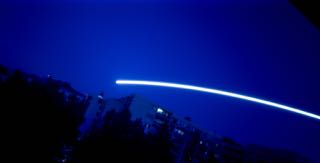
Andy Martin has a great project on display at his website called Nite Flights, combining long night time pinhole exposures and motion to get a visual embodiment of chaos. You can find the rest of these images on his website by clicking here. He also has more great work on his Flickr page.[spacer height=”20px”]


Antonis Kioupliotis – No Lens Athens

If I’ve seen one picture of Athens, I’ve seen a thousand. Moreover, paintings, statues, and studies in art history. They just pile up. The common thread though, at least of the photos I’ve seen of Athens is that they are, not always but usually, produced by tourists.

You know you’ve truly lived in a place when you get to a point where you have to try something other than a straight on shot. When you get past the tourist shots, after you turn the camera around a few times. Then you really start to find something new in your little piece of the world.

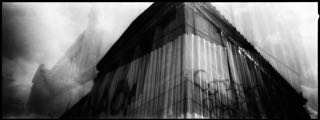
Antonis Kioupliotis knows Athens. He was born in Thessaloniki, Greece and studied photography in Cologne, Germany before returning to Greece to work as a professional photographer. Most recently, he resides in Athens where he creates dynamic scenes with a Hasselblad XPan fitted with a pinhole and loaded with expired Kodak Double X film. The results are, to say the least, remarkable; enveloping; and inspiring. It is truly the work of a man who knows his place.

Featured below is a sampling of this project. It is a large body of work – at least 57 images all told. After checking out the below, you can find the rest of the project on his website here. You will not be disappointed.[spacer height=”20px”]

[singlepic id=465 w=600]Syntagma Square, ©Antonis Kioupliotis 2016[/singlepic][spacer height=”20px”]

[singlepic id=455 w=600]Acropolis Museum, ©Antonis Kioupliotis 2016[/singlepic][spacer height=”20px”]

[singlepic id=461 w=600]People I, ©Antonis Kioupliotis 2016[/singlepic][spacer height=”20px”]

[singlepic id=462 w=600]People II, ©Antonis Kioupliotis 2016[/singlepic][spacer height=”20px”]

[singlepic id=464 w=600]House, ©Antonis Kioupliotis 2016[/singlepic][spacer height=”20px”]

[singlepic id=463 w=600]University, ©Antonis Kioupliotis 2016[/singlepic][spacer height=”20px”]

[singlepic id=460 w=600]Filopappou, ©Antonis Kioupliotis 2016[/singlepic][spacer height=”20px”]

[singlepic id=458 w=600]Buildings, ©Antonis Kioupliotis 2016[/singlepic][spacer height=”20px”]

[singlepic id=457 w=600]Athens Academy, ©Antonis Kioupliotis 2016[/singlepic][spacer height=”20px”]

[singlepic id=456 w=600]Acropolis, ©Antonis Kioupliotis 2016[/singlepic][spacer height=”20px”]

[singlepic id=454 w=600]Abandoned Houses, ©Antonis Kioupliotis 2016[/singlepic][spacer height=”20px”]

[singlepic id=459 w=600]Face, ©Antonis Kioupliotis 2016[/singlepic][spacer height=”40px”]

Inspiration Week of 8/15

Welcome to this week’s set of pinhole inspiration! It’s been a busy week – as the Call for Entry came to a close, we got a flood of GREAT work! We’re very excited about this upcoming project. Don’t stress if you entered and haven’t heard back yet – we have some catching up to do!

Low Season
[singlepic id=449 w=600]Low Season, ©Vincenzo Caniparoli 2016[/singlepic]

Vincenzo Caniparoli made this image recently in Sardinia, Italy as part of his work looking at popular holiday locations during the less popular hours. He used his homemade 4×5 camera with Fomapan 100 to capture the reminiscent scene. You can find more of Vincenzo’s wonderful work on his personal website and his Flickr page.[spacer height=”20px”]

Untitled
[singlepic id=453 w=600]Untitled, ©Petr Stul 2016[/singlepic]

Petr Stul provides us this beautiful rushing scene that pulls you in close. You can find more of his work on Live Journal, Facebook, 500px, and Flickr.[spacer height=”20px”]

Lunargraphy in summer
[singlepic id=450 w=600]Lunargraphy in Summer, ©Dirk Ahrens 2016[/singlepic]

Dirk Ahrens produced this lunargraphy photo as a first attempt, and a quite wonderful one at that. The experience has taught him a lot, which he’ll use to produce more. The moon stayed low in the sky because of the summer latitude. You can find more of his work, which will soon include more recent lunargraphs, on his Flickr page.[spacer height=”20px”]

Pordenack Point
[singlepic id=451 w=600]Pordenack Point, ©Mark Rowell 2016[/singlepic]

Mark Rowell made serene this photo with his Zero Image 45 loaded with New55 film from Pordenack Point looking across Zawn Trevilley towards Carn Boel. He has more great imagery on his Flickr profile.[spacer height=”20px”]

Trouville crépuscule
[singlepic id=452 w=600]Trouville Crépuscule, ©Etienne Boissise 2016[/singlepic]

Etienne Boissise likes how “pinhole sets you free from the ordinary eye’s perception” and how holding the camera over a long exposure involves the hand and body in a way that other forms lack. The result in this beach scene is extraordinary. You can find more of Etienne’s work on Flickr.

Accurate Pinhole Exposure Measurement

Almost every pinhole photographer I talk to today is using a smart phone app to do their exposure measurement. There’s some holdouts who use the Sunny 16 rule. There’s the occasional pinholer who’s got a trusty Pentax Spotmeter or the latest Sekonic digital meter. But by and large, pinholers today are using smartphone apps, and so am I.

The smartphone apps are an amazing development of convenience – nobody leaves their house without their phone anymore, so it just makes sense. Getting a passable exposure is a no brainer. But we’re not here today to talk “passable” – no, today we’re going to talk about wielding this tool to create the image you’ve pre-visualized. Have you ever taken a shot where you expected a one portion of the scene to be rich in detail and tone, but what you get back from the lab in either unusably dark or completely blown out? Yep, we’re gonna fix that today!

Grab a cup of coffee or tea – this is a lengthy one

Deceptions in Smartphone Apps

The first step is to understand that while your smartphone app is amazing, if you don’t know some details, it’s lying to you. Here’s some of the ways:

  • If auto-brightness is turned on, the screen display is almost always going to be brighter than what the reading says
  • Without the spot meter enabled, it can be difficult to make decisions on the scene you want
  • Your smartphone screen has a different dynamic range than film
  • Certain screens have inherent color casts
  • Reflections off the screen can mean that problem areas of the scene aren’t noticed

Solution: Return of the Zone System

I grew up before digital, when you had to sweat it out in a darkroom for hours trying to rescue a bad exposure. While film was cheap, time wasn’t, so Ansel Adams’s Zone System was a great shorthand in that day. Lately, a lot of photographers eschew the Zone system referring to it as antiquated – in many situations, they’re right. The light meters these days are better, film and digital latitudes are longer, and if you’re shooting digital, you can “chimp” the histo till you’ve got the exposure.

But of course there’s no light meter in our pinhole cameras. And the apps have the shortcomings noted above. So once again, the Zone System becomes a useful shorthand to ensuring you have the exposure you want.

What I’m going to describe here is what I call a “loose” Zone System. Why “loose”? Because the Zone System should be used with a spot meter, and that “spot meter” on your phone isn’t a true 1º spot meter – the iPhone is more like a 10º spot, maybe even 15º. This means that when you read areas for a Zone, you’re going to be reading more than you might want to be. So Zone System purists I apologize, but everything relies on that bigger swath of metering.

What is the Zone System?
If you’re not familiar with the Zone System, I’m not going to do a full write up here – plenty others have done that job extremely well already. Here’s a very very brief shorthand:

  • There’s 10 zones, or distinct exposure levels, in print latitude. Zones correlate to stops in exposure
  • Zone 0 is pure black
  • Zone III is the lowest shadow value with detail
  • Zone V is “middle gray”, what your light meter reads, and what you expose at
  • Zone VI is typical caucasian or asian skin, while Zone V is typical African American skin, and darker skin types can be as low as III
  • Zone VII is the typical highlight value with detail – but if you know what you’re doing, you can get detail in IX or X
  • Zone X is pure white

Want to learn more? The rabbit hole is deep – here’s a good primer: Norman Koren Simplified Zone System

Applying the Zone System with a Smartphone App

As I alluded above, typically the Zone System calls for a 1º spot, but a smartphone has a 10º or 15º spot. Traditionally you use the 1º spot meter so that when you read a portion of your scene, you’re just getting that Zone of exposure. Since smartphone apps have such a large “spot”, we need to slightly adjust how we use the Zone System to get the exposure we want.

So here’s my process to get loose on this concept and still get the details I want:

  1. Determine the composition of the scene
  2. Open my smartphone app and turn on the spot meter setting
  3. Meter every area of the scene that you want detail in, writing down the EV values
  4. Mark the lowest EV value you read as Zone III
  5. Add 2 to the EV value in step 4 and that is my Zone V
  6. Add 4 to the EV value in step 4 and that is my Zone VII

Now that you have your scene “mapped” by zones, you can evaluate the exposure. If based on the above you have the shadow and highlight details you want, and your mid ranges are right, then you can expose for the reading at Zone V. However if your shadows will be too light or your detailed highlight above Zone VII, you might want to reduce the Zone V exposure by one or more stops before shooting that reading. Alternatively, if your shadows are too dark or highlights will be on Zone V, you may want to expose your Zone V reading longer. Remember when making these adjustments: 1 zone = 1 stop of exposure!

Zone system purists would tell you to get your smartphone closer to try and get more detailed reading on the shadow and highlight detail areas. For lens based photography I would agree, however for pinhole I feel that the larger sensing area of the smartphone app “spot” is appropriate due to the reduced detail available in pinhole photos.

Real World Example 1

If this your first foray into Zone System photography, the above was probably confusing to you. The following example may shed some needed light on the process.

Near my office I wanted to take a photo of some old smoke stacks. I’ve photographed them before, but they’ve always come out boring. Today was a windy day, so I thought I’d take a stab at using the wind-whipped branches blurred in the foreground to add some drama. I’ll know in a few weeks if it worked. In the meantime…

I approached the scene knowing my framing and wanting to see the range of values. I got the lowest value in the base area of the tree. I got mid values in the upper area of the tree. I got high values in the sunny mid-day sky. Here’s my readings:

[bscolumns class=”one_third”][singlepic id=441 w=200][/bscolumns][bscolumns class=”one_third”][singlepic id=442 w=200][/bscolumns][bscolumns class=”one_third_last”][singlepic id=443 w=200][/bscolumns][bscolumns class=”clear”][/bscolumns]

Note that these readings line up almost perfectly to my process:

  • Zone III: EV 13
  • Zone V: EV 15 1/3
  • Zone VII: EV 17 1/3

Also note that if I weren’t using Zones and just relying on the full screen or even on a single reading:

  • The sky would have been blown out in the EV 13 example
  • The smoke stacks and foliage would have been darker than I wanted in the EV 17 1/3 example

Ultimately I made a 1 second exposure for the photo. Since everything was going to be in motion, I was OK with losing a smidge of shadow detail, but I could gain some better cloud streaks.

Real World Example 2

I know you’re thinking that that example was just too damn convenient, because of the way the zones lined up just right. Honestly, they often do in outdoor scenes, but in this example let’s look at how zones help us when things aren’t just right.

In this indoor scene, I want to capture some details of the radiator and wall inside the stairwell as well as some of the clouds streaking by outside. When I look at the scene through my phone, it looks like it should be possible, but lets see how some of the reading stack up:

[bscolumns class=”one_fourth”][singlepic id=444 w=150][/bscolumns][bscolumns class=”one_fourth”][singlepic id=445 w=150][/bscolumns][bscolumns class=”one_fourth”][singlepic id=446 w=150][/bscolumns][bscolumns class=”one_fourth_last”][singlepic id=447 w=150][/bscolumns][bscolumns class=”clear”][/bscolumns]

If I map this the way I did in example 1, then I’d get:

  • Zone III: EV 7 1/3
  • Zone V: EV 10 1/3
  • Zone VII: EV 12
  • Zone X: EV 15 1/3

Hmm… that might not quite be the exposure I was hoping for, because I do want the clouds to streak by some, but putting the upper window are on Zone X would probably blow them out. Then again, if I put the upper window on Zone VII, that will knock the radiator down to Zone 0. A creative decision needs to be made here – the important thing to take away is that without understanding how to map these readings to Zones, my creative decision would just be a guess.

Closing Notes

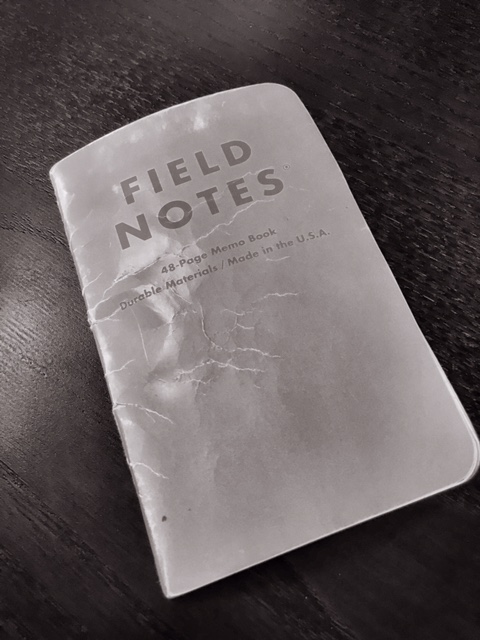
I hope this walkthrough helps your creative journey. Once you understand how to apply the zones to your pinhole photography, you’ll be able to get more full rolls of “winners” and reduce your reliance on luck. My single biggest piece of advice is this: Take detailed notes! Even if you don’t use the Zone System to drive your exposure decisions, a few notes about different EV readings in the scene will help you review later what went right or wrong with the exposure decision. I keep a notebook in my back pocket constantly just for this purpose.

[singlepic id=448 w=300 float=center]My exposure notebook,
rides in my back pocket every damn day[/singlepic]

[spacer height=”20px”]

Inspiration Week of 8/8

Summer is winding down but it has been a looong week here. Lots of meetings, and LOTS of great entries coming in for the Call for Entry (only a few days left!) – we’re looking forward to the weekend here at ƒ/D. Thankfully, some fresh pinhole inspiration to keep the spirits up![spacer height=”20px”]

Summer Eyes
[singlepic id=440 w=600]Summer Eyes Diptych, ©Victor Senkov 2016[/singlepic]

Viktor Senkov made this warm image with his converted Lubitel 2 pinhole camera and Kodak Portra 400. He is a very accomplished photographer and works in many forms of the medium. You can see more of his work on his Flickr profile.[spacer height=”20px”]

Pinhole Session with Ben
[singlepic id=438 w=600]Pinhole Session with Ben, ©Bernie Vander Wal 2016[/singlepic]

Bernie Vander Wal hails from BC, Canada who took up pinhole photography 5 years ago because of the way it related to the aesthetic of painting that he’s trained in. He builds his own cameras and mostly captures his local landscape, but has been branching out to portraiture. This photo is a collaboration with his grandson Ben, as he introduces the young man to the art form. You can find more of Bernie’s work on his Flickr page here.[spacer height=”20px”]

Restaurant
[singlepic id=439 w=600]Restaurant, ©Paul Jones 2016[/singlepic]

Paul Jones made this image outside the Lost Soul restaurant in the River Arts District of Asheville, NC. He’s got a solid body of good pinhole work on his Flickr profile, and I encourage you to check it out.[spacer height=”20px”]

Forest stream
[singlepic id=436 w=600]Forest Stream, ©Alexander Popov 2016[/singlepic]

Alexander Popov made this double exposure to create a wispy feel to the forest using his DIY 6×6 pinhole camera. Double exposures can be tricky, but it definitely worked for him. You can find more of his excellent work on his Flickr page. [spacer height=”20px”]

my favorite tree
[singlepic id=437 w=600]My Favorite Tree, ©Dieter Schneider 2016[/singlepic]

Dieter Schneider captured this moment of his favorite tree using an Ondu 4×5 camera. Dieter has developed a truly remarkable and consistent feel to his work and I encourage you to check it out on his Flickr page.

[spacer height=”20px”]

July Recap

July was a busy month! We covered a lot of ground in pinhole – opening up some very interesting perspectives and adding to our catalog of technical articles. Check below to make sure you didn’t miss anything.

Have you responded to our Call for Entry? If not, have a look! Entry is free!

[spacer height=”20px”]

Brussels Rd Point - Rue Antoine Labarre - Jeanus Loctet - thumbAs always, we found some great fresh pinhole work. You can see July’s full gallery and links to past months here.

[spacer height=”40px”]

Ljusets Hastighet - Lena Källberg 2016 - thumbWe explored the impressionistic views of life slipping by in Lena Källberg’s Decisive Movement work.

[spacer height=”40px”]

NEW DAY - Michael D Hawley - thumbWe interviewed Michael D Hawley, the talented professional photographer from the Pacific Northwest, and learned how he grew up in photography and how it shaped his pinhole work.

[spacer height=”40px”]

On the Move - Howard Mosier - thumbHoward Moiser brought us a new perspective on movement in his Relative Movement series.

[spacer height=”40px”]

Finally, guest author Delio Ansovini shared with us his journey in IR pinhole, and shared some great data to get you started exploring the medium yourself.

[spacer height=”40px”]

Be sure to sign up for our newsletter (on the right) so that you get weekly updates sent straight to your inbox!

[spacer height=”20px”]

On Travel – Markus Kaesler

Markus Kaesler is a German photographer with a level of intent to his multi exposure work that is rarely seen. As you’ll soon see, the photos below require a care in execution that is as meticulous as it is devoted. What follows are samples from two of Markus’s projects. The first, CONTACTS, are multi exposures taken from cities connected by his travels. The second, in between, are whole travel exposures that record the experience as travel between places.

After viewing these, I implore you to take a look at Markus’s website for more of his work. Markus first reached out to us through our Call for Entry and will be included in the upcoming ƒ/D book. If you’re so inclined, I recommend that you also consider responding to our Call for Entry!

CONTACTS.

//crossing cities is a visual melting pot of cities. It links pairs of cities in different countries and unites them in a unique photographic way; one part of the pinhole images is taken in one city, the other part in its corresponding. On the same sheet of film. Every place has its very own character, determined by cultural values, religion and geographical settings. Keeping this in mind, the overlaying of cities in two different countries into a series of images that contains essential parts of both places does not only mean the physical crossing of borders. By using a technique of twisted double exposures, images are created that may be looked at from both sides. Depending on whichever side you look at, you may focus on different patterns of the image. And oversee others. The diversity of the places is shown in the same way as new ties are revealed. New forms and structures become visible, while the specific character of the places remains. The previous known adds up and leads to the unknown. The exposures float into each other. A kind of in between appears. The alphabet serves as a pattern. The cities are selected by the first letter of their names in english spelling. From that results the extent of 52 cities in 52 different countries.

Berlin//Bucharest 01
[singlepic id=426 w=600]CONTACTS Berlin//Bucharest 01 – ©Markus Kaesler 2016[/singlepic][spacer height=”20px”]

Paris//Prague 02
[singlepic id=431 w=600]CONTACTS Paris//Prague 02 – ©Markus Kaesler 2016[/singlepic][spacer height=”20px”]

Berlin//Bucharest 04
[singlepic id=427 w=600]CONTACTS Berlin//Bucharest 04 – ©Markus Kaesler 2016[/singlepic][spacer height=”20px”]

London//Lissabon 07
[singlepic id=429 w=600]CONTACTS London//Lissabon 07 – ©Markus Kaesler 2016[/singlepic][spacer height=”20px”]

London//Lissabon 08
[singlepic id=430 w=600]CONTACTS London//Lissabon 08 – ©Markus Kaesler 2016[/singlepic][spacer height=”20px”]

Berlin//Bucharest 10
[singlepic id=428 w=600]CONTACTS Berlin//Bucharest 10 – ©Markus Kaesler 2016[/singlepic][spacer height=”20px”]


in between

„in between“ shows the space between two places. The whole time of a journey banned on light sensitive paper. You see the resulting light traces that are painted on light sensitive paper during its journey crossing borders of countries and continents. The exposure starts in one country and ends in another. What you see is the “ in between“. Why do I care so much about the materials I use? If you consider photography as a storytelling art, you will recognize that the used material is part of the story. It makes a difference if a sheet of light sensitive paper actually has travelled thousands of miles while being exposed or if its just a piece of paper where the visual impression of a voyage is printed on. Some may say, that for the final visible impression it doesn’t matter how an image has been created. I oppose this, that the creating process is part of the resulting work. The true story may only be told by the one who experienced it.

BKK-SIN
[singlepic id=432 w=600]in between BKK-SIN – ©Markus Kaesler 2016[/singlepic][spacer height=”20px”]

FRA-BKK
[singlepic id=433 w=600]in between FRA-BKK – ©Markus Kaesler 2016[/singlepic][spacer height=”20px”]

FRA-IST
[singlepic id=434 w=600]in between FRA-IST – ©Markus Kaesler 2016[/singlepic][spacer height=”20px”]

TPE-HKG
[singlepic id=435 w=600]in between TPE-HKG – ©Markus Kaesler 2016[/singlepic][spacer height=”20px”]

Inspiration Week of 7/25

Welcome back, friends, for the latest installment of our photos to get you inspired for the weekend. Just a short set this week as coordinating things for our open Call for Entry took up a chunk of time. Hope you enjoy this set! When you’re done, there’s lots more to check out at the past features gallery! Use the newsletter signup on the right side of the page to get these updates mailed to you weekly!

Look Back
[singlepic id=425 w=600]Look Back, ©Dirk Ahrens 2016[/singlepic]

Dirk Ahrens made this photo as one of his first pinhole photos. Before this, he was working a lot with solargraphs until he picked up a Sharan Wide 35 and loaded it with Agfa APX 100. This foggy scene is from 1850 meters up in the Alps, at the passage between Kanzelwand and Fellhorn as rain fell in the valley. You can find more of Dirk’s Alps photos, solargraphs, and other work on his Flickr profile.[spacer height=”20px”]

GW Metro
[singlepic id=423 w=600]GW Metro, ©Scott Davis 2016[/singlepic]

Scott Davis is an experienced photographer in historic printing processes, and has recently started to work in pinhole for additional inspiration. He’s developed an appreciation for the simplicity of pinhole and how it lets him focus on the image, not the equipment. As he states: “Working with cameras that don’t have lenses or shutters per se, or at least that have primitive ones, means that serendipity becomes important in my work…What interests me is the capture of whole seconds, minutes and even hours of time in a frame, contrasting the things that move in the scene with things that remain static.” I encourage you to learn more about his work and processes at his site, dcphotoartist.com [spacer height=”20px”]


Lake Erie
[singlepic id=424 w=600]Lake Erie, ©Kier Selinsky 2016[/singlepic]

I made this photo of Lake Erie from the shores of the small city of Avon Lake, near Cleveland, OH, at about 8PM as the sun got low in the West. It was an exceptionally calm day, and my family and I enjoyed just basking in the warmth. I made this photo with my Zero Image 69 and Kodak Ektar film, exposure was about 9 seconds.

Pinhole Infrared by Delio Ansovini

Over a year ago we presented a fantastic guest article by Delio Ansovini covering the important aspects of camera geometry in pre-visualization of your pinhole photos. Today we are rejoined by Delio as he walks us through his IR process.

IR, or Infrared, is one of the more dramatic techniques available in film. Rather than exposing on the visible light spectrum that we see, Infrared film is exposed by the invisible Infrared waves that have just a bit longer wavelength than we can see. More importantly, to our purposes, the aesthetic of IR is dramatic because of the way that certain materials reflect more IR than others.

Shooting IR with a normal camera is a challenge, doubly so with a pinhole camera. The wavelength properties of pinhole, the film handling of IR, and reciprocity failure all combine to make a unique problem set. Below, Delio has put together his notes on learning IR pinhole. We hope this helps you on your journey to IR pinhole greatness!

On B/W Infrared Photography with 4×5 pinhole cameras

By Delio Ansovini

I started experimenting with infrared films using a pinhole camera in 2012 with a lens-less 6×9 Ikonta. It came out as an f316 with the R72 filter taped on to the mechanical shutter, all in front of the pinhole plate. Certainly it was awkward but…a functional arrangement. The Efke 820 was still ready available in the local stores so I made it my choice for infrared work.

There followed a couple of weeks of shooting around the local parks, all in the mid-daysun; high winds pushed the white clouds high in the sky across the frame creating very blurred streaked photographs. The poignant images were published in Blur Magazine in 2012.

Encouraged by how successfully they turned out, I ventured into the 4×5 format thinking that: aside from the much extended exposure time, there was not much difference in infrared photography between using a pinhole or a camera with a lens. What blessed ignorance; but here is the story one step at a time.

The film speed and exposure

It’s difficult to pinpoint an ISO rating for IR film because the ratio of infrared to visible light varies greatly from scene to scene and of course we can’t judge the difference since we can’t see IR reflections (IR frequencies are out of range for our eyes); nor can your off-the-shelf light meter help since it is calibrated for visible light.

Other factors affecting speed are the type of filter, the developer being used, and how you process the film. Some broad assumptions and decisions had to be made to eliminate the multitude of variables. Here’s my quick guide on how I initially approached the issues (since then revised):

  • I assumed that the sensitivity to visible light of the Efke IR820 was ISO100,
  • I used only the R72 filter and I assumed that factor was 5 stops.
  • I set the light-meter (L358) to ISO3, the lowest setting available. That is 5 stops from ISO100 using incident readings
  • I limited the pinhole 4×5 cameras to be used to the f175 and f250 only.
  • I used incident light readings at f22 and converted the exposure time from f22 to the pinhole camera f# using the following factors:
    • for f175 multiply the f22 exposure time by 63.3
    • for f250 multiply the f22 exposure time by 129.1
  • Add the reciprocity correction as in the following table.

recip correction efke


Development process

With the exposure method as established above, the first few 4×5 exposures were developed in a Unicolor tank using the Kodak Tmax Developer, 1+4 for 7minutes, all at 20C, in a continuous reversing agitation mode. I used 2 baths of water as stop wash for 3 minutes in total; fixed in Kodak Fixer for 10 minutes; washed for 20 min and hung to dry for 2 hours.

The results or lack of them

The negatives were underexposed; furthermore I noticed serious IR seepage through the camera’s felt gasket on both cameras and film holders dark slide when the camera was positioned in full sun for the required exposure.

I also felt that the TMax developer had no compensating properties at all, in fact rather useless for the application!

In short: neither my 4×5 cameras made in wood and Gator foam board, nor the old 4×5 dark slide in the aging film holders were infrared-proof. The relatively aggressive Tmax developer did not help either.

The fixes

The following procedural changes were implemented with good results with the 4×5 Efke IR820 film and the unmodified existing cameras and film holders.

  • Wearing latex gloves to handle the IR film for loading in full darkness, my fingerprints somehow became visible on the developed negatives if I did not use gloves.
  • Carry 3 film holders in an aluminum foil covered black plastic envelope. I used a recycled 8×10 film black plastic pouch, lined on the exterior with aluminum foil and double-sided sticky tape.
  • Load the film holder onto the camera in the shade and wrap the aluminum shield around the 3 sides of the camera covering the felt edge. Making sure the shutter is closed and locked in place, remove the blind slide and cover the top of the film holder with the shield.
  • Position the camera on the tripod in the sun for the shot.

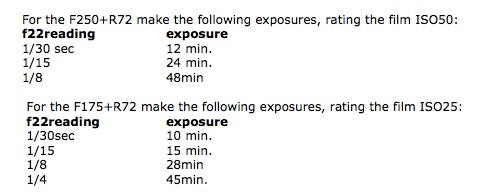
Calculate the exposure as before but rating the film as follows:
corrections2


• Open the shutter for the timed exposure.

Revised development process

Blown-out highlights are not my favorite attribute in a photograph, so I tried what I know works well with panchromatic films. My notes on the revised process read:

Film used: 4×5 Efke 820IR rated ISO25, f175, Filter R72, Exposure 15 minutes.
Film development: AdoxAPH09 1+100 for 15min In Rotary tank, continuous reversing; water wash 3 min; fixing 10 min.

The results after the fixes

All much better, no blow-out of the highlights, no elaborate PS editing with curves or masking, therefore I was quite happy.
However; the aluminum foil wrapping of the camera sitting on a tripod for 20 minutes or so did generate some amusing conversation with the curious (or alarmed?) passersby.
For that I devised a wooden back cover lined with foil, as shown in the photo. It is classier…

[singlepic id=415 w=600] [/singlepic]

Illustration legend:
1. The f250 back with the aluminum lining of the back cover
2. The back cover mounted on the camera
3. The camera front with the shutter (aluminum foil is lining the inside of the cap)
4. The R72 filter mounted in the camera inside. One of the three tabs is rotating so that the filter can be removed and the camera used with normal Pan film

Good things don’t last very long

First they discontinued the 4×5 Efke 820IR film, and then some chemist decided to change the formulation of the Adox APH09 so that what I used to dilute 1:100 I now have to dilute 1:40.

And yet I do sympathize with the individual in the German laboratory. I use only 120cc of APH09 working solution to develop 4-4×5 negatives. At 1:100 dilution it means 24 drops of APH09 concentrate from the 500cc bottle available. However; the compensating characteristics of the APH09 previous version are no longer there.

Fortunately we can be resourceful

Just a few weeks ago, I decided to revive two chemicals that I stored in glass jars- one is Sodium sulfite and the other is Metol. I purchased some distilled water and that’s all I needed to make the old D23 and, try it on a new Maco IR 820c.

New? Not quite, just new on eBay and available at a reasonable price. I did find this link to the film datasheet useful; in fact, I wish I had come across it earlier, although I enjoy the experimentation process.
http://www.maco-photo.de/files/images/MACO_TA820c_ENG.pdf

In reference to the making of the D23

It’s easy, even I can do it; and very economical. As far as I know there is only one formula for making this developer, the one listed in Ansel Adams’s book “The Negative”.

D23

Both chemicals can be purchased in powder form from Photographer’s Formulary, or as prepared solutions from B&H and others.

Well, the results of these two last process changes are shown in the photographs accompanying this article, and the details for each photograph are listed in my usual cryptic fashion. At least now you know what’s behind all the puzzling verbiage.

A warning to all that intend to use the data in this article: it works for me but it may be quite different for you. The major difference is in the agitation of my rotating developing tank which is quite unusual and energetic and cannot be controlled. At least the developing times, contrast and sharpness all reflect that.

In reviewing my writing along with the data published on the MACO IR820c data sheet referenced above, I become aware of a great discrepancy in the reciprocity factor to be used. This subjects maybe something to look into closer.

IR Sample Images

[singlepic id=422 w=600]The Midle of the Swamp, ©Delio Ansovini[/singlepic]


[singlepic id=418 w=600]The Ducks Pond, ©Delio Ansovini[/singlepic]


[singlepic id=417 w=600]Seat in the sun, ©Delio Ansovini[/singlepic]


[singlepic id=419 w=600]The Dunes, ©Delio Ansovini[/singlepic]


[singlepic id=421 w=600]The Rivulet, ©Delio Ansovini[/singlepic]


[singlepic id=420 w=600]The House on Fire, ©Delio Ansovini[/singlepic]


[singlepic id=416 w=600]Casa Loma Stables, ©Delio Ansovini[/singlepic]


Data for the photos presented

The swamp
The Duck Pond
Seat in the sun
The dunes
The rivulet

4×5 Pinhole
f175, L=35mm, Photo location: H. Park, Ontario
Date: June 2016
Film used: MACOPHOT-IR820c
Rated ISO 25 Exposure: 30 minutes
Filter.R72; Lighting: None;
Negative development: D23 1:1 for 11min In a Unicolor Rotary tank, continuous reversing agitation; no water wash; Neg. scanned 1200 dpi, RGB, spotted, duotone; framed to size.
——————————————-
The house on fire
Casa Loma

4×5 Pinhole
F250, L=50mm, Photo location: Casa Loma, Ontario
Date July 2016
Film used: MACOPHOT-IR820c
Rated ISO50, Exposure: 24minutes
Filter.R72; Lighting: None;
Negative development: D23 1:1 for 11min In a Unicolor Rotary tank, continuous reversing agitation; no water wash; Neg. scanned 1200 dpi, RGB, spotted, duotone; framed to size.

Inspiration Week of 7/18

Usually I start these weekly inspiration posts with some entertaining banter about the photos, but this week I have something more urgent. ƒ/D exists for two main reasons: to promote the art of pinhole photography and to promote those artists who – regardless of reputation or education – work with pinhole.

However, because of my persistent reaching out to photographers through other sites, I’m at risk of being shut out as a spammer. I need to throttle back on the unsolicited messages, and I need pinhole photographers to meet me halfway.

If you have work of your own or someone else’s that you’d like to be considered for sharing, I encourage you to do one of the following:

  • Like and message ƒ/D about your new work on Facebook: https://www.facebook.com/fslashd
  • Email ƒ/D about your new work at [email protected]
  • Tweet at ƒ/D about your new work @fslashd
  • Sign up for my email newsletter (right side of the page) – I haven’t sent these yet, but will be doing so soon

With your help, I can still send weekly updates of great pinhole photography!

Don’t forget our open Call for Entry!

Körök / Circles
[singlepic id=411 w=600]Körök Circles, ©Fitt Tamás 2016[/singlepic]

Fitt Tamás made this dramatic capture with his 6×12 medium format “Natasha” pinhole camera with Kodak Ektar 100 film. Fitt enjoys the super wide angle panoramic format because of the challenge it provides in finding that perfect location and scene. The long exposures and ritual process of pinhole give him the opportunity to observe more of his environment around him. You can find much more great work by Fitt at his flickr page.


Untitled
[singlepic id=414 w=600]Untitled, ©Michael Nelson 2016[/singlepic]

Michael Nelson has a very strong style to his work, which he applied with great results to this pinhole photograph. You can check out more of his work on his Flickr page.


祝 金沢開業
[singlepic id=409 w=600]祝 金沢開業, ©Takahiro Chiba 2016[/singlepic]

Takahiro Chiba used an Abelson Scope Works Omniscope to make this mind-bending capture of Kanazawa Station, Japan. The Omniscope has an anamorphic feature to it, that allows the light to come in at a 90º angle to the film plane, causing such radical distortion of the image. Anamorphic is also a favorite tool of ƒ/D interview subject, Jana Obscura. I invite you to check out more of Takahiro’s excellent work on Flickr.


My Ninety Seconds
[singlepic id=412 w=600]My Ninety Seconds, ©Eric Li 2016[/singlepic]

Eric Li made this image with an Ondu 6×12 and Kodak Ektar film, with a 90 second exposure over water. This was only his 3rd roll through a pinhole camera – look for great stuff to come from this guy. You can see more of his work on his Flickr page.


Pinhole Photo
[singlepic id=413 w=600]Pinhole Photo, ©Vanesa Henseleit 2016[/singlepic]

Vanesa Henseleit is from Santiago de Chile where she runs a group called Lucky Pinhole. Her group conducts workshops, projects, and respond to calls for entry where pinhole is appropriate. This is a great example of stutter stepping an image – difficult technique to get good results from, but when you do, they’re truly remarkable. You can find more of Vanessa’s work on her Flickr page.

DIY Paper Obscura Camera 6×12
[singlepic id=410 w=600]DIY Paper Obscura Camera 6×12, ©Jason Huang 2016[/singlepic]

Jason Huang made this still life image with a paper 6×12 pinhole camera. It’s an excellent example of the soft and luscious mood that pinhole can give to even simple subject. You can find more of Jason’s work on his Flickr page.


Remember to respond to our open Call for Entry! It’s free!


Exploring the Art of Pinhole Photography