Get Inspired – Carrousel à la Place Ducale – Charleville-Mézières

Today’s featured photo is dizzying in it’s energy!

Carrousel à la Place Ducale – Charleville-Mézières
[singlepic id=56]Carrousel à la Place Ducale – Charleville-Mézières, Zero Image 2000, TMax 100, ©Joël Lintz 2015[/singlepic]

This wonderful capture of a carousel in the French town of Charleville-Mézières was produced by Joël Lintz. We love the use of pinhole to grab the motion and energy of this fun childhood memory! Clearly, as we’ve seen before, one can get some fantastic results when the fair is in town!

More of Joël’s work can be found on Flickr.


Get Inspired – Poppies & Flare

Today’s featured pinhole photo is exploding with color.

Poppies & Flare
[singlepic id=55 w=600]Poppies & Flare, Ondu 6×12, Kodak Ektar, ©Steven Boelaars 2015[/singlepic]

Steven Boelaars captured this wonderful image by pointing his Ondu 6×12 directly into the sun. The subject matter – the red poppies, is perfect for the effect because of the way they bleed with the flare of the sunlight. This is a common side effect of shooting a pinhole straight at the sun – without a lens to tame the sun’s rays, things stay raw and uncontrollably vibrant.

More of Steven’s excellent pinhole work can be found on Flickr.


Get Inspired – The Spells of the North Wind

Sometimes the best inspiration is a different perspective.

The Spells of the North Wind
[singlepic id=54 w=600]The Spells of the North Wind, 6*6, MO pinhole camera, Riga, Latvia, ©Inga Dinga 2015[/singlepic]

In this fine example of pinhole photography, Inga Dinga shows us what joys come from finding different angles with your pinhole camera. Because of the near infinite depth of field of pinhole photography, the format frees you to put your camera in any odd place and find some wonderful new results.

You can find more of Inga’s work on Flickr and the Facebook Pinhole Group.


Get Inspired – Old Tree No. 4 (In the fog)

If you’ve spent much time in the country, you can identify with today’s featured pinhole photo.

Old Tree No. 4 (In the fog)
[singlepic id=53]Old Tree No. 4 (In the Fog), Zero Image 6×7, Delta 100, ©Daniel Guy 2015[/singlepic]

Daniel Guy captured this wonderful image with his Zero Image 6×7, showing a tree that has been the subject of his pinhole photos a couple other times as well (here, here, and here). Often it’s wonderful to capture the same subject multiple times from different angles and under different lighting or weather conditions.

As Daniel explained to me, he shoots for narrative rather than for the spectacular. Shooting the same subject over days or months is a great way to tell a narrative about that subject, and perhaps about the viewer. He is surprised to find that this is often the favorite view of the tree, when his favorite view is often #1 – a preference and perspective that says as much about us individually as it does about the subject.

More of Daniel’s work can be found on Flickr.


Get Inspired – Blick auf Alster II

This moody pinhole photo of the day comes Germany.

Blick auf Alster II
[singlepic id=52]Blick auf Alster II, Bomboo pinhole camera, Fuji Velvia 50, ©左眼對焦 (Cheng-I Chien) 2015[/singlepic]

This wide angle water scene was produced by Cheng-I Chien in the waters of Hamburg, Germany. The choice of Velvia, which normally has a blue cast in longer exposures, is perfect in the way it brings out the subtle marks of red on the boat.

More of Cheng-I’s work can be found on Flickr.

Jan Geisen: Stormy Pinholes

These dark and moody photographs were made at the docks at the new building area “Überseestadt” in the north of the City of Bremen, Germany and the harbor of Brake, Germany. Jan would head there after throwing his clothes in at the laundromat. Having time to kill, he would arrange his pinhole cameras there even in the most miserable of conditions. Most of us wouldn’t bother to set out cameras in a huge storm, however Jan was pleasantly surprised in the way that some photos came out spectacularly in that they conveyed more about the storms than they did about the scene.

“I think [the pictures] are more “whole”, because they show not only the physics of light, but -by accident- even the physics of humidity or even wetness chemically reacting with the photo-sensitve paper in the camera (add to it the poor developement technique and its imprints on the negative they became in a “Berthold Brecht Way” epical).”

Photos 1 – 3
Jan set up his camera in a heavy downpour, and then waited in his car with a beer and the radio on for about 15 minutes while making the exposure on Ilford multigrade paper. During the exposure, the rain became even heavier, and a thunderstorm started, before he left his car again to retrieve the cameras. The wood box cameras had become soaked through. He headed for home, grabbing his laundry on the way, to develop the paper negatives.

On #1 there were some sprinkles of water from the rain that got in the camera. The uneven sky, water stains, and dark foreground bring the stormy situation together.

#1
[singlepic id=44 w=400]#1, ©Jan Geisen 2015[/singlepic]


Photo #2 was taken by a camera placed underneath a small dock for yachts. This camera also had some water issues, causing parts of the image to be brightened, reminiscent of the lightning of the storm.  As luck would have it, the water stains add to the linear feel of this image and help with the contrast. The lasting impression is of the moody, violent storm that had washed through during the exposure.

#2
[singlepic id=45 w=400]#2, ©Jan Geisen 2015[/singlepic]


The camera for #3 takes in the broader scene that was detailed in photos #1 and #2, and it too took in rainwater. Again we see more of the staining and bright streaks that were shown in the previous photos. The distant buildings are softened by the rain, and one feels the blanketing of this storm.

#3
[singlepic id=46 w=400]#3, ©Jan Geisen 2015[/singlepic]


Jan returned to the scene another time for #4, this time under different weather conditions. He set up the camera under sunny conditions, but in the distance there were dark clouds forming for another storm. The exposure was just a few minutes, but in that time the weather had turned measurably worse, and Jan collected his camera just as the heavy rains moved in on him.

#4
[singlepic id=47]#4, ©Jan Geisen 2015[/singlepic]


Now in photo #5, Jan set up to capture another perspective – this time at the harbor of Brake, a town near Bremen – and again, the storms came too. But unlike in #5, Jan wasn’t as lucky with his timing. Just as Jan started the exposure, the hardest rains yet soaked him through, and again he waited in his car for 15 minutes during the exposure. When he did retrieve his camera, he found it face down in the mud. The final image being very dark and foreboding, with but a streak of light in the middle to give a tease of what he came for.

#5
[singlepic id=48 w=400]#5, ©Jan Geisen 2015[/singlepic]


Get Inspired – Pinhole Egg

Today’s featured pinhole photo is a masterwork of simplicity.

Pinhole Egg
[singlepic id=51 w=600]Pinhole Egg, Zero Image 6×9, ©John Healey 2015[/singlepic]

John Healey provided an excellent description of his creative process:

I usually use my pinholes for landscapes and outdoor shoots but this pinhole picture was developed for one of Zack Aries’s Dedpxl assignments call The Egg. I had shot many photos of eggs using a wide rage of cameras,mediums and lighting set-ups but nothing was jumping out at me so I loaded my Zero 6X9 and stripped down the lighting to the bare essentials and got to work. Using a daylight balanced CFL bulb with a 12″ reflector  clamped to a chair I lit the egg from above and behind and then underexposed the film to give the image a dark and moody feel. I developed the roll and found two images that I thought would print and scan well. A little tweaking and I had the photo.

I learned that reducing an image down to it’s simplest elements can help clarify your vision and once again that being persistent can pay dividends.

Pay dividends indeed! One of the many joys of pinhole photography is the way in which it forces you to think simple.

More of John’s work can be found on Flickr.


April Recap

April 2015, the inaugural month for ƒ/D, was quite the month! In case you missed it, here’s what happened:

April 10: ƒ/D launched! And what a launch it’s been! The support and reaction from the pinhole photography community has been huge. We’re more encouraged than ever about what’s to come!

Delio Ansovini - cala lilly - smallApril 17: We highlighted Delio Ansovini’s wonderful pinhole still life photography.

April 20: We wrote up a quick overview of some of the most popular cameras available. Coming soon will be coverage of camera building and modifications

April 22: We covered multi-lapse exposures and how to leverage them for your creative purposes.

Scott Speck - The Mad Scientist - smallApril 24: We had a talk with Scott Speck about how he came to pinhole photography and what drives his creative vision.

April 26: We celebrated Worldwide Pinhole Photography Day with you!

April 29: We explained the concept of Circles of Confusion and how, once understood, the concept can be utilized to better realize your creative vision.

And finally, we’ve been proud to bring you some great pinhole inspiration for every day of the month:

[nggallery id=1 images=35]


All images on this page are copyright protected by the respective artists.

Get Inspired – Elves and Reindeer

Olle shows us the magic of miniature in today’s featured pinhole photo.

Elves and Reindeer
[singlepic id=40]Elves and Reindeer, Reality So Subtle 141, Kodak 400TX, ©Olle Pursiainen 2015[/singlepic]

Olle and his dear wife made these elves and reindeer with their grandchildren while waiting for Santa this holiday season. The adorable little figures are set in a scenic Finnish hillside. Looks to me like the children made a wonderful Christmas memory with their grandparents.

We chose to highlight this photo because it exemplifies the wonderful way in which pinhole’s infinite depth of field can be used to build scenes with both tiny and large components.

Olle can be found on Flickr.


Circles of Confusion

At ƒ/D our mission is not only to inspire, but to inform in a way that we hope leads to further discovery. Today I want to dive into some of the details of how a pinhole camera “works” so that we can all better wield this tool we’ve chosen. This is a somewhat technical subject, but I’m going to do my best to stay above water. I’m going to do the math for you – but there’s a link at the end of this for those that revel in complicated math and details.

Circles of Confusion

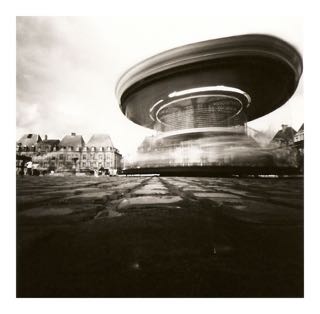
In photography, “Circles of Confusion” (CoC) are what make up the image that you see in the final photo. Blurry portions of photos taken with a lensed camera are made by large CoC, and sharp portions of a photo are made by small CoC. So what are CoC? In a word: points. Fine detail is produced by the optics of the camera resolving the many rays of light that make up that detail into many tiny tiny points. Blur (not including motion blur) is produced by out of focus areas that are resolved into much larger spots. If you get your face super close to your screen, you’ll see everything is made of thousands of little dots, called pixels – this is very similar to a photo’s CoC.

A pinhole camera works by creating CoC’s that are all the size of the pinhole. Light travels in a straight line, and in a scene there’s gazillions of straight lines reflecting off of your subject. Those straight lines travel through the pinhole, at the size of the pinhole, and then hit your film. Contrast this with a camera that uses a lens – that lens works by bending the light and focusing it to a much smaller CoC, and thus a much greater amount of detail onto the film plane.

The Pinhole Look

First, let’s take a second to define what the “pinhole look” is. I believe it can be characterized by 2 things:

  • infinite softness and
  • infinite Depth of Field

There are those that would argue that qualities such as vignetting, distortion, and long exposure are also part of the pinhole look, but each of those qualities can either be designed out of a pinhole camera or mitigated with light and film speed.

Infinite Softness

Now that we know what a CoC is (again, Circle of confusion), let’s take a second to understand how that translates into the aesthetics of a pinhole photo. Your typical pinhole is going to range from 0.2mm to 0.5mm. Because of the physics involved, your CoC is going to be roughly the same size – not exactly the same size, but close enough for this article. So a pinhole camera that has a 0.2mm pinhole will have CoC that are about 0.2mm as well. By comparison, a typical DSLR with lens is producing CoC that are about 0.019mm. That’s 10 times smaller! That’s also 10 times sharper.

Since the CoC produced by a pinhole camera must be many times larger than those produced by a DSLR or just about any other well designed lensed camera, we get softness at all points of the photo as a result of the pinhole photograph.

“Infinite” Depth of Field and the Real Limitations

Now we know that the resolving sharpness (CoC) of a pinhole camera is much less than that of a DSLR. But what does that really mean? Well, the first impact is in Depth of Field. Recall that Depth of Field is the distance over which parts of your subject will appear to be in focus. It’s often said that pinhole cameras have an infinite Depth of Field, but that’s a little misleading.

It’s misleading to say that pinhole cameras have an infinite Depth of Field because while that is technically true, the practical Depth of Field is limited by the CoC. Why? Consider a landscape photo, with some trees that are 500 yards away. Let’s say you’re shooting this scene with 2 cameras: one a medium format pinhole camera with a 0.3mm pinhole and the other and the other a medium format lensed camera set on f/22 for maximum Depth of Field. Imagine those trees, when projected onto the film, are 1mm tall. In your pinhole camera, those trees are going to be represented by about 3 CoC (1/0.3 = 3.3). In your lensed medium format camera, which produces CoC of 0.053mm, there will be about 20 CoC. Remember, more circles equals more sharpness! So while the pinhole camera has infinite Depth of Field, it runs into a limitation of resolving power because of the CoC.

At this point, you might get the bright idea to just use a smaller pinhole. Hold your horses! If you go smaller than the prescribed pinhole for your camera, physics is going to put a stop to you right there. But the reason why is whole ‘nother article. Suffice to say, for now, go with the size pinhole that’s prescribed for the dimensions of your camera.

The Impact of Circles of Confusion

So what does all this mean? What the hell is the point? What are you getting in exchange for this headache? Armed with this information, we can make better choices for our artistic vision.

Digital Workflows

If you’re like many pinhole photographers today, you are shooting with film or paper negatives, and then scanning them into your computer where you apply some digital touching up before publishing. CoC make it all the more important in this workflow to really nail your exposures. Having less detail in the negative means there’s less detail to work with later. Dodges and burns that would have worked on a DSLR photo will look fake on a pinhole photo, because there’s less detail to manipulate. This means that you’ll want to ditch that habit of telling yourself you’ll photoshop it later, and instead take up the mantra: “Get it in camera!”. Perhaps a refresher in ole Ansel Adams’s classic, The Negative.

Film Formats

Your choice of film format can have a great impact on your level of sharpness. This is true in all photography, but especially true in pinhole. Consider our previous example – the medium format pinhole camera with the 0.3mm pinhole. All things being equal – the scene, the exposure, an appropriate pinhole size, and the angle of view of the camera – a 4×5 camera will produce 2.5x more detail than the medium format camera! Now of course we’re not in pinhole photography for the sharpness. But there are times when sharpness needs to be considered. If your subject, or the scene, includes lots of details and, further, you want to highlight some of those details, you may want to consider using a 4×5 or even 8×10 camera. At other times, when the scene or your vision is free of fine details, you can safely use your medium format or 35mm pinhole camera.

Composing a Shot

What do you envision from the final print from the photo you’re taking? If the magic in this shot is depending on some distant or small piece being recognizable, consider the amount of resolution your film will have based on your pinhole size. No way does this mean get out the ruler and old trigonometry textbooks – but rather take a moment to visualize how large that detail will be on the film plane and if you’re going to have the desired detail needed. Granted – much of this relies on practice, but we’re here to flatten the learning curve, not remove it!

Wrap Up

Hopefully this helps you be a better pinholer now and for many years to come. Again, in short:

  • The softness in the details of pinhole photography means you have less detail to work with during burning and dodging, so get the exposure right!
  • If you need more detail, use a larger format
  • Visualize the final print and make sure that you’re framing for the detail that you feel is needed to make the photo work!

As promised, if you need further info, including the detailed math behind CoC, there’s a very good write-up on Wikipedia.

Did I bring clarity or stir up the mud? Let me know in the comments below, or hit me on twitter @fslashd


Exploring the Art of Pinhole Photography